
In Windows 10, you can share files on your computer with other users over the network. While this may seem complicated, it is actually not as difficult as it seems.
Depending on your network environment and what you want to achieve, there are at least three ways to set up file sharing in Windows 10. You can use the Public Folder, a special setup that allows you to share files over the local network without configuring permissions. Or you can share the content using the File Sharing feature on Windows 10.
In previous versions of Windows, you could also use a workgroup, which unlike the Public folder, automatically shared Windows 10 folders (Pictures, Videos, Music, Documents), Printers, and other devices connected to your computer. However, this feature is no longer available in Windows 10.
In this tip, you will learn the steps to share files over the network using File Sharing in Windows 10.
Share a folder in Windows 10
There are two ways to share a folder in Windows 10. You can use the simple and quick sharing settings to share a folder, or you can use the more advanced sharing option. The advanced option is not directly more difficult, but the advanced options allow you to manage more settings.
Share folder in Windows
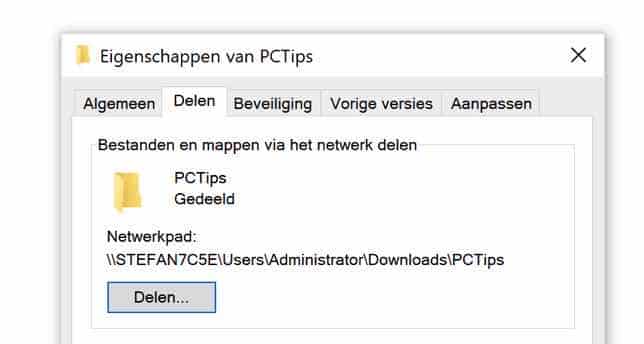
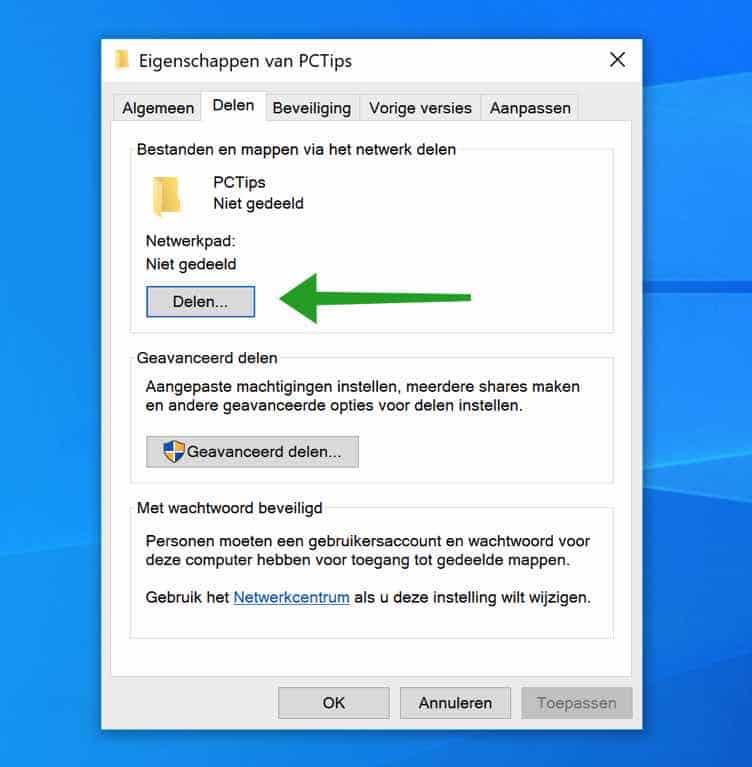
To share a folder in Windows, open Windows Explorer. Go to the folder you want to share in Windows.
Right-click the folder you want to share and click Properties from the menu. In the Properties folder, click on the tab: Sharing.
Click the Share button to share the folder in Windows. A new window will open.
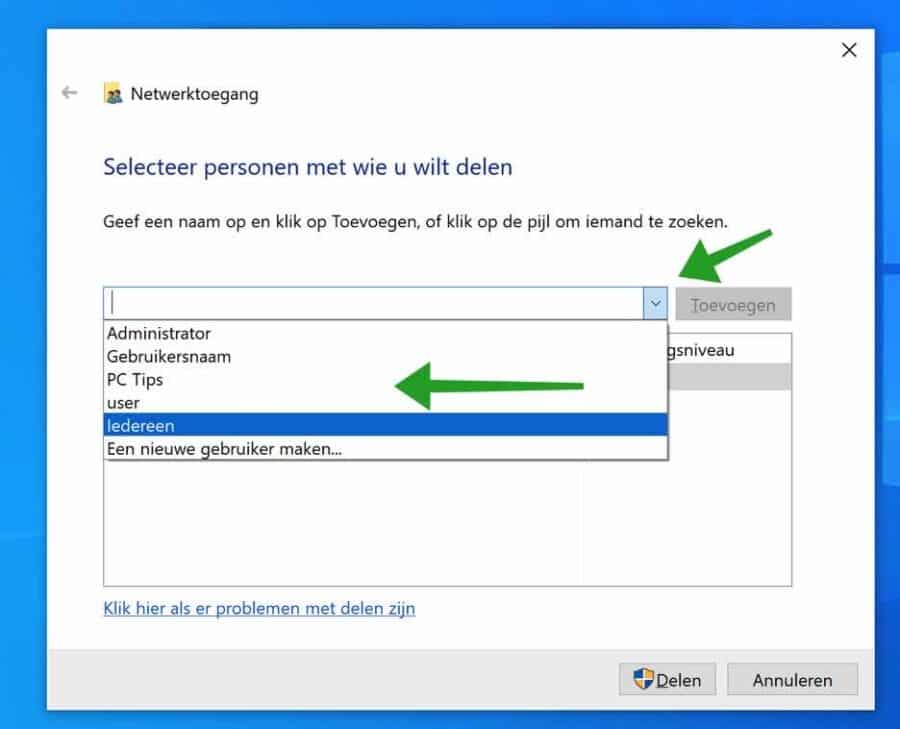
Assign user to shared folder
To start sharing you need to assign a user to the folder. This user can be a network user, a local computer user or you can create a new user. This user will only have access to the shared folder. If you choose for everyone by clicking on the down arrow to the right of the bar, every user who knows the location of the shared folder can access this folder.
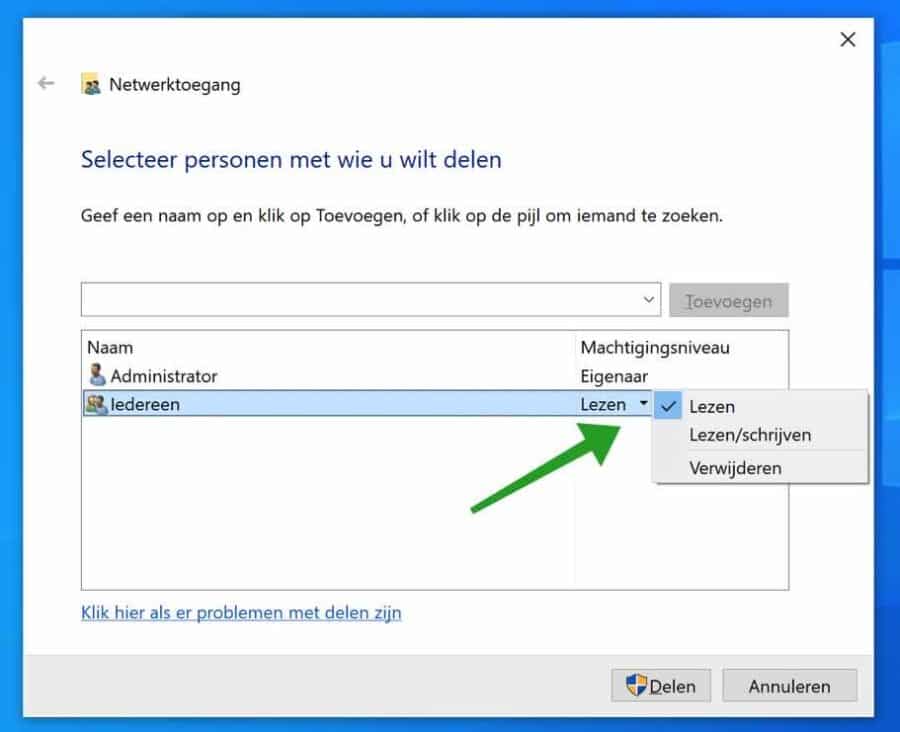
Assign permission level to user for the shared folder
After assigning a user to the folder, you must set the permission level for this user. A permission level is a permission for the user as to what the user can do with the files in this shared folder. You can ensure that the user can only read files and folders, read and/or write (creating files and folders in the shared folder) or also delete files and folders in the shared folder.
Assign the desired permission to the user. Then click the Share button at the bottom.
Share shared folder location
You will now see a link, also called a share location, that the user can use to access the shared folder. This link is only available for computers connected to the same network as the computer on which you created the shared folder. Right-click on the location and choose Copy Link. You can now share this location.
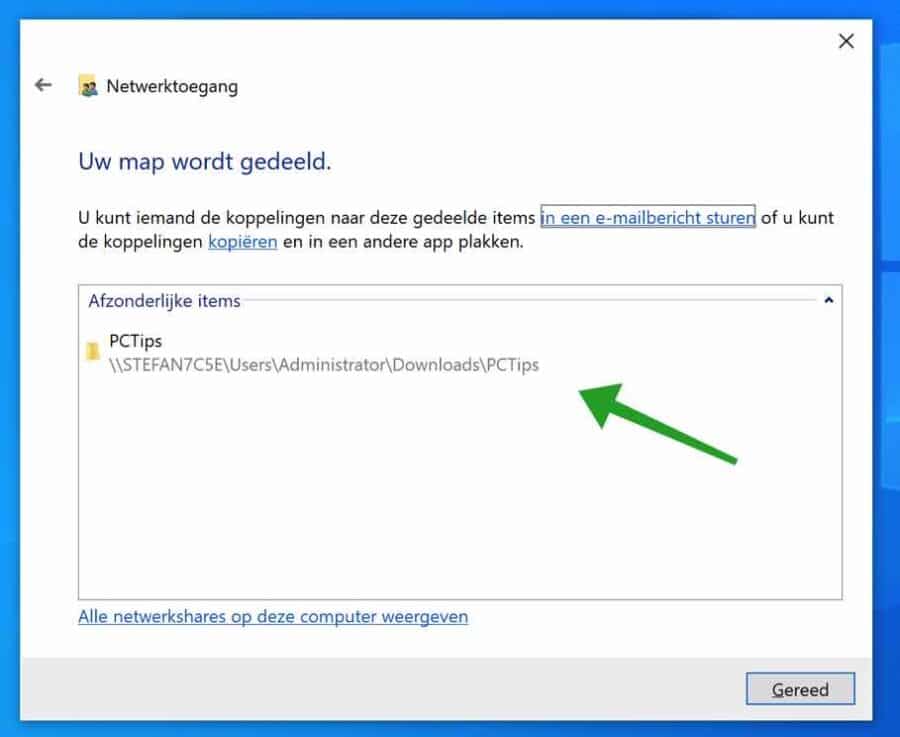
You have now created a shared folder in Windows. You can share this shared folder location with other users whose user you have assigned to this folder.
Delete shared folder or disable shared folder
If you have shared a folder and you want to disable sharing, you can do this in the following simple way.
Open Windows Explorer. Go to the shared folder. Right-click on the folder you shared.
In the menu, click on Grant access to and then on Remove access.
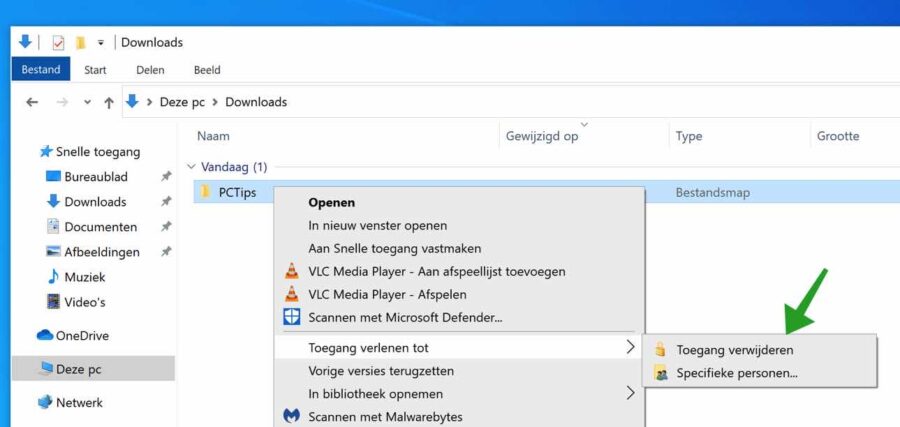
The shared folder is now a regular folder again without sharing options.
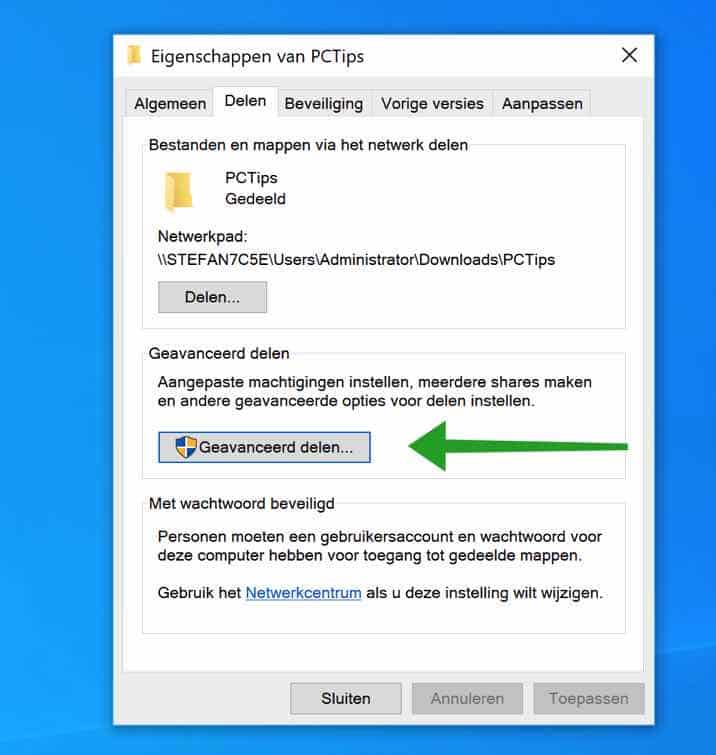
Advanced sharing
Modern versions of Windows, such as Windows 10, allow users to share folders with other computers and devices on the local network, using a wizard that should make things easy.
However, it doesn't offer the same level of customization as the old-school Advanced Sharing feature. If you want to share folders with specific users, limit the number of users who can access those folders at the same time, or block access to some users on your network, you will need to share a folder using Advanced Sharing.
To share a folder in Windows, open Windows Explorer. Go to the folder you want to share in Windows.
Right-click the folder you want to share and click Properties from the menu. In the Properties folder, click on the tab: Sharing.
Click the Advanced Sharing button to share the folder in Windows. A new window will open.
Enable the option: Share this folder. In the settings you can enter a name for the share (shared folder). This folder is visible in a shared network environment after sharing. You can limit the number of users who can access the folder by adjusting the option: Limit the number of concurrent users to.
To adjust user permissions, click the Permissions button.
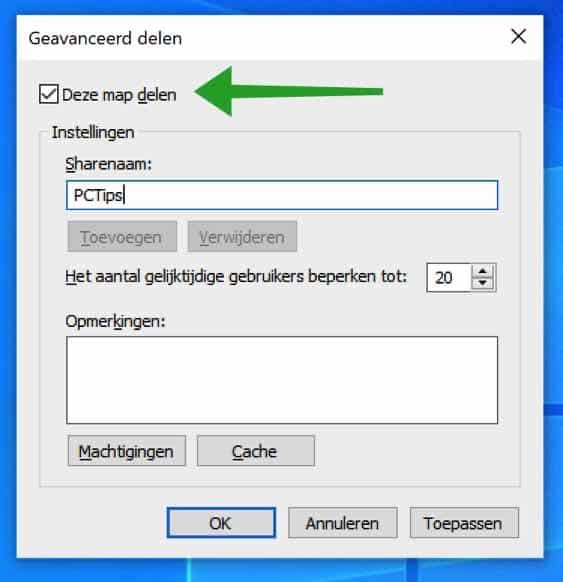
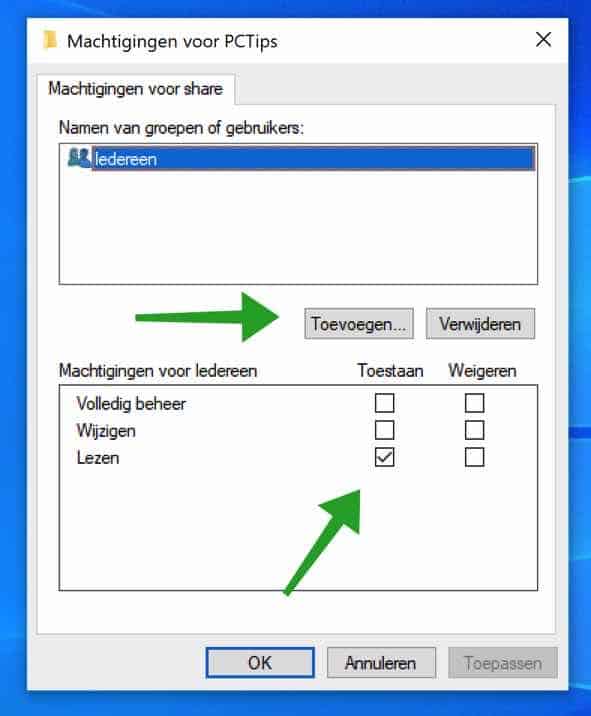
If you have shared a folder you will need to add permissions for a user. Click Add to add a network or local user. At the bottom under permissions you can assign permissions for this specific user or group. The permissions you can choose from are Full Control, Modify, and Read. The permissions are self-explanatory and are only applied to the specific user or group you assign to the shared folder on your network.
Note that by default the everyone group is added to a shared folder. Do you only want to share the folder with a specific user or another group? Then first remove the Everyone group from the share permissions setting. If you do not do this, Anyone can read the contents of the shared folder.
Share folder without password
In Windows, a folder is first shared and provided with a username and password. This means that only someone with a username and password can access the shared folder. If you want to create a shared folder that everyone can access without a password, you can do this as follows.
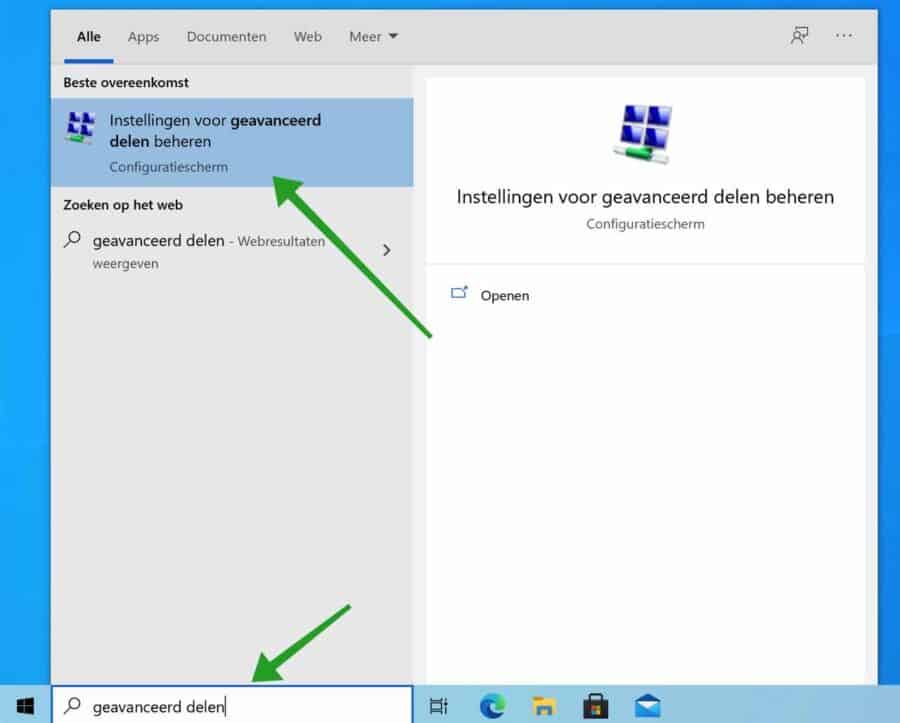
In the Windows search bar type: advanced sharing. Click on the Manage advanced sharing settings result.
Click on the all networks bar at the bottom. A new section will open in the same window.
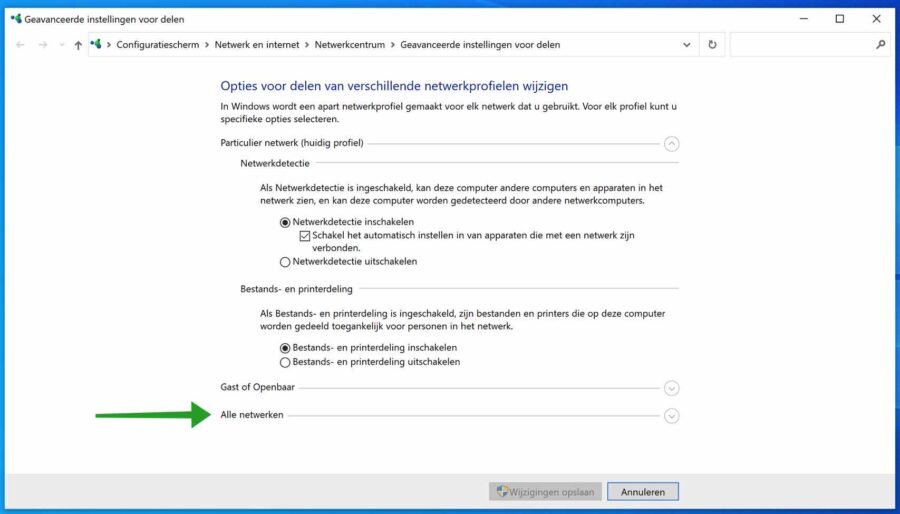
Click on the option: Disable password protection. Then click the Save Changes button.

Users can now access the shared folder without a password.
I hope this helped you. Thank you for reading!
Under “Advanced Sharing” on a W10 Pro Computer, the maximum “concurrent users” of a share is limited to 20. Can this be increased?
Hello, 20 is the maximum. This has to do with licensing conditions. If you want more, you must purchase a Windows Server license and install Windows server. You can also use Linux with SAMBA server.
Greetings, Stefan