
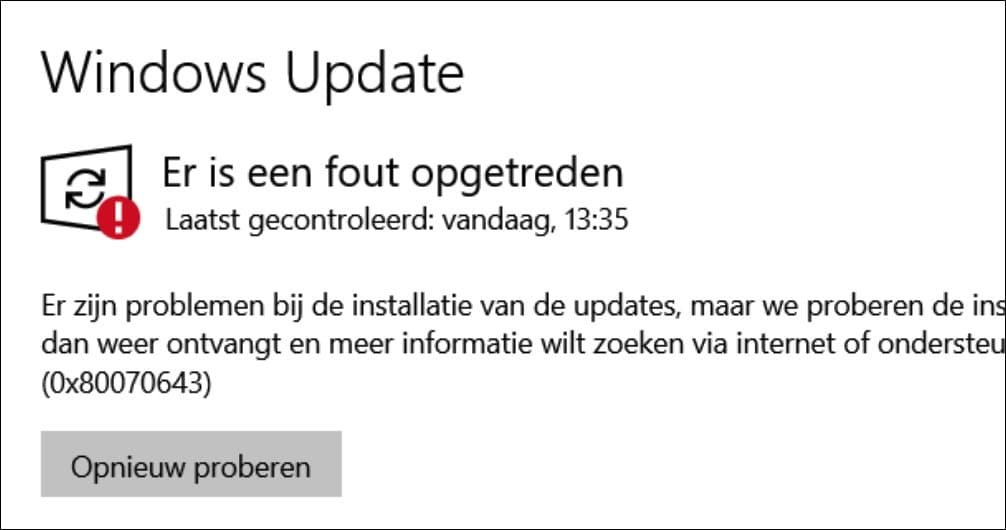
Op 10 januari 2024 heeft Microsoft verschillende updates uitgebracht voor Windows 10. Update KB5034441 is er een die bij veel mensen niet wil installeren.
Als u foutmelding 0x80070643 ziet in combinatie met update KB5034441, dan kunt u onderstaande oplossing uitvoeren.

Deze update heeft namelijk 250 MB vrije ruimte op de herstelpartitie nodig om succesvol te kunnen installeren. Als de herstelpartitie niet voldoende vrije ruimte heeft, zal deze update mislukken. In dat geval ontvangt u de volgende foutmelding in Windows update: 0x80070643 – ERROR_INSTALL_FAILURE.
Microsoft raad aan om de herstelpartitie met 250 MB te vergroten in dit geval. Het is belangrijk dat u weet waar u aan begint, maak eerst een back-up van uw hele computer of een herstelpunt.
Windows update KB5034441 foutmelding 0x80070643 (Oplossing)
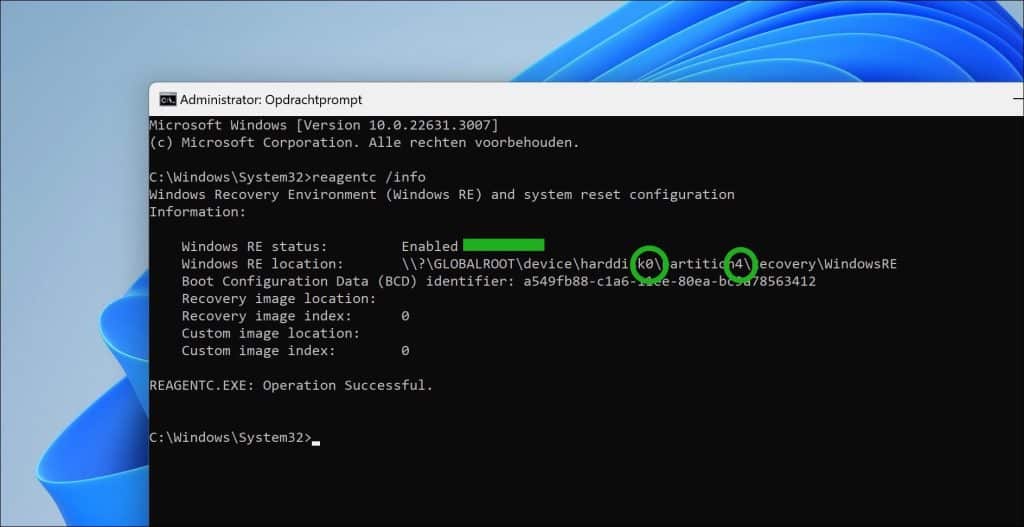
Om te beginnen opent u een Opdrachtprompt als administrator.
Voer het volgende commando in:
reagentc /info
Dit geeft informatie over de status van de herstelpartitie. We willen weten of de herstelpartitie is ingeschakeld. Dit ziet u aan “Windows RE status”, als deze optie is “Enabled” dan is de herstelpartitie ingeschakeld.
We hebben het indexnummer van de “harddisk” en van de “partition” nodig. Deze ziet u in “Windows RE location” achter harddisk en partition.
Noteer deze indexnummers zoals deze bij u worden weergeven, niet overnemen van afbeelding!
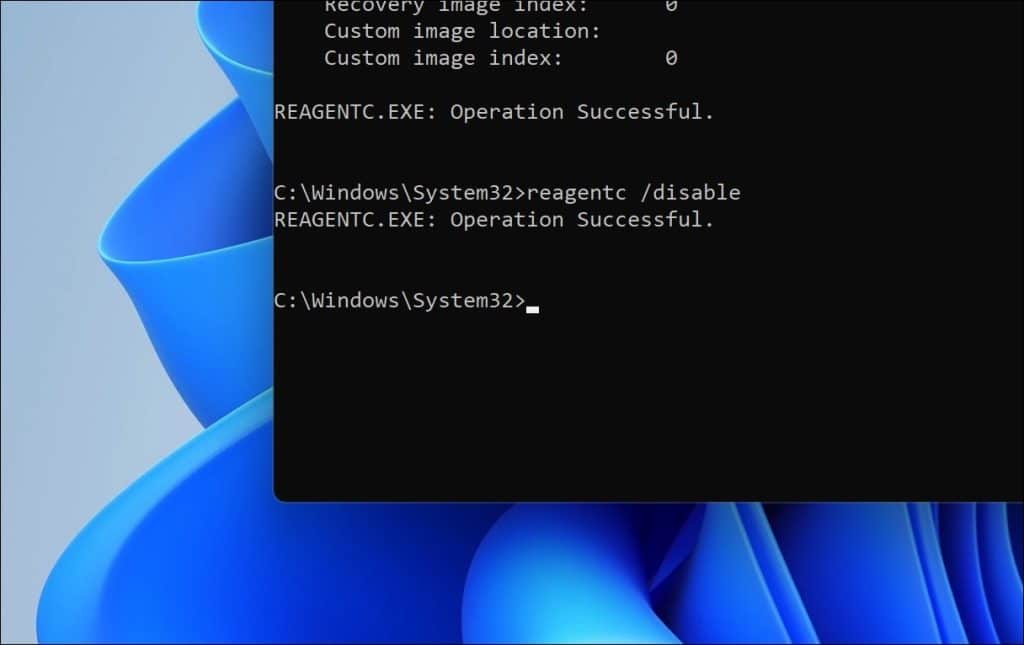
Nu gaan we de reagentc uitschakelen. Geef hiervoor het volgende commando in:
reagentc /disable
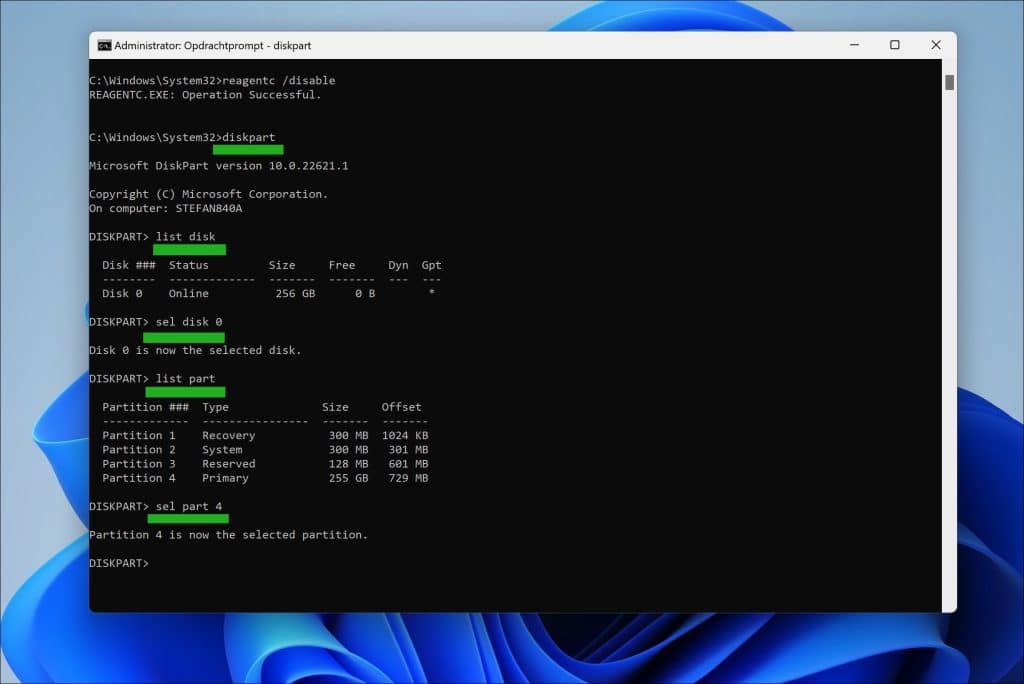
We gaan nu de besturingssysteempartitie partitie verkleinen en de huidige herstelpartitie verwijderen om deze vervolgens opnieuw aan te maken, maar dan groter zoals vereist voor deze update.
Geef het volgende commando in:
diskpart
Gevolgd door:
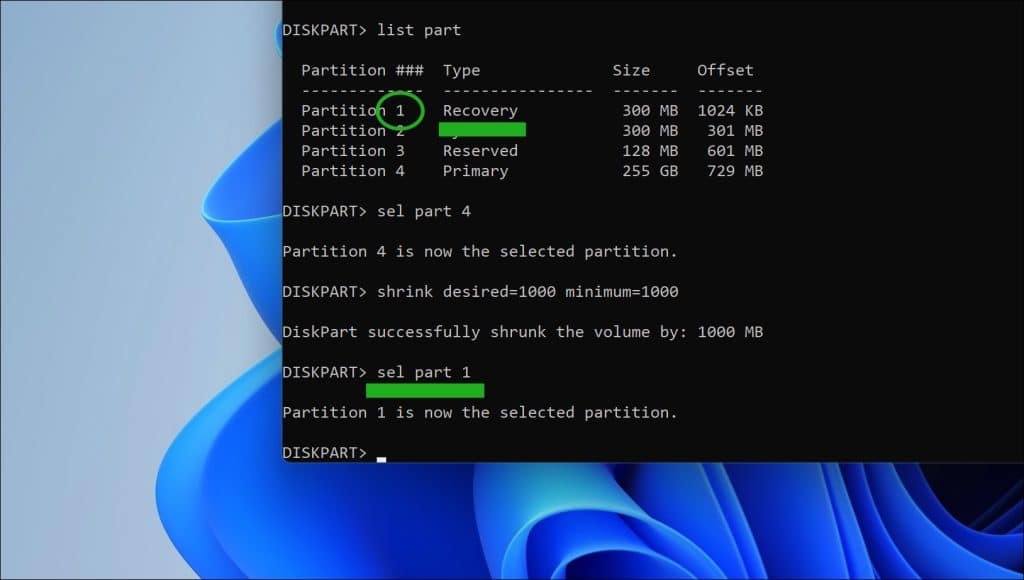
list disk
U ziet nu uw schijf. Nu gaan we de indexnummers gebruiken die we eerder hebben vastgesteld. Hiermee kunnen we de primaire schijf en de primaire partitie selecteren waarop de herstelpartitie is aangemaakt.
Typ nu:
sel disk {het-harddisk-indexnummer}
Hierna
sel part {het-partition-indexnummer}
Zie voorbeeld afbeelding. Nogmaals gebruik uw eigen nummers. Geen idee, lukt niet? Te moeilijk? Sluit dan nu af door het Opdrachtprompt venster te sluiten.
Nu we de primaire partitie hebben geselecteerd gaan we deze verkleinen. Hiermee kunnen we later opnieuw een grotere herstelpartitie aanmaken op de primaire schijf.
Geef het volgende commando in:
shrink desired=1000 minimum=1000
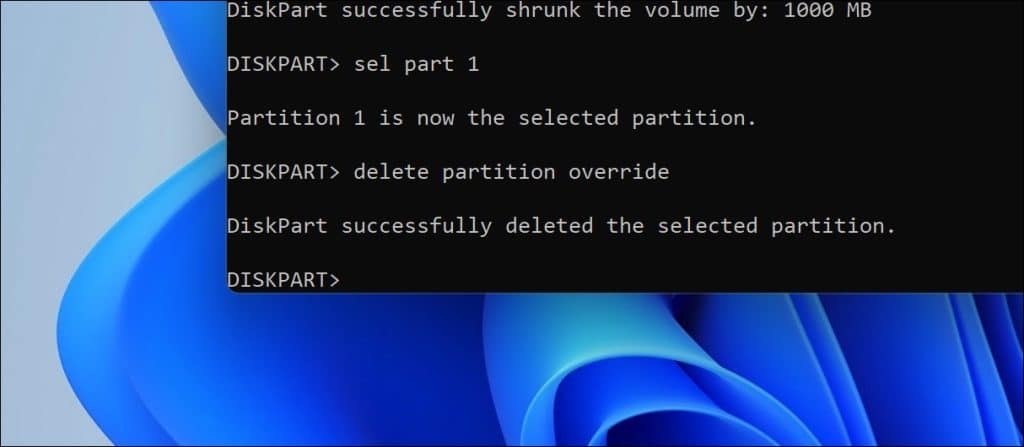
Nu we de primaire partitie hebben verkleind gaan we de huidige herstelpartitie verwijderen. Met het eerdere “list part” commando hebben we de partities vastgesteld. U dient nu de “Recovery” partitie te selecteren.
Geef het volgende commando in:
sel part {indexnummer-recoverypartitie}
zie afbeelding voor voorbeeld.
Geef het volgende command in om de herstelpartitie (“Recovery”) te verwijderen:
delete partition override
Nu gaan we een nieuwe herstelpartitie aanmaken met de ruimte die we eerder vrij hebben gemaakt van de primaire partitie.
Eerst moeten we vaststellen of het een GPT of MBR schijf betreft. Geef hiervoor het volgende commando in:
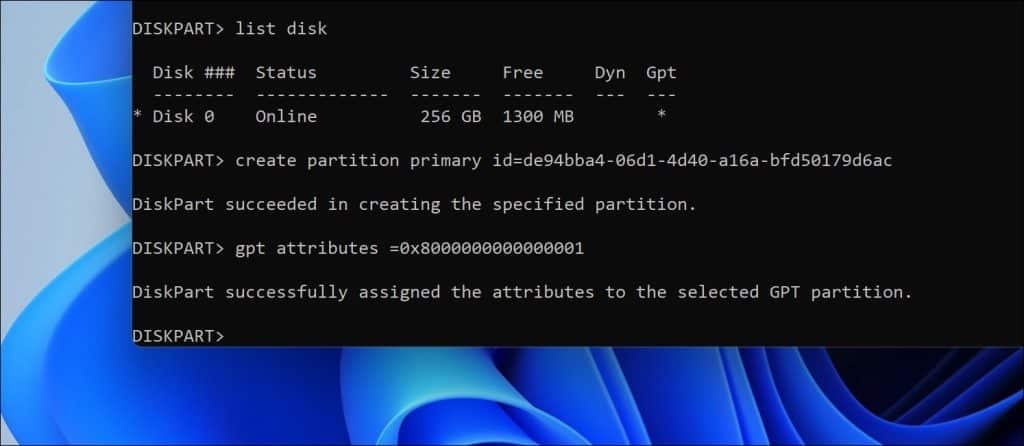
list disk
Controleer nu of er een sterretje staat onder GPT.
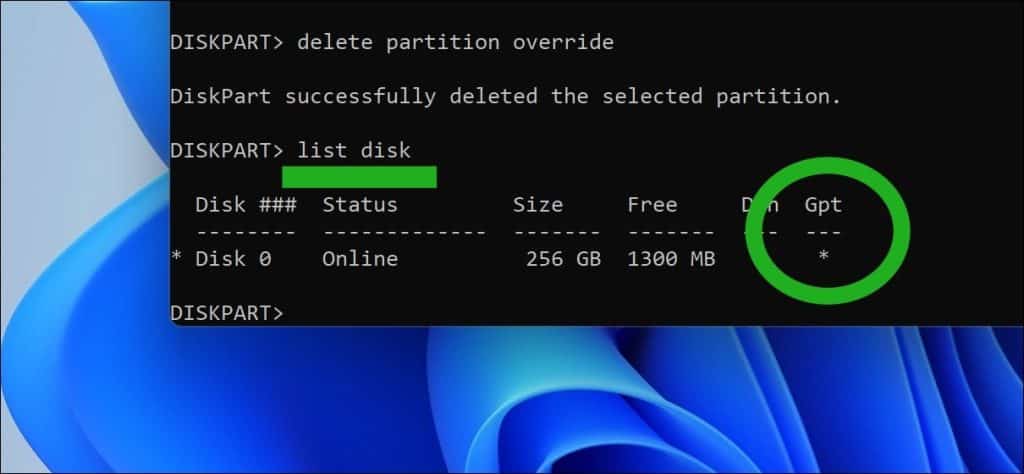
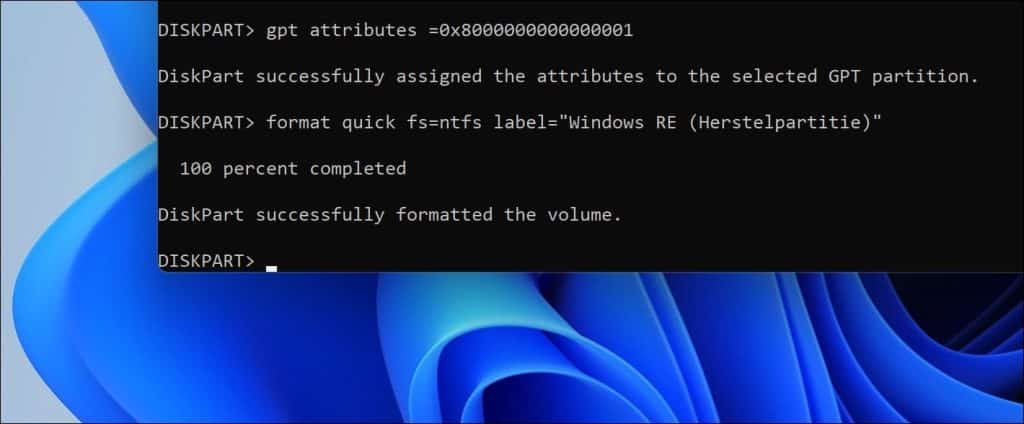
Er staat een sterretje onder GPT, dan voert u deze twee commando’s een voor een uit:
create partition primary id=de94bba4-06d1-4d40-a16a-bfd50179d6ac
gpt attributes =0x8000000000000001
Staat er geen sterretje onder GPT, dan voert u dit commando uit:
create partition primary id=27
Nu gaan we de herstelpartitie formatteren als NTFS. Geef hiervoor het volgende commando in:
format quick fs=ntfs label=”Windows RE (Herstelpartitie)”
Om te bepalen of het is gelukt om de herstelpartitie opnieuw aan te maken, geeft u het volgende commando in:
list vol
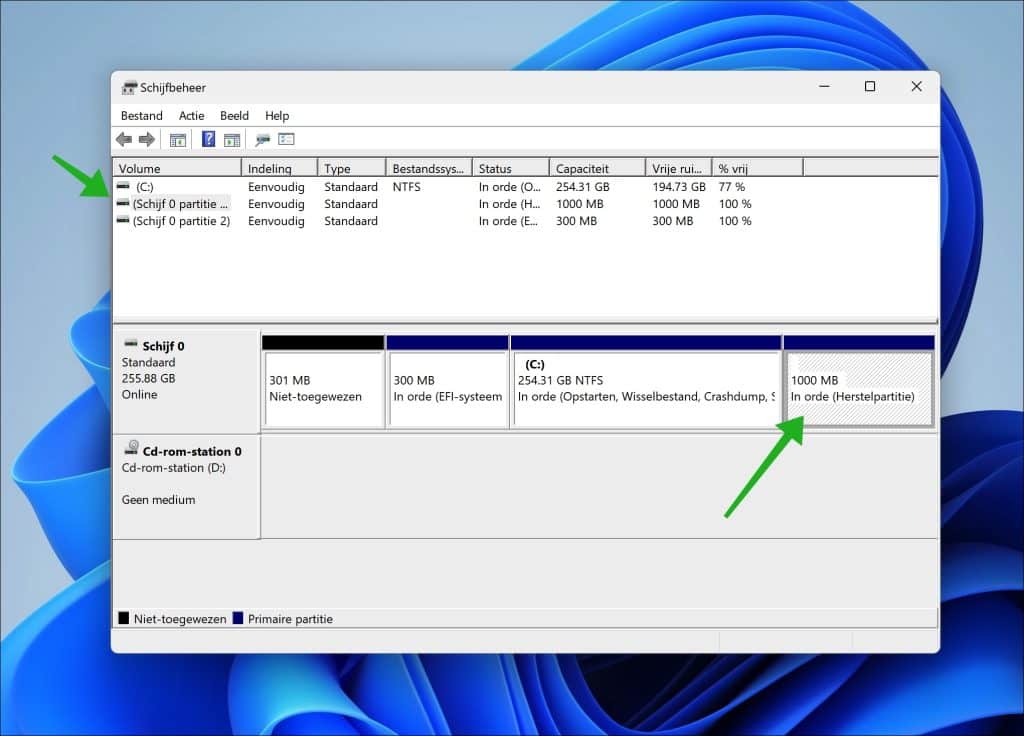
U ziet nu een nieuw volume met het “Windows RE” label, geformatteerd als NTFS met 1000MB grootte en verborgen.

Type vervolgens:
exit
om diskpart te verlaten Nu gaan we reagentc opnieuw inschakelen. Geef het volgende commando in:
reagentc /enable

Open nu schijfbeheer. In schijfbeheer selecteert u eerst uw primaire schijf en controleert vervolgens op de nieuwe herstelpartitie aanwezig is. Zie afbeelding.
Herstart uw computer en controleer of de KB5034441 update nu wel wordt geïnstalleerd.
Ik hoop u hiermee geholpen te hebben. Bedankt voor het lezen!
Met freeware aomei partion manager heb ik de WinPE partitie kunnen herschalen naar meer dan 1GB. Klik met rechter muisknop op de WinRE partitie, kies bovenste optie “herschaal/verhuis partitie”. Vink in de popup onder de “Ken vrije ruimte toe van partitie (*) aan (*)”, middels een pull down menu kan je aangeven welke partitie hiervoor kleiner gemaakt moet worden. Daarna kan je de partitiegrootte wijzigen/vergroten. Klik daarna op “OK”. Deels wordt dit uitgevoerd tijdens een herstart.
Hierna kon ik de update laten uitvoeren.
Super! Bedankt voor deze toegevoegde waarde. Ik zal dit eens testen en toevoegen aan dit artikel 🙂
Beste Stefan. Is deze optie al getest ? Het probleem doet zich bij mij nog steeds voor en de beschreven oplossing vind ik nogal ingewikkeld.
Hallo, ja deze oplossing werkt. In het commentaar op deze pagina, commentaar van “JanB” staat een alternatieve oplossing beschreven. Succes!
Werkt prima. Eindelijk geïnstalleerd. Dank!!
Met de laatste versie van aomei partition assistent moet je hiervoor betalen. Ik heb versie 8.1 gebruikt. Met versie 9.1 lukt het ook.
Bedankt !! Het is gelukt, de update is nu wel geïnstalleerd !!!!
Top! Fijn dat het is gelukt 🙂