Adding a watermark or logo to an image helps create some authority or awareness of your brand.
Adding a logo or watermark to an image is not very complicated. It can be a lengthy process if you want to provide multiple images individually with a watermark, for example.
There are several software apps available to download that make this watermarking process easier. For example, software often allows you to add “batch” watermarks or logos. This means that you can easily provide multiple images with the same logo, watermark or text.
You can also adjust the watermark or logo. It is possible to adjust the size, the position in the images and the transparency. If you do not want to add an image or logo as a watermark, but only a certain text or a link to a website, this is also possible.
Add Watermark or Logo to Image
To begin download uMark to your computer. uMark is not completely free software, it does offer a 15 day test license. You can use this without restrictions.
You will then be asked whether you want to purchase the software or not. If you don't purchase the software, the free version will become active. It You can read the difference between the paid version and the free version here. The free version is also easy to use.
Install the uMark watermark software by following the installation process. Then open uMark.
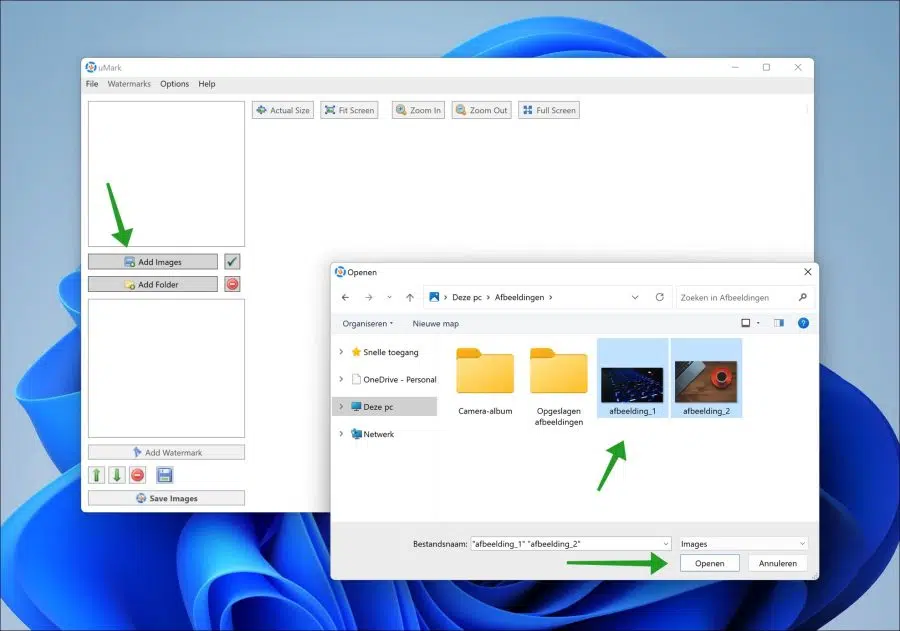
Once you have opened uMark, the first step is to add the image(s) to which you want to add the watermark, logo or want to add text. To do this, click on the “Add images” button and select the image(s). Then click Open.
The second step is to select the type of watermark you want to add to the image. You can choose from:
- A text watermark.
- An image watermark.
- A certain shape as a watermark.
- A QR code as a watermark.
- Apply an effect to the image as a watermark.
- Add a filter as a watermark.
- Add copyright to the image metadata.
- Add an existing watermark to the image.
Click on the “Add watermark” button and make your choice. The further options depend on the watermark selected.
In this example I continue with a logo (image) as a watermark. At the very top, click on the “Browse” button and select the logo that you want to add as an image to the image(s).
You can then select to add the logo as grayscale or a transparent color. To adjust the size of the logo, enable the “Resize” option. You can then adjust the size by adjusting the option so that it is added in the correct place. You can adjust the width and height in percentages or specify an absolute value by selecting this option.
In the preview window you can immediately see how large the watermark is and where it will be added. By adjusting the “Preset position” option you can choose to move the logo or watermark to different corners or exactly in the middle.
Finally, you can adjust the transparency of the logo or watermark. To do this, change the slider to the desired transparency. You will find this slider in the “Watermark options”.
In these options you can also change the position of the image, for example diagonally across the image. To do this, click on “Normal” and select the desired position. Now you can immediately see what it will look like in the preview window.
When you have completely finished formatting the logo or watermark, click OK. If necessary, you can restart the process by adding another watermark. You do this by clicking “Add watermark” again and re-formatting the logo or watermark. You can then apply this to another image. By default, the first formatted watermark is applied to all added images.
To save everything, click on the “Save images” button.
Under “Save images in”, select a folder in which the image(s) with the logo or watermark can be saved.
You can then select the file type in which the image can be saved under “Output format”. By default this is the same file type as the original image, but you can change this to, for example, GIF, PNG, JPG etc.
You can also adjust the metadata for the image. You can, for example, include a copyright or delete the GEOlocation data.
By activating “Resize” you can specify a certain size for the image(s) during saving. You can enter this in percentages or absolute pixels.
Click “Start” to save all selected images with logo or watermark to your computer. You will now find these image files in the folder you defined.
I hope this helped you. Thank you for reading!


