
Server Message Block (SMB) is het internet-standaardprotocol dat Windows gebruikt om bestanden, printers en seriële poorten te delen. In een netwerkomgeving stellen servers bestandssystemen en bronnen beschikbaar aan clients. Cliënten doen SMB-aanvragen voor bronnen, en servers geven SMB-antwoorden in wat wordt beschreven als een client-server, verzoek-antwoord-protocol.
Het SMB-protocol kan via het internet worden gebruikt bovenop het TCP/IP-protocol of bovenop andere netwerkprotocollen. Met behulp van het SMB-protocol kan een app (of de gebruiker van een app) toegang krijgen tot bestanden op een server op afstand, evenals tot andere bronnen, waaronder printers. Een client-toepassing kan dus bestanden op de externe server lezen, maken en bijwerken.
Microsoft Windows besturingssystemen sinds Windows 95 bevatten client en server SMB protocol ondersteuning. Als om u om veiligheidsredenen of welke reden dan ook het SMB protocol wenst uit te schakelen dan is dit mogelijk via PowerShell.
Meld u dan aan voor onze nieuwsbrief.
Het is wel belangrijk dat u weet wat de gevolgen zijn van het uitschakelen van SMB. Het uitschakelen van SMB is niet voor de gemiddelde – standaard computer gebruiker.
SMB uitschakelen in Windows
Als u via de stappen in deze tip SMB gaat uitschakelen dan schakelt u SMB2 en SMB3 uit.
Klik op de startknop. Zoek naar: Powershell. Klik met de rechtermuisknop op het resultaat en klik op Als Administrator uitvoeren.

Om te beginnen dient u eerst te controleren of SMB is ingeschakeld in Windows.
Is SMB ingeschakeld of uitgeschakeld in Windows?
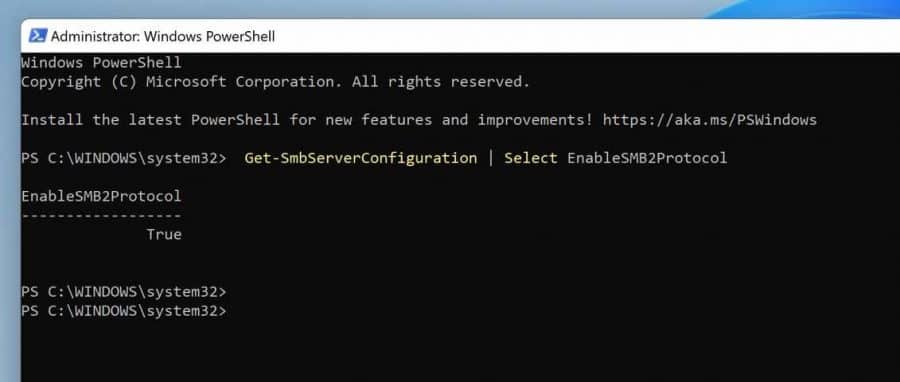
Dit kunt u doen door het volgende commando te kopiëren en te plakken in het PowerShell venster.
Get-SmbServerConfiguration | Select EnableSMB2Protocol
U krijgt dan een resultaat terug met “True” of “False”. True betekend dat SMB protocol is ingeschakeld en False betekend het SMB protocol is uitgeschakeld.
SMB uitschakelen in Windows
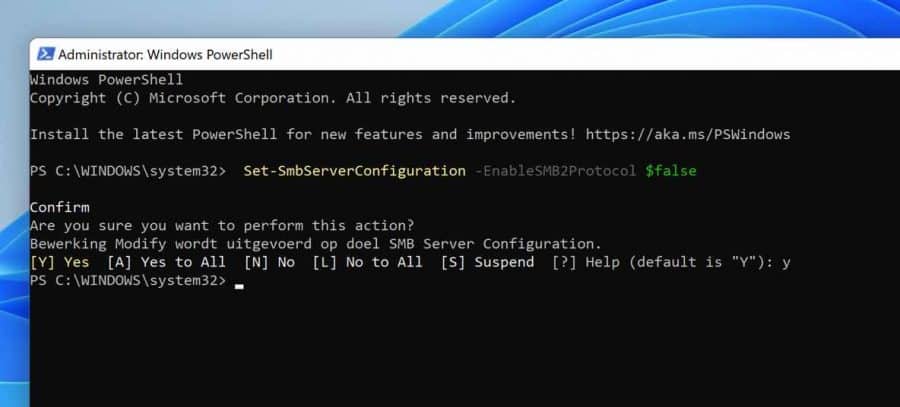
Om SMB uit te schakelen, kopieert en plakt u het volgende commando in het PowerShell venster.
Set-SmbServerConfiguration -EnableSMB2Protocol $false
Bevestig de uitschakeling van SMB protocol met een “Y” van yes. Druk daarna op de enter toets.
SMB inschakelen in Windows
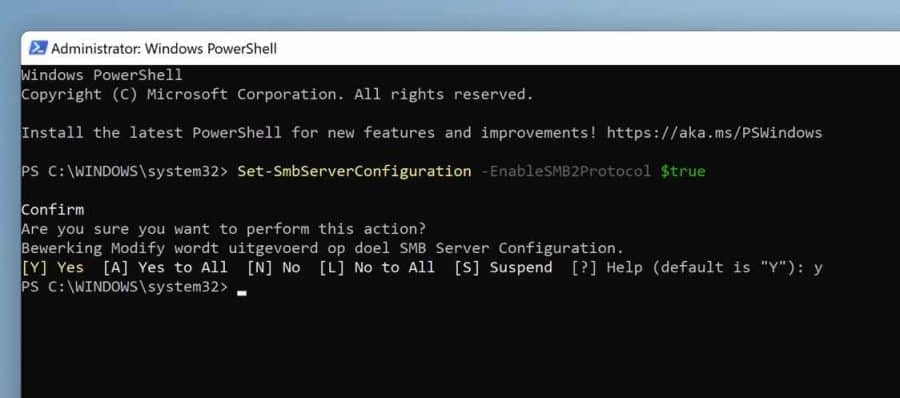
Om SMB in te schakelen, kopieert en plakt u het volgende commando in het PowerShell venster.
Set-SmbServerConfiguration -EnableSMB2Protocol $true
Bevestig de inschakeling van SMB protocol met een “Y” van yes. Druk daarna op de enter toets.
Ik hoop u hiermee geholpen te hebben. Bedankt voor het lezen!
Help mee
Mijn computertips zijn gratis en bedoeld om andere mensen te helpen. Door deze pc-tip te delen op een website of social media, helpt u mij meer mensen te bereiken.Overzicht met computertips
Bekijk ook mijn uitgebreide overzicht met praktische computertips, overzichtelijk gesorteerd per categorie.Computerhulp nodig?
Loopt u vast met uw pc, laptop of software? Stel uw vraag op ons computerforum en krijg gratis computerhulp van ervaren leden en experts.