
DNS-over-HTTPS (DoH) is een beveiligingsprotocol voor het internet. Het idee erachter is de privacy van de gebruiker. DNS-over-HTTPS sluit bepaalde aanvallen uit, omdat DoH gebruik maakt van HTTPS. Dit vereist een door DoH ondersteunde server om versleutelde DNS-query’s van gebruikers uit te voeren.
In Windows 10 was DNS-over-HTTPS (DoH) niet beschikbaar via ingebouwde functionaliteit. Het was echter wel mogelijk om bepaalde apps zoals een browser te voorzien van DNS-over-HTTPS (DoH) functionaliteit.
Gelukkig heeft Windows 11 deze essentiële beveiligingsfunctie in zijn standaard instellingen opgenomen en u, de gebruikers, kunt er gemakkelijk gebruik van maken om meer privacy te garanderen.
Meld u dan aan voor onze nieuwsbrief.
DNS via HTTPS werkt namelijk op dezelfde manier als DNS, maar HTTPS-sessies houden de verzoeken bij en minimaliseren de informatie die tijdens het verzoek wordt uitgewisseld.
DNS via HTTPS inschakelen in Windows 11
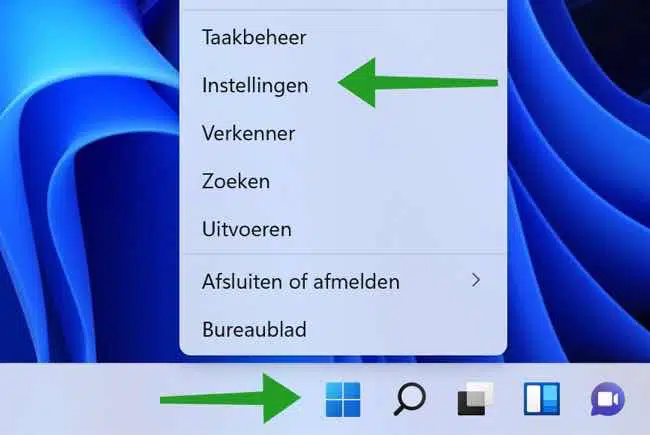
Klik met de rechtermuisknop op de Windows startknop. Klik op Instellingen in het menu.
Klik links in het menu op Netwerk en internet. Klik daarna op de actieve verbinding. Dit kan zijn een ethernet (via de kabel) of een Wi-Fi verbinding.

Klik daarna in het menu: DNS-server toewijzing op de Bewerken knop.

Wijzig de DNS instelling van Automatisch naar Handmatig. Als Handmatig al geconfigureerd staat dan laat het zoals het er staat.
Klik op IPv4 en schakel deze optie in. In de voorkeurs-DNS geeft u de volgende servers in (dit zijn Google public DNS servers).
8.8.8.8
In het veld Alternatieve DNS-server vult u in:
8.8.8.4
Wijzig de instellingen: Voorkeurs-DNS-versleuteling naar Alleen versleuteld (DNS via HTTPS).
Er zijn nog twee opties beschikbaar stel ze in naar keuze: Alleen niet-versleuteld en bij voorkeur versleuteld, niet-versleuteld toegestaan. Deze laatste optie zou u ook nog kunnen selecteren.
Klik op de Opslaan knop.

U heeft nu DNS via HTTPS geactiveerd in Windows 11. Ik hoop u hiermee geholpen te hebben. Bedankt voor het lezen!
Help mee
Mijn computertips zijn gratis en bedoeld om andere mensen te helpen. Door deze pc-tip te delen op een website of social media, helpt u mij meer mensen te bereiken.Overzicht met computertips
Bekijk ook mijn uitgebreide overzicht met praktische computertips, overzichtelijk gesorteerd per categorie.Computerhulp nodig?
Loopt u vast met uw pc, laptop of software? Stel uw vraag op ons computerforum en krijg gratis computerhulp van ervaren leden en experts.