
Windows 11 is het nieuwste besturingssysteem van Microsoft, boordevol verbeteringen en geavanceerde functies. Echter, hoewel het veel te bieden heeft, zal het nog enkele jaren duren voordat het Windows 10 zal overtreffen als het meest gebruikte desktopbesturingssysteem wereldwijd.
Ondanks Microsoft’s ambitie om iedereen te laten upgraden naar Windows 11, hebben ze het pad ernaartoe niet gemakkelijk gemaakt. Dit komt voornamelijk door de hoge systeemvereisten die nodig zijn voor dit nieuwe besturingssysteem. Voor velen zullen huidige computers niet voldoende zijn om aan deze nieuwe vereisten te voldoen.
Als u ervoor kiest om bij Windows 10 te blijven en niet direct te investeren in een nieuwe computer, hebben we goed nieuws voor u. De officiële ondersteuning van Microsoft voor Windows 10 zal nog voortduren tot 2025. Dit biedt u de kans om het meeste uit uw huidige systeem te halen, zelfs als het al wat ouder is.
Meld u dan aan voor onze nieuwsbrief.
Voor diegenen die willen genieten van alles wat Windows 10 te bieden heeft: er zijn tal van tips en trucs die u kunt gebruiken. Of u nu nieuw bent bij Windows of onlangs bent overgestapt vanuit een ander besturingssysteem, deze computer tips zullen uw gebruikservaring aanzienlijk verbeteren. Sommige tips zijn wellicht bekend uit eerdere Windows-versies, terwijl andere specifiek zijn voor Windows 10.
Handige tips voor alle Windows 10 gebruikers
In de loop der jaren heeft Microsoft verschillende wijzigingen aangebracht in het ontwerp en de functionaliteit van het Startmenu. Voor degenen die gehecht zijn aan het klassieke, niet-getegelde ontwerp, is er goed nieuws. U kunt nog steeds een vleugje van die oude charme ervaren, zelfs met de nieuwste versies van Windows.
Het Windows-pictogram, herkenbaar geplaatst in de linkerbenedenhoek van uw scherm, is niet alleen een handige knop. Het is ook een toegangspunt voor verschillende cruciale systeemfuncties. Door met de rechtermuisknop op dit pictogram te klikken, opent u een handig tekstueel snelmenu.
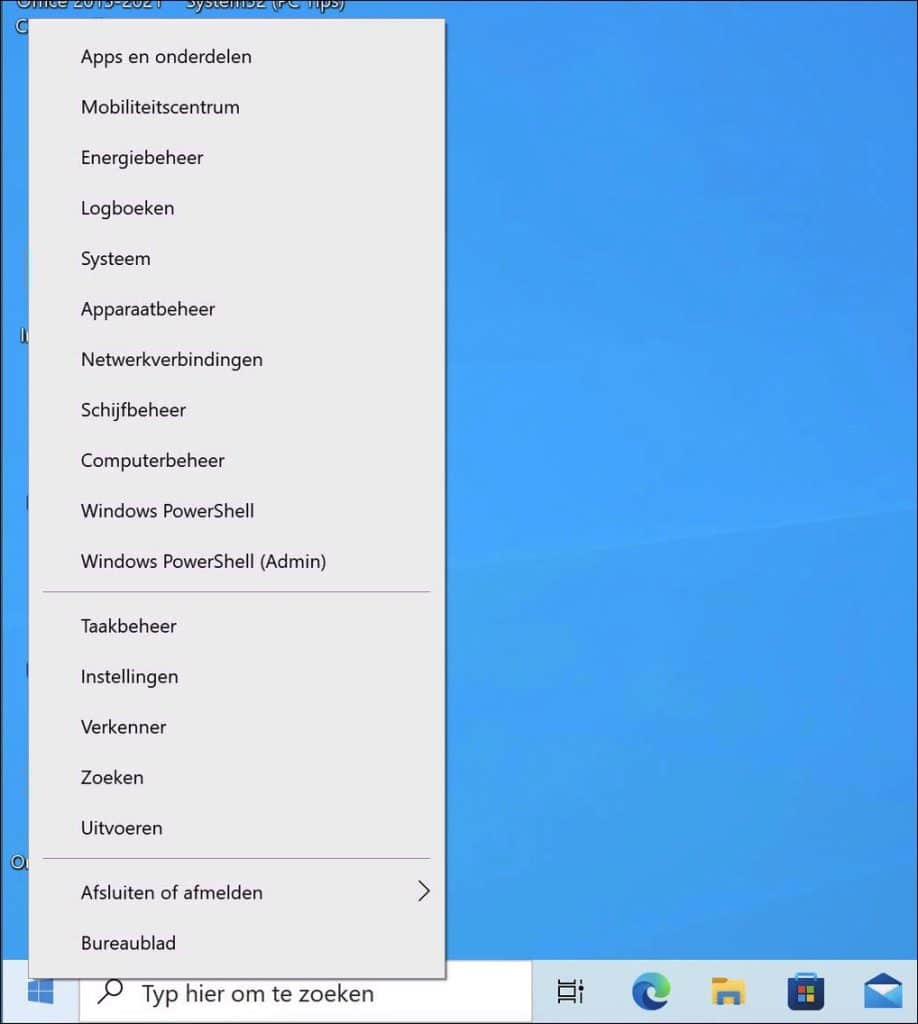
Dit menu biedt directe snelkoppelingen naar verschillende bekende en veelgebruikte functies. Enkele van deze snelkoppelingen zijn:
- Apps en Onderdelen: Hier kunt u programma’s en apps bekijken, toevoegen of verwijderen.
- Zoeken: Met deze optie kunt u snel bestanden, instellingen of programma’s op uw computer zoeken.
- Uitvoeren: Een krachtige hulpmiddel waarmee u specifieke commando’s kunt invoeren om apps te openen of systeeminstellingen te wijzigen.
Hoewel al deze functies toegankelijk zijn via het standaard Startmenu, zorgt het Win-X menu voor een snellere en meer directe benadering. Het is vooral handig voor gebruikers die efficiëntie waarderen en direct toegang willen hebben tot bepaalde tools zonder door meerdere menu’s te hoeven navigeren.
Snel toegang tot het bureaublad zonder te minimaliseren
U kent vast wel het gevoel: meerdere vensters open hebben staan en snel toegang willen hebben tot uw bureaublad zonder alles handmatig te minimaliseren. Gelukkig heeft Windows een verborgen trucje dat dit proces vergemakkelijkt.
Aan de uiterste rechterkant van uw taakbalk, net voorbij de datum en tijd, bevindt zich een bijna onzichtbaar, slank knopje. Op het eerste gezicht lijkt het misschien alsof er niets is, maar dit subtiele ontwerpelement is eigenlijk een zeer functioneel onderdeel van Windows. Door op dit kleine gebied te klikken, worden al uw geopende vensters in één keer geminimaliseerd. Wilt u uw vensters weer terug? Een tweede klik op dezelfde plek en alles keert terug naar hoe het was.
Naast deze klikfunctie biedt Windows ook de mogelijkheid om uw vensters te minimaliseren door simpelweg met de muis over dit knopje te bewegen, zonder te klikken. Om deze functie naar wens in te stellen:
- Ga naar ‘Instellingen’.
- Klik op voor ‘Persoonlijke instellingen’.
- Klik vervolgens ‘Taakbalk’.
- Zoek naar de optie ‘Voorbeeld van het bureaublad weergeven wanneer ik de knop Bureaublad weergeven aanwijs aan het uiteinde van de taakbalk’ en schakel deze in of uit, afhankelijk van uw voorkeur.
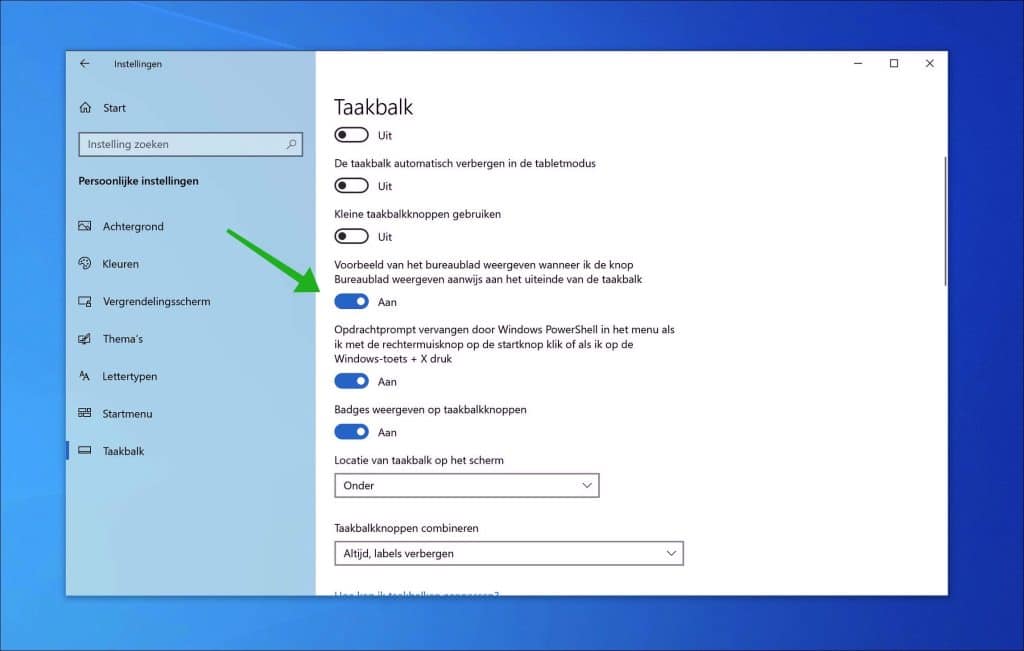
Dit geeft u nog meer flexibiliteit en controle over hoe u snel toegang kunt krijgen tot het bureaublad, wat bijdraagt aan een efficiënte en aangename gebruikerservaring.
Optimaliseer de zoekfunctie in Windows voor snellere zoekresultaten
Het zoeken naar bestanden en programma’s op uw pc is een essentiële functie van het Windows-besturingssysteem. Maar wat als deze zoekopdrachten te lang duren? Er zijn instellingen binnen Windows die u kunnen helpen de zoekresultaten te verfijnen en te versnellen, waardoor uw efficiëntie wordt verhoogd.
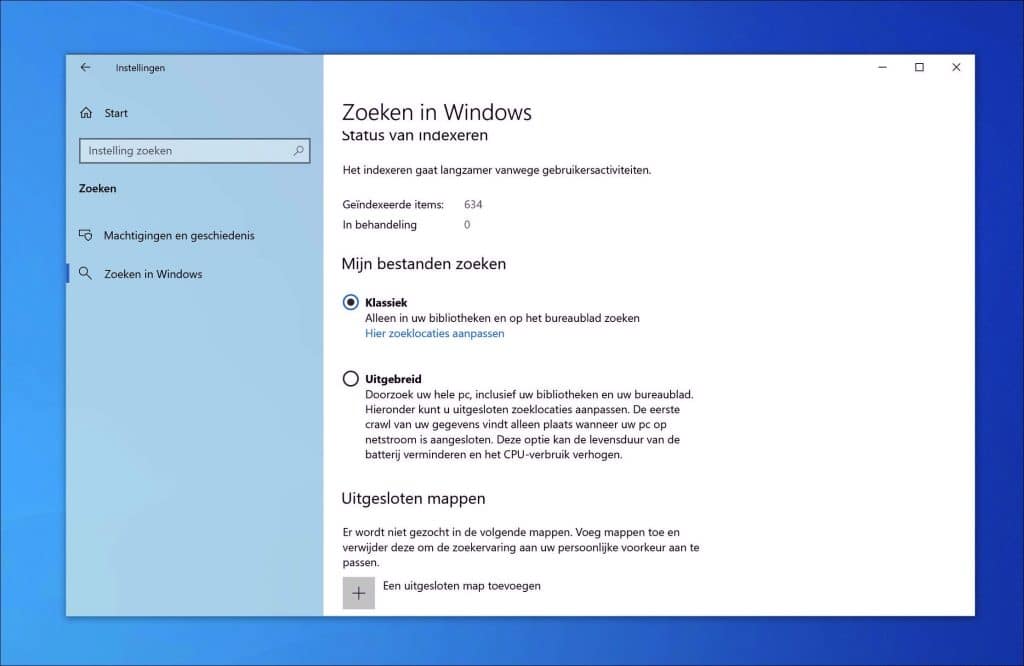
Binnen de instellingen van Windows kunt u bepalen waar het systeem precies zoekt:
- Ga naar ‘Instellingen’.
- Kies vervolgens voor ‘Zoeken’.
- Navigeer naar ‘Zoeken in Windows’.
Hier vindt u twee belangrijke zoekmodi:
- Klassiek: Deze modus beperkt het zoeken tot uw bibliotheken en het bureaublad. Dit is ideaal als u voornamelijk documenten en bestanden op deze locaties bewaart. De zoekopdrachten worden hiermee sneller uitgevoerd omdat er minder locaties worden doorzocht.
- Uitgebreid: Deze optie indexeert uw gehele computer. Hoewel het grondiger is en bestanden van overal op uw pc kan vinden, kan het langer duren en meer computervermogen vereisen. Dit komt doordat er een veel grotere databank van informatie wordt doorzocht.
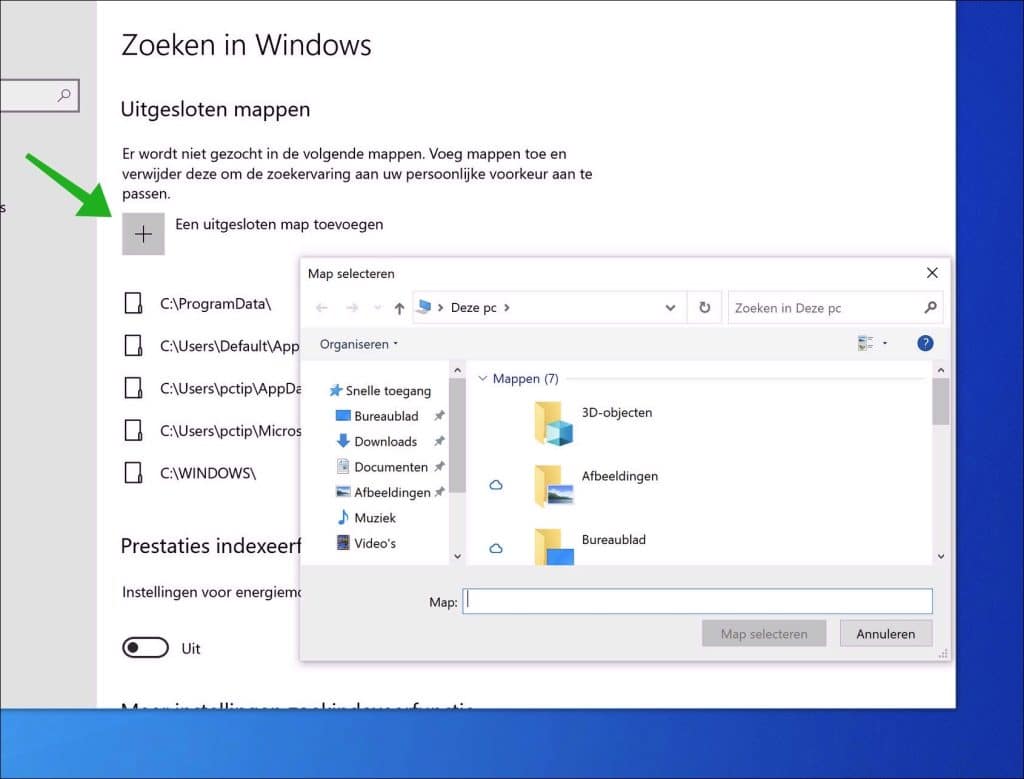
Voor degenen die nog specifieker willen zijn in hun zoekopdrachten, biedt Windows de mogelijkheid om bepaalde mappen uit te sluiten van de zoekindex. Door dit te doen, worden deze mappen niet doorzocht tijdens zoekopdrachten, wat de snelheid en relevantie van de resultaten kan verhogen.
Om dit te doen, navigeer naar hetzelfde ‘Zoeken in Windows’ menu en voeg de mappen die u wilt uitsluiten toe aan de uitsluitingslijst. Dit is met name handig als u mappen heeft met grote hoeveelheden data die u normaal gesproken niet zou doorzoeken.
Door deze instellingen te optimaliseren, kunt u uw Windows zoekervaring aanzienlijk verbeteren, waardoor u sneller en efficiënter toegang krijgt tot de bestanden en informatie die u nodig heeft.
Schudden om te minimaliseren
Stel, u heeft veel vensters openstaan op uw scherm en het wordt een beetje chaotisch. Misschien werkt u aan een project, hebt u meerdere webpagina’s geopend en probeert u tegelijkertijd uw e-mails te beheren. Hier komt het ‘schud’ mechanisme van pas:
1. Klik op het venster dat u open wilt houden te midden van de chaos.
2. Pak de bovenste rand van dit venster vast met uw muis en ‘schud’ het een paar keer heen en weer. Alle andere geopende vensters worden geminimaliseerd, waardoor alleen het door u geschudde venster zichtbaar blijft.
Soms kunnen we te snel handelen en realiseren we ons dat we misschien toch toegang nodig hebben tot enkele van die geminimaliseerde vensters. Geen zorgen, Windows heeft hier ook een oplossing voor. Schud hetzelfde venster opnieuw en als bij toverslag keren alle eerder geminimaliseerde vensters terug naar hun oorspronkelijke staat.
Het toont de aandacht voor detail van Microsoft en hun streven naar het creëren van een gebruiksvriendelijke ervaring. Het kennen van dergelijke trucjes kan de algehele productiviteit en efficiëntie bij dagelijkse computertaken aanzienlijk verbeteren.
Slide to shutdown
Windows 10, bekend om zijn geavanceerde functies en verbeterde gebruiksvriendelijkheid, heeft een interessante afsluitfunctie die vooral handig kan zijn voor gebruikers van tablets of touch-screen computers. Echter, niet veel mensen weten dat deze functie ook beschikbaar is voor elke pc met Windows 10. Hier is hoe u deze kunt instellen en gebruiken.
- Klik met de rechtermuisknop op een leeg gedeelte van uw bureaublad.
- Kies ‘Nieuw’ en vervolgens ‘Snelkoppeling’. Dit zal een nieuw venster openen.
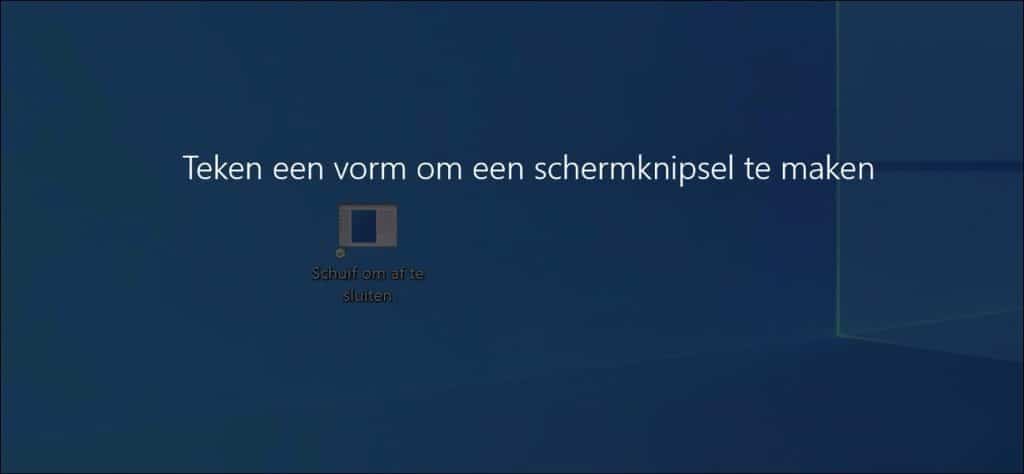
- In het geopende venster wordt u gevraagd naar de locatie van het bestand. Type hier “SlideToShutDown.exe” (zonder spaties).
- Geef de snelkoppeling een naam die voor u herkenbaar is, bijvoorbeeld “Schuif om af te sluiten”.
- Klik op ‘Voltooien’. Er verschijnt nu een nieuw pictogram op uw bureaublad met de door u gekozen naam.
Om de functie nog sneller toegankelijk te maken, kunt u een toetscombinatie instellen:
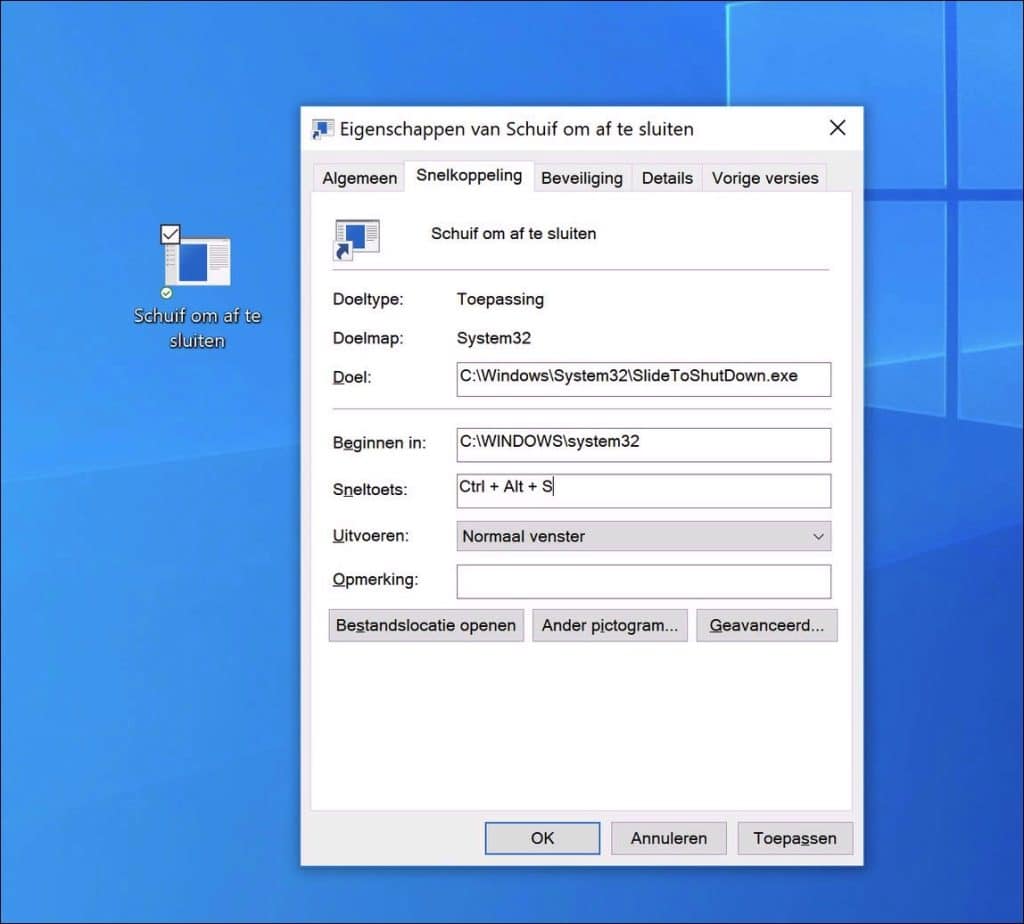
- Klik met de rechtermuisknop op het zojuist gemaakte pictogram en kies ‘Eigenschappen’.
- Ga naar het veld ‘Sneltoets’ en voer een toetscombinatie in die u wilt gebruiken, zoals Ctrl+Alt+S.
- Klik op ‘Toepassen’ om de wijzigingen op te slaan.
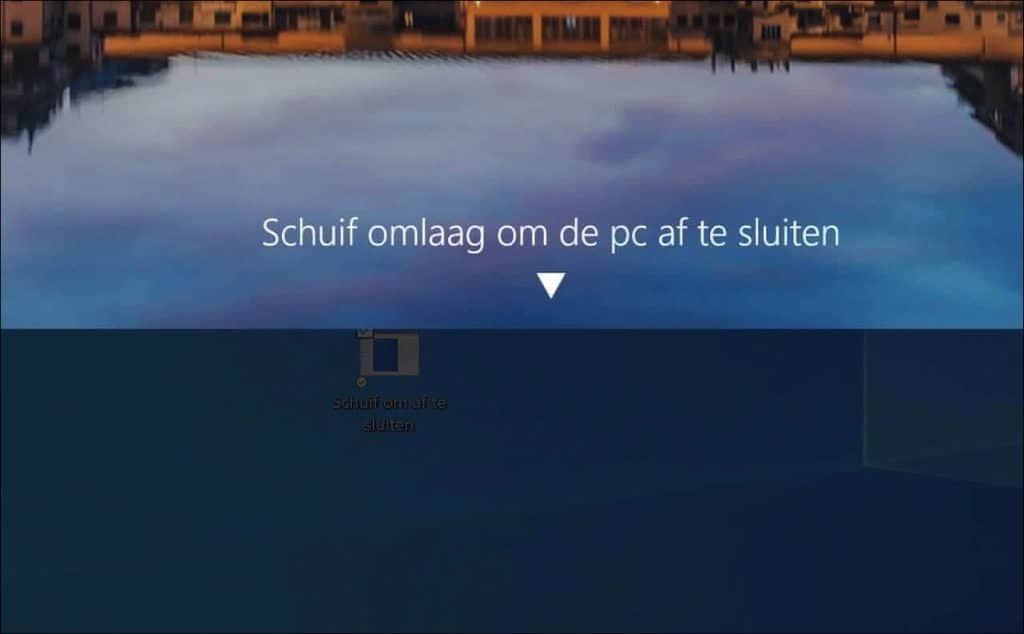
Dubbelklik op de snelkoppeling of gebruik de ingestelde toetscombinatie. Er verschijnt een ‘schermgordijn’ vanaf de bovenkant. Sleep dit gordijn met uw muis naar de onderkant van het scherm om uw computer uit te schakelen. Let op: dit is een volledige afsluiting, geen slaapstand.
Deze unieke manier van afsluiten kan niet alleen efficiënt zijn, maar voegt ook een beetje flair toe aan het routineproces van het afsluiten van uw pc. Zo blijft u altijd in controle, maar op een stijlvolle manier.
God mode (Windows Master Control panel)
Voor de gemiddelde computergebruiker klinkt de term ‘God Mode’ wellicht als iets uit een videospel. Echter, voor power users en IT-professionals kan deze functie in Windows een game-changer zijn. Het biedt namelijk toegang tot alle bedieningspanelen van Windows vanuit één centrale map. Hieronder leggen we stap voor stap uit hoe u deze geavanceerde functie kunt inschakelen.
- Ga naar uw bureaublad, de achtergrond van uw computer waar u normaal uw snelkoppelingen en bestanden vindt.
- Klik met de rechtermuisknop op een leeg gedeelte van het bureaublad. Kies vervolgens ‘Nieuw’ en daarna ‘Map’. Er zal een nieuwe map op uw bureaublad verschijnen.
- Klik met de rechtermuisknop op de nieuwe map en kies ‘Naam wijzigen’. Plak nu de volgende code als de naam van de map:
GodMode.{ED7BA470-8E54-465E-825C-99712043E01C}
Zodra u de naam bevestigt, zal het pictogram van de map veranderen, wat aangeeft dat de ‘God Mode’ nu actief is.
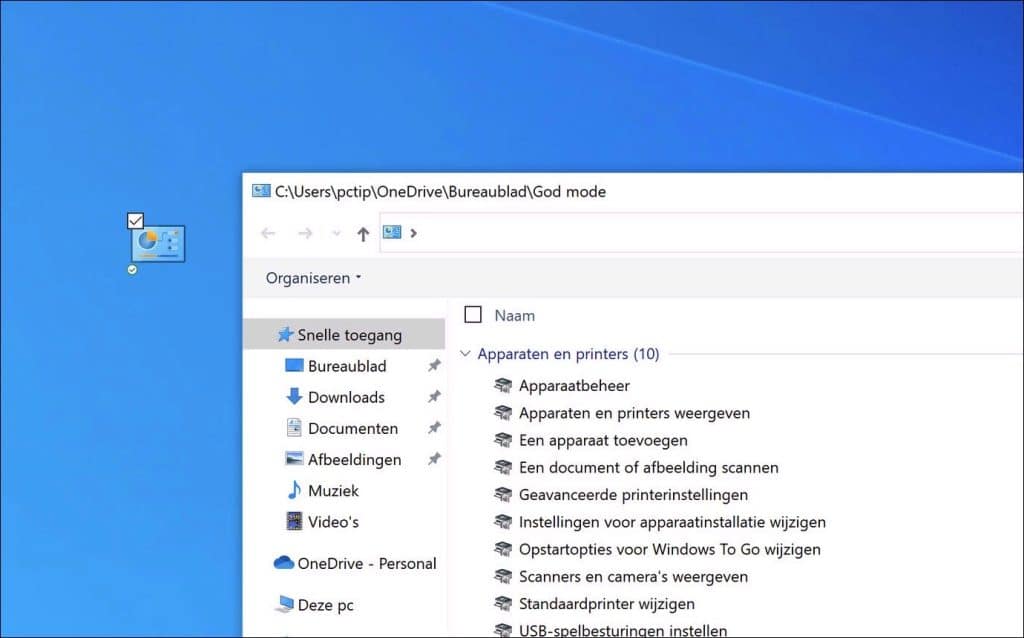
Dubbelklik op de zojuist gecreëerde ‘God Mode’ map. U zult versteld staan van wat u ziet: een uitgebreide lijst van instellingen, bedieningspanelen en configuratie-opties die Windows te bieden heeft. Hoewel het officieel de ‘Windows Master Control Panel shortcut’ wordt genoemd, geeft ‘God Mode’ een passend beeld van de controle die u nu heeft.
Dit paneel bevat alles, van administratieve tools tot opties voor toegankelijkheid en weergave-instellingen. Het is een one-stop-shop voor degenen die diepgaande aanpassingen en optimalisaties willen doorvoeren aan hun Windows-systeem.
Hoewel God Mode een krachtig hulpmiddel is, is het belangrijk om met zorg te navigeren. Omdat u toegang heeft tot zoveel geavanceerde instellingen, is het mogelijk om per ongeluk systeemconfiguraties te wijzigen. Zorg er dus altijd voor dat u weet wat u aanpast en maak indien nodig back-ups van uw systeem.
Vensters optimaal benutten
Voor sommige is multitasken een tweede natuur geworden. Met meerdere taken tegelijkertijd bezig zijn kan soms uitdagend zijn, maar Windows 10 heeft enkele ingebouwde functies die dit proces aanzienlijk vergemakkelijken. Het strategisch positioneren van vensters op uw scherm kan uw productiviteit verhogen en zorgt voor een overzichtelijkere werkruimte.
Pak een willekeurig venster bij de bovenste balk en sleep het naar de linker- of rechterrand van uw scherm. Het venster zal zich automatisch aanpassen om de helft van uw scherm in beslag te nemen. Dit is vooral handig wanneer u twee vensters naast elkaar wilt bekijken.
Wilt u meer dan twee vensters tegelijkertijd op het scherm hebben? Geen probleem. Sleep een venster naar een van de vier hoeken van het scherm en het zal zich aanpassen om die specifieke hoek in te nemen. Op deze manier kunt u met gemak vier applicaties of bestanden gelijktijdig bekijken.
Het gebruik van het toetsenbord kan vaak sneller zijn dan met de muis werken. Windows 10 heeft een reeks sneltoetsen die speciaal zijn ontworpen voor vensterbeheer:
Met de combinatie van de Windows-toets (vaak weergegeven met het Windows-logo) en de pijl naar links of rechts, kunt u het actieve venster snel naar de betreffende zijde van het scherm verplaatsen.
Nadat u een venster naar de zijkant hebt verplaatst, kunt u de Windows-toets in combinatie met de pijl-omhoog of pijl-omlaag gebruiken. Het venster zal zich dan verplaatsen en vergrendelen in de bovenste of onderste hoek van die zijde.
Het beheer van vensters is slechts een van de vele functies die Windows 10 biedt om uw werkervaring te optimaliseren. Door deze technieken toe te passen, kunt u moeiteloos schakelen tussen verschillende taken en uw productiviteit maximaliseren.
Wisselen met virtuele bureaubladen
Nu we de computer steeds meer voor werk en prive gebruiken, kan het moeilijk zijn om werkgerelateerde zaken te scheiden van persoonlijke zaken. Windows biedt een oplossing voor dit dilemma door de mogelijkheid te bieden om virtuele bureaubladen te creëren. Hiermee kunt u uw applicaties en taken netjes geordend houden en uw productiviteit verhogen.
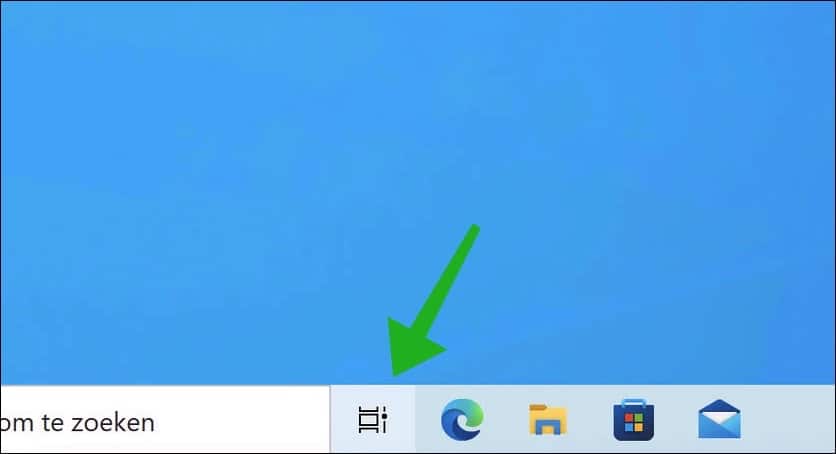
Begin op uw normale bureaublad. Zoek naar het pictogram ‘Taakweergave’ in uw taakbalk. Dit pictogram lijkt op enkele kleine rechthoeken of dozen. Klik hierop en u zult een overzicht krijgen van al uw geopende vensters en applicaties.
In de ‘Taakweergave’ ziet u een optie genaamd ‘Nieuw bureaublad’. Sleep eenvoudig de vensters of applicaties die u wilt scheiden naar dit gebied. Zodra u loslaat, zal er een nieuw, apart virtueel bureaublad worden gecreëerd waarin de geselecteerde items zich bevinden.
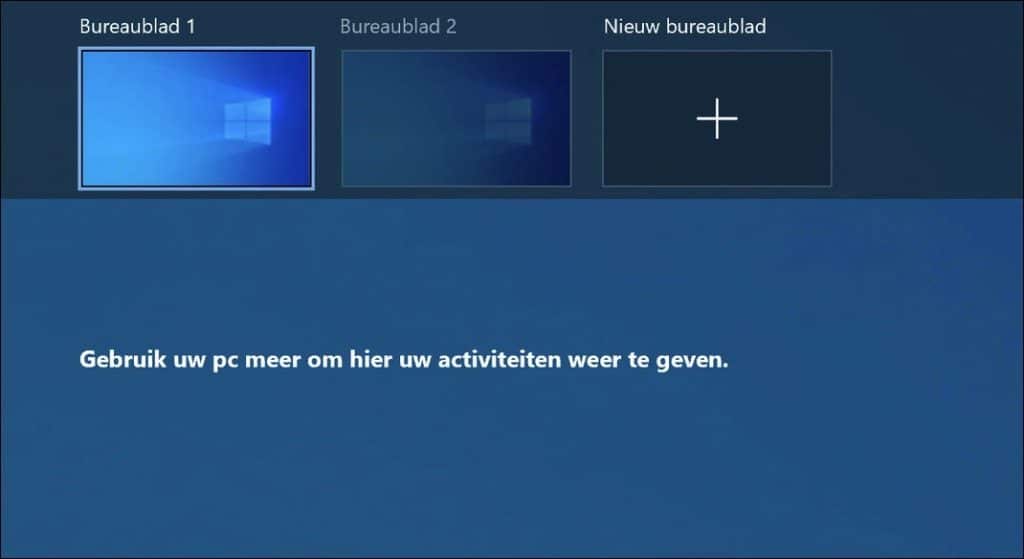
Nadat u uit de ‘Taakweergave’ bent gegaan, kunt u gemakkelijk tussen uw oorspronkelijke bureaublad en uw nieuwe virtuele bureaubladen schakelen. Gebruik hiervoor de combinatie Windows-toets + Ctrl, gevolgd door de linker- of rechterpijltoets. Deze sneltoetsen maken het navigeren tussen verschillende werkruimtes een fluitje van een cent.
Het gebruik van virtuele bureaubladen kan uw computerervaring sterk verbeteren. Hiermee kunt u bijvoorbeeld uw werkgerelateerde webbrowsers, software en documenten op één bureaublad hebben, terwijl uw persoonlijke foto’s, sociale media en hobbyprojecten op een ander zijn opgeslagen. Dit bevordert niet alleen de organisatie, maar kan ook afleiding minimaliseren en u helpen om efficiënter te werken.
Of u nu een freelancer bent die thuis werkt, een student die studeert of iemand die gewoon wat meer orde in zijn digitale leven wil brengen, de virtuele bureaubladen in Windows kunnen een essentiële tool zijn om uw taken georganiseerd en gescheiden te houden.
Opdrachtprompt personaliseren
Voor de tech-liefhebbers en geavanceerde gebruikers van Windows die graag de diepere lagen van het besturingssysteem verkennen via de Opdrachtprompt, is er goed nieuws. U kunt deze tool namelijk naar uw eigen hand zetten en personaliseren. Met een paar eenvoudige stappen kunt u de Opdrachtprompt aanpassen aan uw voorkeuren en zo uw ervaring met deze tool optimaliseren.
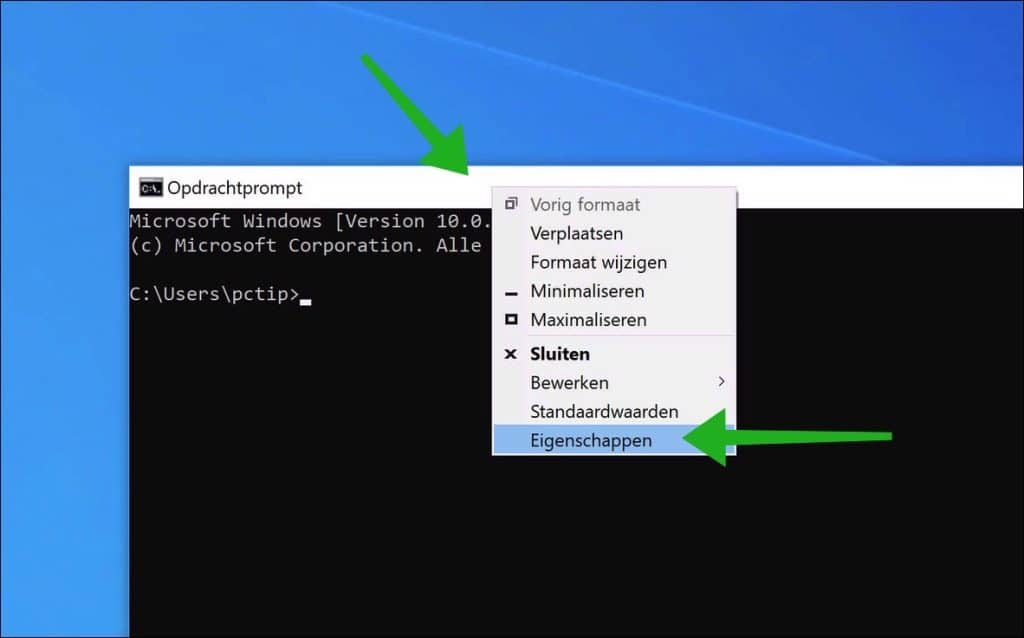
Open eerst het Opdrachtprompt. Klik met de rechtermuisknop op de bovenste balk van het venster. In het dropdown-menu dat verschijnt, kiest u voor ‘Eigenschappen’. Dit opent een nieuw venster waarin u diverse aanpassingen kunt doen.
In het ‘Eigenschappen’-venster heeft u de mogelijkheid om verschillende aspecten van de Opdrachtprompt te wijzigen. Zo kunt u:
- Aanpassen hoe u door het venster navigeert.
- Kies een lettertype dat prettig leest en stel de grootte in naar wens.
- Verander de grootte en positie van het venster.
- Pas de achtergrond- en tekstkleuren aan voor betere zichtbaarheid of esthetiek.
- Wijzig hoe de cursor wordt weergegeven, zodat deze beter zichtbaar is of juist subtieler.
Een van de meest interessante functies is de mogelijkheid om de Opdrachtprompt transparant te maken.
- Ga naar het tabblad ‘Kleuren’ en zoek naar de schuifregelaar voor ‘Matheid’.
- Door deze te verschuiven, kunt u het venster meer of minder transparant maken.
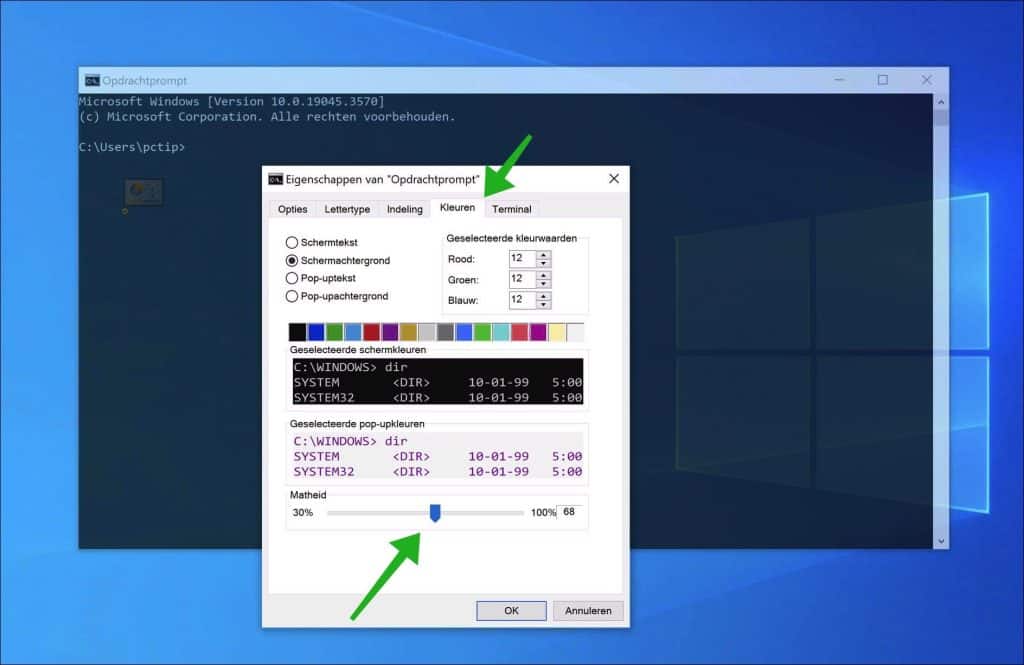
Dit is vooral handig als u in de Opdrachtprompt werkt, maar tegelijkertijd wilt zien wat er op uw bureaublad gebeurt.
Door deze aanpassingen kunt u de Opdrachtprompt in Windows niet alleen visueel aantrekkelijker maken, maar ook functioneler en aangepast aan uw specifieke behoeften. Of u nu een ontwikkelaar bent die regelmatig codeert, of iemand die af en toe de Opdrachtprompt gebruikt, deze personalisatie-opties kunnen uw workflow aanzienlijk verbeteren.
Minder afleiding met Concentratiehulp
Hedendaags worden we constant gebombardeerd met meldingen en notificaties, die vaak afleidend kunnen werken, vooral als we geconcentreerd willen werken of ontspannen. Windows heeft hier echter een oplossing voor ontwikkeld: Concentratiehulp. Deze functie stelt u in staat om beter te bepalen welke meldingen u wel en niet wilt ontvangen, zodat u ongestoord kunt werken of ontspannen.
Concentratiehulp is een functie binnen het Windows besturingssysteem die u meer controle geeft over de meldingen die op uw PC verschijnen. Hiermee kunt u bepalen welke meldingen belangrijk genoeg zijn om uw aandacht te trekken en welke kunnen wachten.
- Ga naar ‘Instellingen’ op uw PC.
- Kies vervolgens voor ‘Systeem’.
- Klik hierna ‘Concentratiehulp’.
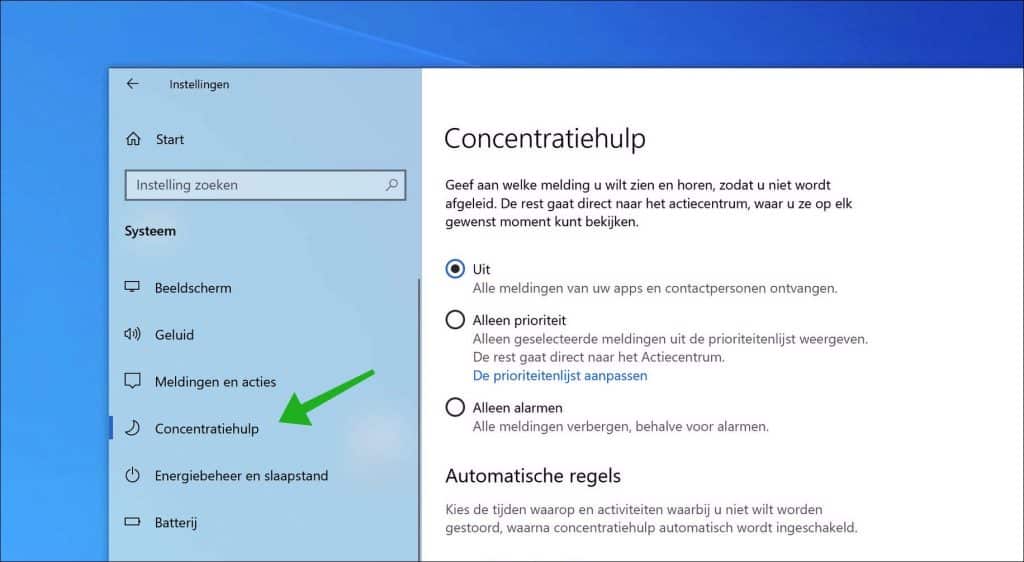
Binnen dit menu heeft u verschillende opties. U kunt kiezen om:
- Alle meldingen uit te schakelen, zodat u in volledige rust kunt werken.
- Alleen prioriteitsmeldingen door te laten. U bepaalt zelf welke apps of contactpersonen prioriteit hebben.
- Automatische regels in te stellen, bijvoorbeeld dat Concentratiehulp alleen tijdens werktijden wordt ingeschakeld.
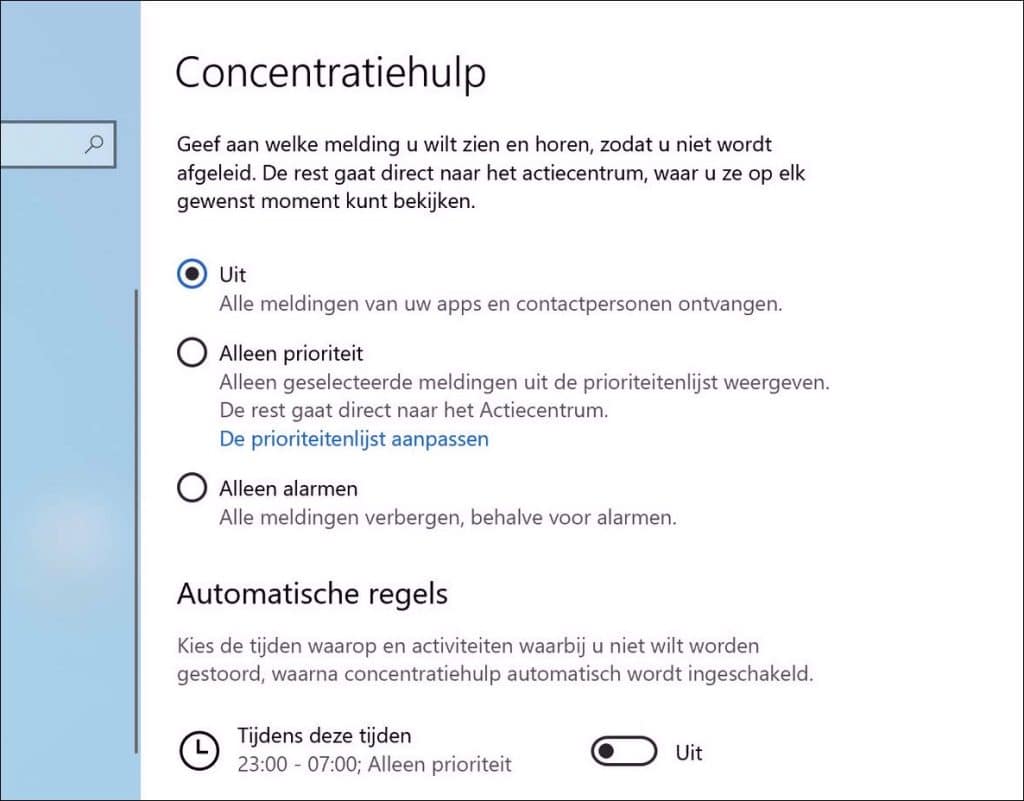
Concentratiehulp biedt ook de mogelijkheid om automatisch in te schakelen onder specifieke voorwaarden, zoals tijdens presentaties, tijdens het gamen of op bepaalde tijdstippen.
Met Concentratiehulp kunt u dus een evenwicht vinden tussen bereikbaar zijn en ongestoord kunnen werken. Het helpt u om de balans te vinden tussen productiviteit en connectiviteit in deze altijd verbonden wereld. Door slim gebruik te maken van deze tool, creëert u een werkomgeving waarin u zich beter kunt focussen en efficiënter kunt werken.
Emoji, Kaimoji en Symbolen
Hedendaags is communicatie veel meer dan alleen woorden. Emoji, Kaimoji en diverse symbolen zijn steeds meer geïntegreerd in onze dagelijkse conversaties, waardoor we emoties, ideeën en concepten op een visuele manier kunnen overbrengen. Windows biedt gebruikers een eenvoudige en snelle manier om toegang te krijgen tot deze visuele elementen.
De snelste manier om deze bibliotheek van visuele expressies in Windows te benaderen, is door gebruik te maken van een handige sneltoetscombinatie.
Druk op de ‘Windows-toets’ in combinatie met de ‘Punt-toets’ (.) en er verschijnt direct een uitgebreid menu aan de rechter onderkant van uw scherm.
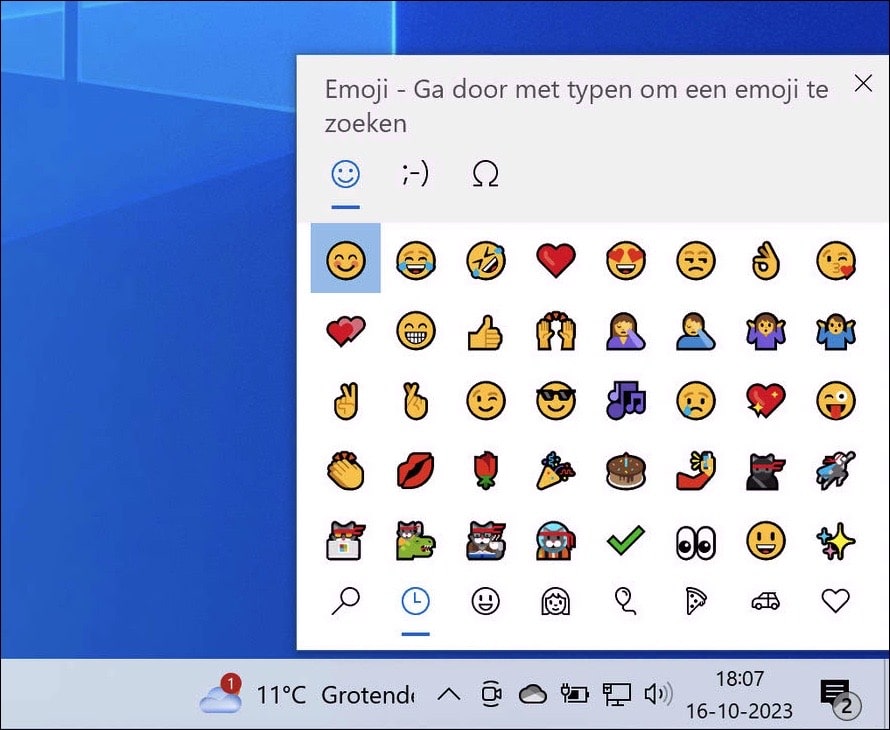
Dit menu geeft u toegang tot een rijke verzameling van:
- Emoji: Deze kleurrijke en expressieve pictogrammen worden vaak gebruikt in chats en berichten om emoties en gevoelens over te brengen.
- Kaimoji: Dit zijn speciale karakters opgebouwd uit Unicode tekens. Ze vormen gezichtsuitdrukkingen en andere figuren en zijn een intrigerend onderdeel van digitale communicatie, met name populair in Aziatische culturen.
- Diverse Symbolen: Of u nu zoekt naar wiskundige tekens, muzieknoten of andere specifieke symbolen, de kans is groot dat u ze hier vindt.
Naast de standaard set aan emoji, kaimoji en symbolen, onthoudt Windows ook uw recent gebruikte tekens. Zo kunt u nog sneller toegang krijgen tot uw favorieten.
Deze visuele expressies zijn niet alleen beperkt tot chatapplicaties. Ze kunnen ook worden gebruikt in documenten, e-mails en andere software die tekstverwerking ondersteunt.
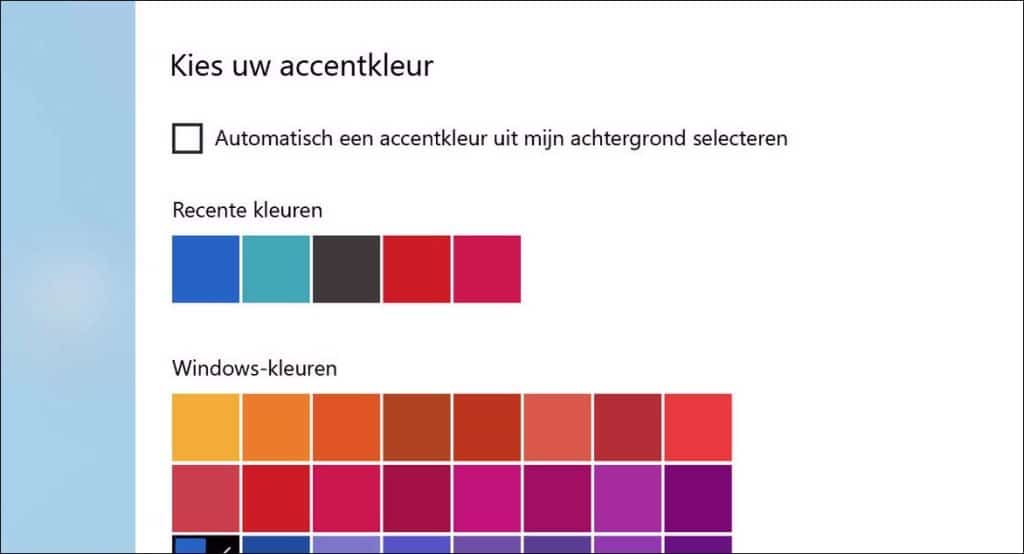
Kleuren personaliseren
Het esthetische aspect van een besturingssysteem is van groot belang voor veel gebruikers. Niet alleen omdat het de visuele beleving tijdens het gebruik verbetert, maar ook omdat het kan bijdragen aan een betere gebruikservaring. Windows 10 erkent dit en biedt daarom een breed scala aan personalisatiemogelijkheden voor kleurthema’s.
Kleuropties
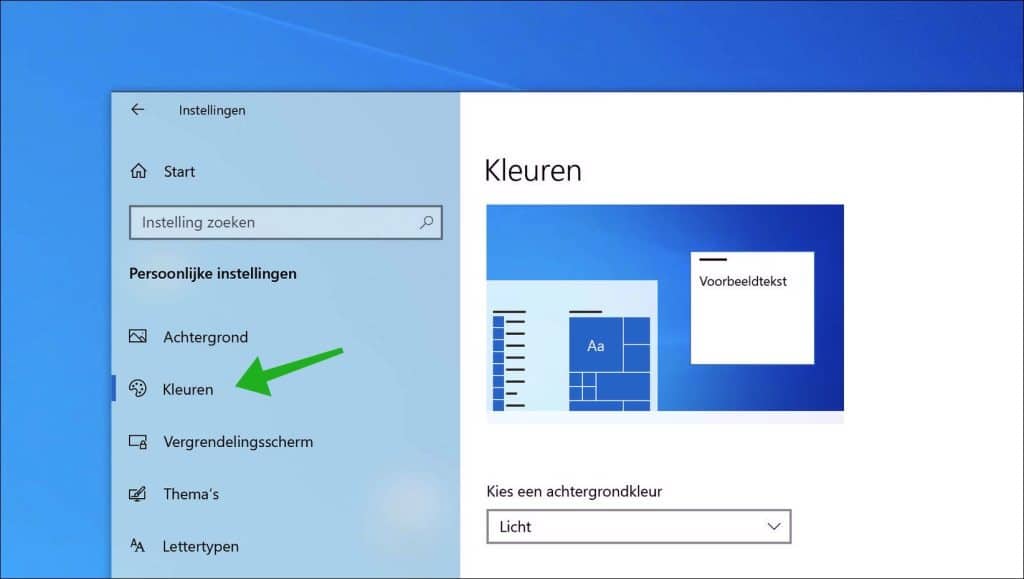
- Ga eerst naar ‘Instellingen’ vanuit het Start-menu.
- Kies vervolgens voor ‘Persoonlijke instellingen’.
- Hier vindt u de optie ‘Kleuren’, die u toegang geeft tot een reeks kleurconfiguratie-opties.
Binnen de kleuropties kunt u kiezen tussen een ‘donkere modus’ en een ‘lichte modus’. De gekozen modus past de kleur van verschillende interface-elementen aan zoals het Start-menu, de taakbalk, het actiecentrum, Verkenner en de instellingenmenu’s. Dit heeft ook invloed op andere programma’s die compatibel zijn met deze themamodi.
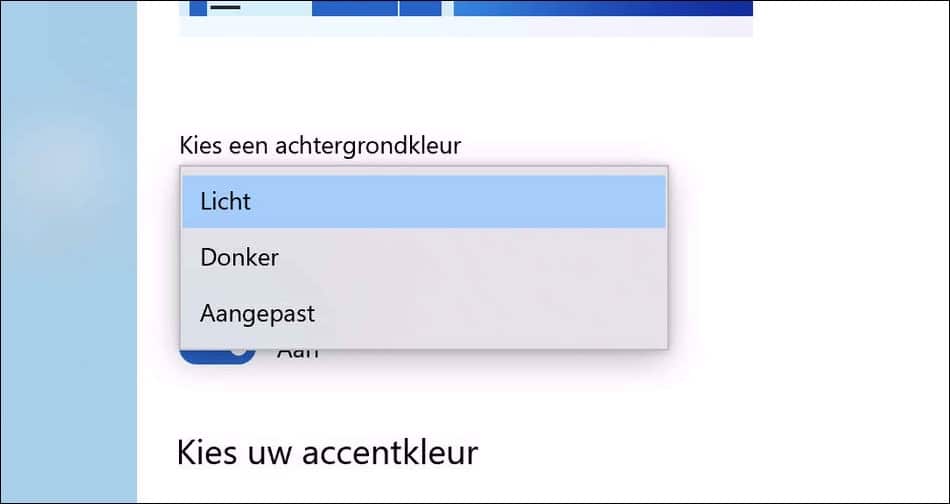
Voor gebruikers die een unieke touch willen toevoegen, biedt Windows 10 een ‘aangepaste’ optie. Hiermee kunt u bijvoorbeeld een licht thema instellen voor Windows-menu’s, terwijl apps in een donker thema worden weergegeven.
Als de standaardkleuropties niet voldoende zijn, biedt Windows 10 ook een scala aan kleurenpaletten (accentkleuren) waarmee u uw menu’s en taakbalken echt kunt laten opvallen. Deze paletten variëren van zachte pastelkleuren tot felle en levendige tinten, zodat er voor elke smaak wel iets bij zit.
Dankzij deze uitgebreide personalisatiemogelijkheden kunnen Windows 10-gebruikers hun besturingssysteem precies zo instellen als zij dat willen, wat bijdraagt aan een plezierigere en meer gepersonaliseerde gebruikservaring.
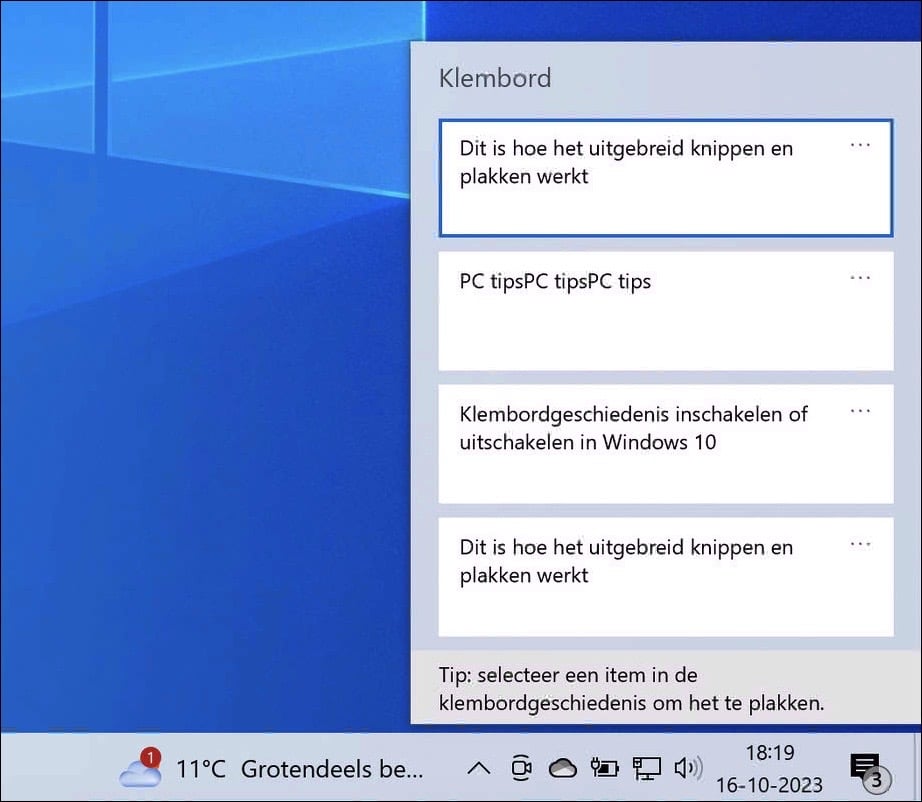
Uitgebreid knippen en plakken met klembordgeschiedenis
Velen van ons maken dagelijks gebruik van het knip- en plakmechanisme op onze computers. Deze functie, vaak eenvoudigweg het “klembord” genoemd, is door de jaren heen een fundamenteel onderdeel van onze computerervaring geworden. Maar wat velen niet weten, is dat Windows dit basisconcept heeft verfijnd en uitgebreid, waardoor het nog functioneler en efficiënter wordt.
Het traditionele klembord was vrij beperkt; het stond alleen toe om één item tegelijk op te slaan. Als u een nieuw item knipte of kopieerde, werd het vorige item overschreven. Met Windows kunt u nu echter meerdere items tegelijk op het klembord opslaan. Hierdoor kunt u snel en gemakkelijk tussen verschillende stukken tekst of afbeeldingen schakelen zonder dat u voortdurend tussen documenten of webpagina’s hoeft te wisselen.
Om een overzicht te krijgen van de recentelijk opgeslagen items, kunt u simpelweg de toetscombinatie Win + V gebruiken. Dit opent een speciaal venster waarin u een lijst ziet van alles wat u onlangs hebt geknipt of gekopieerd, zodat u eenvoudig kunt selecteren wat u wilt plakken.
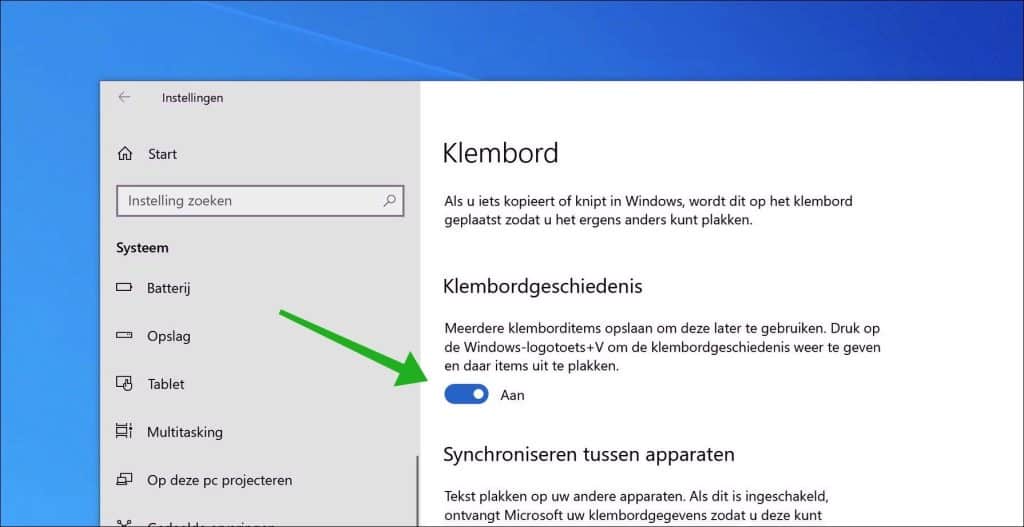
De mogelijkheid om knip- en plakacties over verschillende apparaten uit te voeren, is een andere baanbrekende functie. Stel je voor dat je een stuk tekst op je desktop knipt en het vervolgens plakt op je laptop of tablet! Dit is nu mogelijk door in te loggen op uw Microsoft Account.
- Ga naar ‘Instellingen’ op uw computer.
- Kies vervolgens ‘Systeem’.
- Hier zult u de optie ‘Klembordgeschiedenis’ vinden. Binnen dit menu kunt u deze geavanceerde functies naar in- of uitschakelen.
Door deze innovaties wordt de alledaagse taak van knippen en plakken niet alleen efficiënter, maar ook veelzijdiger, wat de algehele productiviteit en gebruikservaring verbetert.
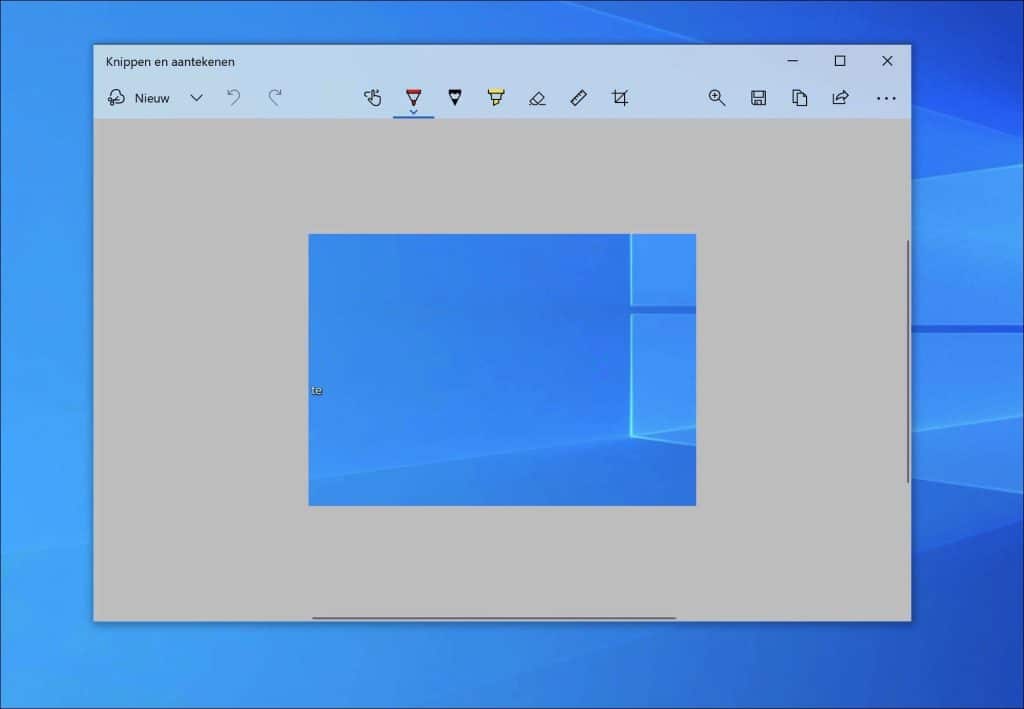
Knippen en aantekenen
Jarenlang was de ‘Knipprogramma’ tool de enige software binnen Windows waarmee u schermafbeeldingen kon maken. Deze simpele tool bood basisfunctionaliteit voor het vastleggen van inhoud op uw scherm. Echter, met de komst van Windows 10 is er een revolutionaire verandering gekomen in de manier waarop we schermafbeeldingen maken en bewerken, dankzij de nieuwe app ‘knippen en aantekenen’.
De ‘knippen en aantekenen’ app is niet zomaar een eenvoudige update van het Knipprogramma. Het brengt een reeks geavanceerde functies met zich mee die het maken van schermafbeeldingen naar een hoger niveau tillen. Met de toetscombinatie Shift + Win + S krijgt u onmiddellijke toegang tot diverse opties: rechthoekige selectie, vrije vorm, het vastleggen van een specifiek venster, of het vastleggen van het volledige scherm. Deze flexibiliteit stelt gebruikers in staat om met precisie te kiezen welk deel van het scherm ze willen vastleggen.
Wat ‘knippen en aantekenen’ nog unieker maakt, is de geïntegreerde beeldbewerker. In tegenstelling tot het klassieke Knipprogramma, waarbij u voor uitgebreide bewerkingen mogelijk een beroep moest doen op externe programma’s zoals Microsoft Paint, biedt deze app u directe toegang tot een reeks bewerkingstools. Hiermee kunt u uw schermafbeeldingen direct annoteren, bijsnijden, markeren en nog veel meer, zonder dat u een ander programma hoeft te openen.
Of u nu een professionele gebruiker bent die regelmatig schermafbeeldingen nodig heeft voor werkdoeleinden, of gewoon iemand die af en toe een afbeelding wil delen met vrienden, deze tool maakt het proces eenvoudiger en efficiënter dan ooit tevoren.
Ik hoop dat u wat heeft geleerd van deze Windows 10 tips. Wilt u dit artikel delen met andere mensen? Bedankt voor het lezen!
Help mee
Mijn computertips zijn gratis en bedoeld om andere mensen te helpen. Door deze pc-tip te delen op een website of social media, helpt u mij meer mensen te bereiken.Overzicht met computertips
Bekijk ook mijn uitgebreide overzicht met praktische computertips, overzichtelijk gesorteerd per categorie.Computerhulp nodig?
Loopt u vast met uw pc, laptop of software? Stel uw vraag op ons computerforum en krijg gratis computerhulp van ervaren leden en experts.