

Once you are familiar with Windows operating system, you will realize that Microsoft creates several partitions on your hard drive. These partitions are split into volumes. These volumes are then assigned to the operating system, the recovery partition, the OEM data and more.
Additional hard drives can also be partitioned and you can create different volumes that can then be used to store additional data or even boot other operating systems using virtual machines.
Sometimes these Volumes can grow larger than necessary, rendering valuable storage space in the volume unusable. You can resize volumes in Windows 11 or Windows 10 to add extra storage space or reduce storage space, depending on your preferences. In this tip I explain how to enlarge the partition on which Windows is installed.
Enlarge Windows partition
The easiest way to modify a partition is to use disk management. Disk Management is an extension of the Microsoft Management Console that allows complete management of the disk-based hardware recognized by Windows.
It is used to manage the drives installed in a computer, such as hard drives (internal and external), optical drives and flash drives. It can be used to partition and format drives, assign drive letters and much more.
To enlarge a partition you need “unallocated” disk space. This can be done by adding hardware or by reducing the size of a partition.
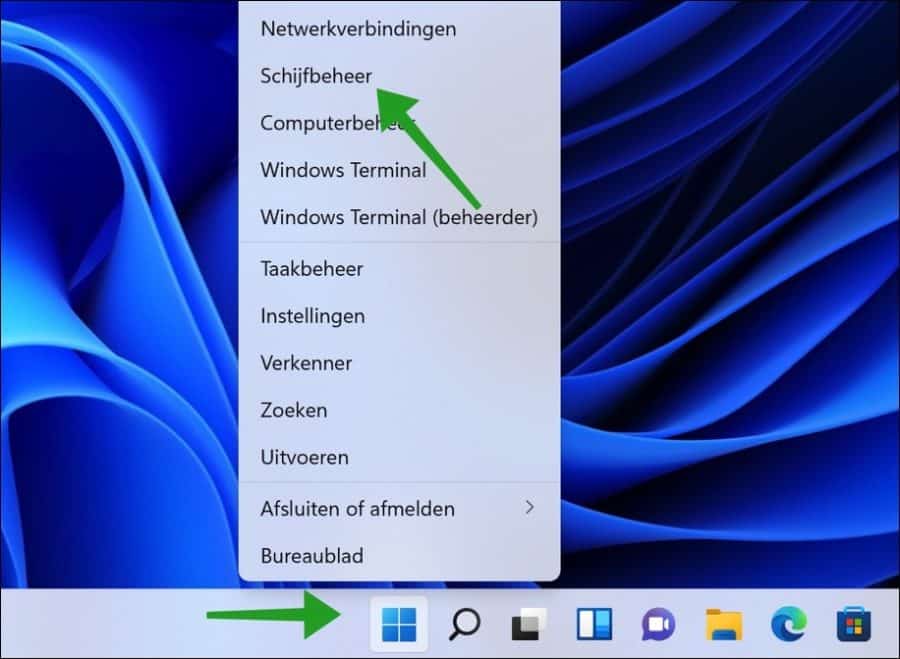
Right-click on the start button. Click on Disk Management in the menu.
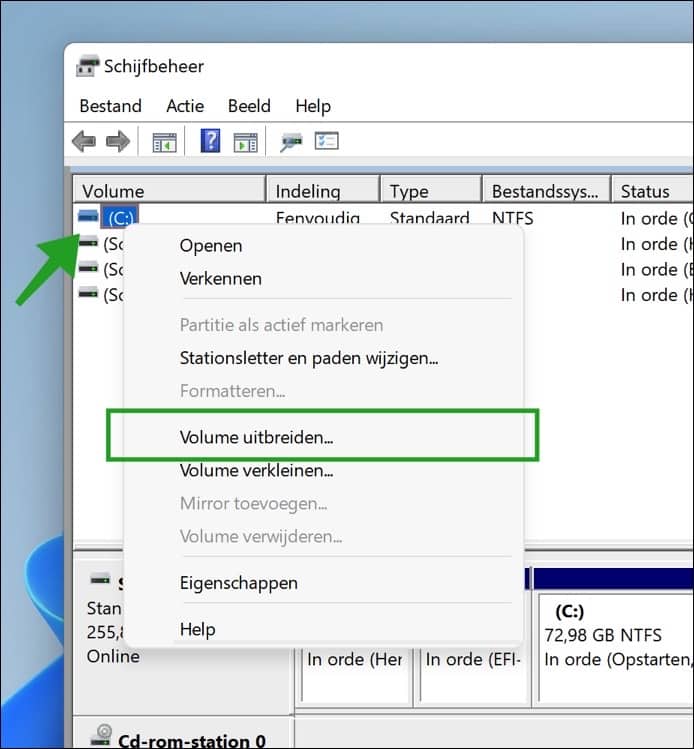
Right-click on the Windows primary installation disk. Then click on Extend Volume.
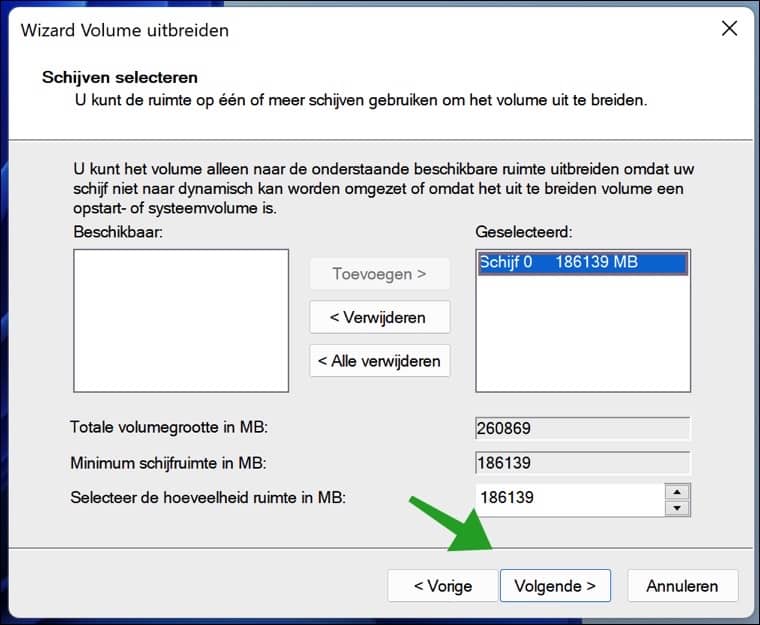
In the “Available” column you will see the disk space to add. Click on the add button.

The disk space to add is selected. Then click next.
Expanding Windows partition is completed. Click the Finish button.

You will see the result in disk management.
Lees meer:
- Create partition on external hard drive.
- 4 ways to change a drive letter.
- Look up hard drive serial number.
- Create a virtual hard drive in Windows.
I hope this helped you. Thank you for reading!
With the information I found in the messages I was able to solve my problem.
I had the following problem
I installed a new larger SSD drive, cloned it, but afterwards it was not partitioned properly, my C partition was the same size as before. I was able to solve this with the recommended program Aomei Partition Assistant.
For which I thank you
kind regards, Eric
Thanks for the info. Glad it worked!
Good afternoon!
I initially created 2 new partitions on my new laptop (Disk Management): D:\ and E:\.
Now I see that I have created C: too small (66,44 GB) because I keep getting an error message due to lack of disk space. I also have an “unallocated” 49 GB drive. I would like to add THAT space to C:\. But, if I right click on C:\ then I can only REDUCE VOLUME (and I want to increase it). How do I approach this?
Thanks in advance for any response!
Hello, that's because the unallocated space is not on the right of the C partition in disk management. It is also possible that this unallocated space is in another partition. You need a tool for this. Read how this works here.
Success!
Hi Stefan, I also have the same question as Peter and Wim and am curious about the solution. Maybe you could write a piece about it. Gr. Richard
Hello, this might help: https://www.easeus.com/partition-master/cannot-extend-volume.html
Greetings, Stefan
I have the same question as Peter, from December 28. 2021.
M.vr.gr.
wim
I want to add 39 GB of 'unallocated' space to the C drive. I followed your guide, but only 'Reduce Volume' is clearly visible. However, 'enlarge' is not accentuated. What to do now. m.fr.gr. Peter
I have sent you an email with more information. Greetings, Stefan