
Wanneer Windows een interne of externe harde schijf detecteert, wijst het systeem automatisch een schijfletter toe.
Deze toewijzing is echter niet altijd standaard en kan variëren, afhankelijk van de configuratie en aangesloten apparaten. Gelukkig biedt Windows meerdere manieren om schijfletters handmatig aan te passen.
In dit artikel leg ik uit hoe u eenvoudig de schijfletters kunt wijzigen via verschillende methoden.
Meld u dan aan voor onze nieuwsbrief.
Schijfletter wijzigen in Windows 11 of 10
In Windows kunt u eenvoudig een schijfletter aanpassen. Hieronder worden vier verschillende methoden uitgelegd: via de Instellingen, Schijfbeheer, Opdrachtprompt, en PowerShell.
via Instellingen
Kies de methode die het beste bij u past.
- Klik met de rechtermuisknop op de Startknop en selecteer ‘Instellingen’.
- Ga naar ‘Systeem’ in het linker menu en klik vervolgens op ‘Opslag’.
- Scroll naar beneden en klik op ‘Geavanceerde opslaginstellingen’ > ‘Schijven en volumes’.
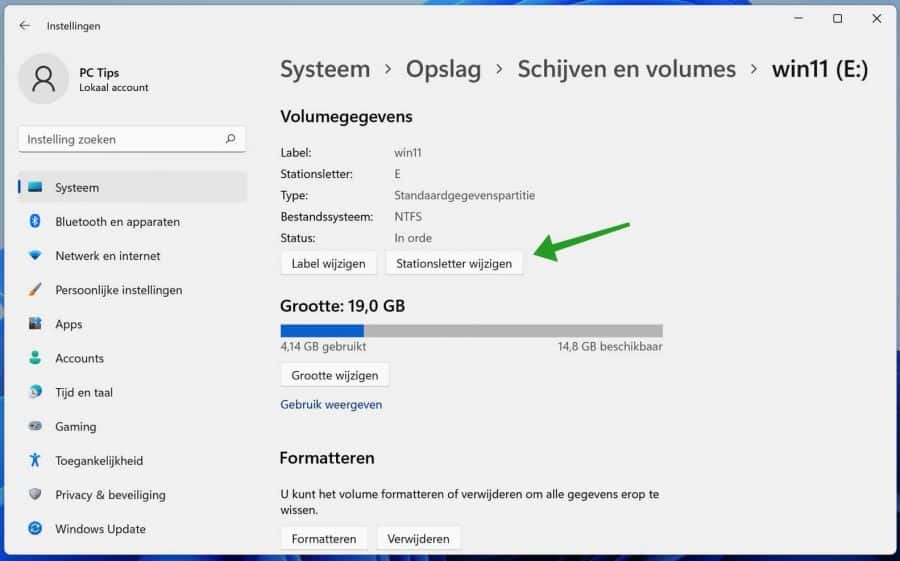
- Selecteer de schijf waarvan u de schijfletter wilt wijzigen en klik op ‘Eigenschappen’.
- Klik op ‘Stationsletter wijzigen’.
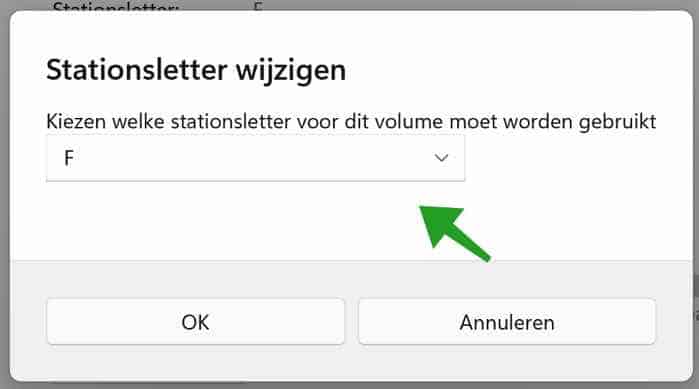
- Kies een nieuwe schijfletter uit de lijst en klik op ‘OK’ om de wijziging te bevestigen.
Geef het station een nieuwe schijfletter door de gewenste letter te selecteren. Klik op OK om te bevestigen.
via Schijfbeheer
- Klik met de rechtermuisknop op de ‘Startknop’ en selecteer ‘Schijfbeheer’.
- Zoek in ‘Schijfbeheer’ de schijf waarvan u de schijfletter wilt aanpassen.
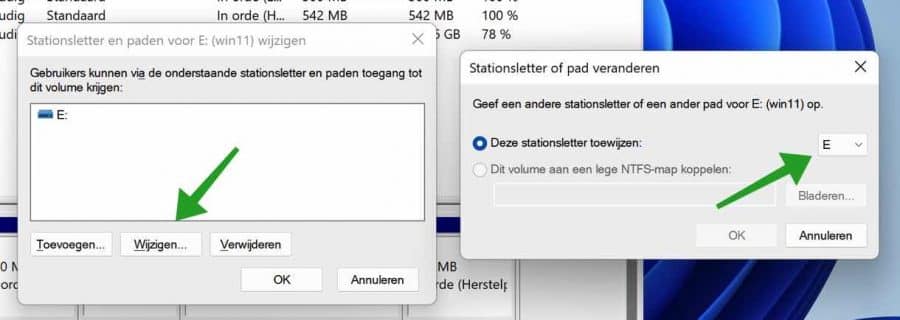
- Klik met de rechtermuisknop op de schijf en selecteer ‘Stationsletter en paden wijzigen’.
- Klik op ‘Wijzigen’, selecteer een nieuwe schijfletter, en klik op ‘OK’.
- Bevestig de wijziging om de nieuwe schijfletter toe te passen.
via Opdrachtprompt
- Klik op het ‘vergrootglas’ in de taakbalk (of zoekbalk in Windows 10).
- Typ
'cmd.exe', klik met de rechtermuisknop op ‘Opdrachtprompt’ en kies ‘Als Administrator uitvoeren’.
Voer de volgende opdrachten uit in de volgorde zoals hieronder beschreven:
- Typ
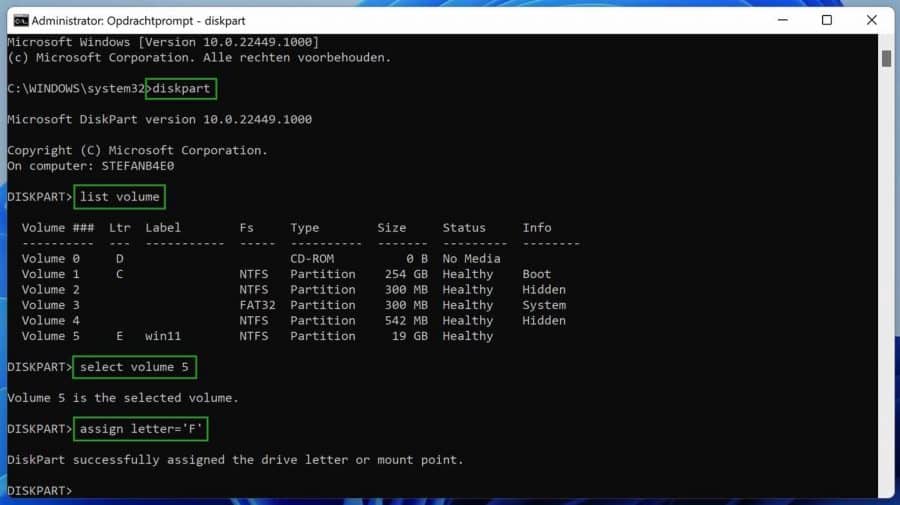
'diskpart'en druk op Enter. - Typ
'list volume'om een overzicht van alle volumes te krijgen. - Zoek het volume dat u wilt aanpassen en noteer het bijbehorende nummer.
- Typ
'select volume [nummer]'(vervang[nummer]door het juiste nummer). - Typ
'assign letter=[schijfletter]'(vervang[schijfletter]door de nieuwe gewenste letter).
via PowerShell
- Klik op het ‘vergrootglas’ in de taakbalk (of zoekbalk in Windows 10).
- Typ
'PowerShell', klik met de rechtermuisknop op het resultaat, en kies ‘Als Administrator uitvoeren’.
Gebruik de volgende commando’s in het ‘PowerShell’-venster:
- Typ
'Get-Partition'en druk op Enter om een lijst van partities en schijfletters te zien. - Voer het volgende commando in om de schijfletter te wijzigen
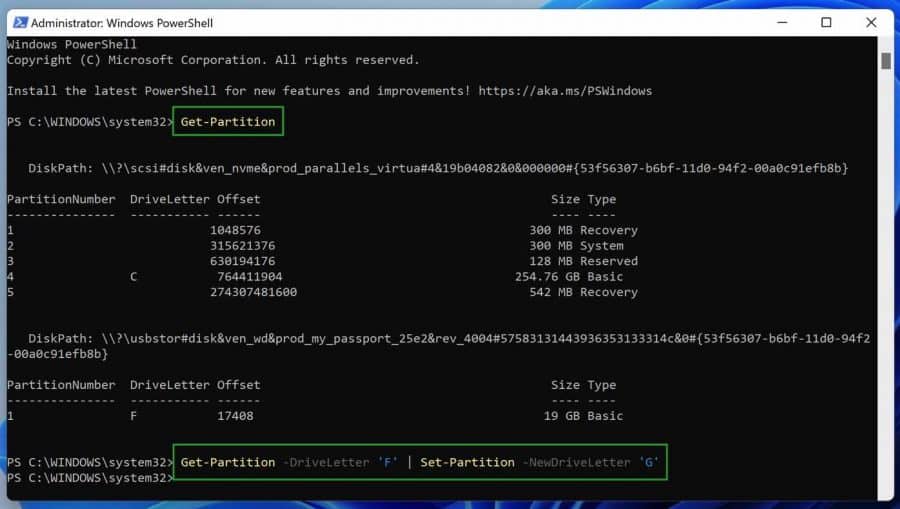
Daarna typt u (vervang oudeschijfletter en nieuweschijfletter):
Lees meer:
Ik hoop u hiermee geholpen te hebben. Bedankt voor het lezen!
Dankjewel voor je antwoord bericht
Als ik alle sata kabels losmaak dan is schijf 1 de c: schijf die op de M2 poort zit. Waar windows op staat.
Sluit ik hierna de sata HD aan dan schuift de M2 op van 1 naar 2 of sata aansluitingen voorrang hebben krijgen op de rest van de aansluitingen.
Heel apart dat je dit dan niet makkelijk kunt aanpassen.
Controleer de UEFI instellingen eens, misschien kunt u daar wat vinden.
https://www.pc-tips.info/tips/windows-tips/2-manieren-om-de-bios-of-uefi-instellingen-te-openen/
Dankjewel voor je uitgebreide handleiding 🙂
Hierop heb ik nog wel 1 vraag. Elke HD heeft nu een letter gekregen maar elke schijf heeft ook een nummer de 1e HD is schijf 1 volgende schijf 2 etc etc hoe kun je de nummers van deze schijven veranderen of de volgorde. Waarom omdat als voorbeeld mijn systeemschijf C schijf 3 is en niet nr 1.
vriendelijk bedankt
Hallo, dan zou u de kabels naar het moederbord moeten omwisselen. Ik raad het niet aan, maar het kan dus wel. In enkele gevallen zou u ook instellingen in de EUFI/BIOS moeten aanpassen.
Succes!