Wanneer u de computer opstart vanaf USB, en u ziet een melding “EFI USB Has been blocked by the current security policy” dan wordt de toegang tot dit USB apparaat geblokkeerd.
Deze melding komt voort uit de “Secure Boot” beveiliging die is ingeschakeld op uw computer, meer specifiek in de UEFI/BIOS.
Secure Boot is een beveiligingsfunctie die is ontworpen om de integriteit van het opstartproces van een computer te waarborgen door ervoor te zorgen dat alleen vertrouwde en ondertekende software en firmware kunnen worden uitgevoerd tijdens het opstarten. Deze functie is meestal geïmplementeerd in het Unified Extensible Firmware Interface (UEFI)-firmware van moderne computers en is bedoeld om te voorkomen dat kwaadaardige software of malware het opstartproces van een computer compromitteert.
Meld u dan aan voor onze nieuwsbrief.

Wanneer Secure Boot is ingeschakeld in het BIOS of UEFI van een computer, controleert het systeem of de bootloader en de kernel van het besturingssysteem digitale handtekeningen hebben van een vertrouwde certificaatautoriteit. Als de software niet is ondertekend of als de handtekening niet kan worden geverifieerd, wordt de opstartprocedure geblokkeerd en wordt een foutmelding weergegeven.
De melding “EFI USB has been blocked by the current security policy” verschijnt meestal wanneer Secure Boot is ingeschakeld en u de computer probeert op te starten vanaf een externe EFI USB-stick die niet is ondertekend of waarvan de handtekening niet kan worden geverifieerd.
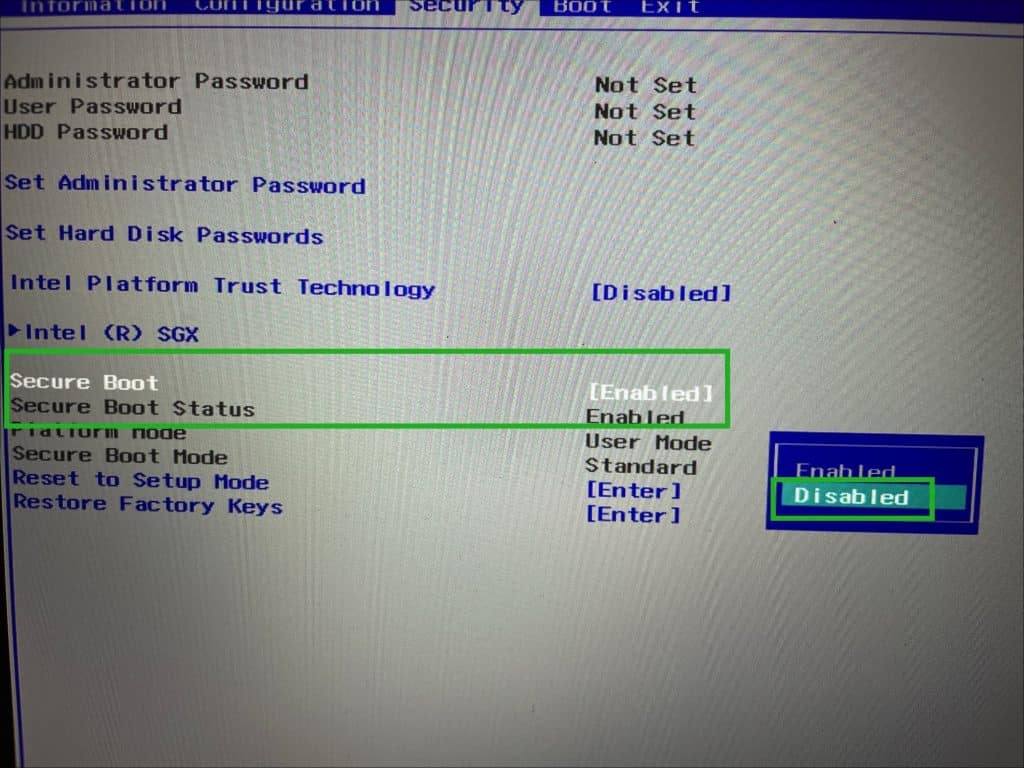
De oplossing is dan ook om Secure Boot in de UEFI/BIOS tijdelijk uit te schakelen. Dit is hoe het werkt.
“EFI USB has been blocked by the current security policy” melding uitschakelen
Zorg ervoor dat uw computer is ingeschakeld en start deze opnieuw op als dat nog niet is gebeurd.
Tijdens het opstarten moet u toegang krijgen tot het BIOS- of UEFI-scherm van uw computer. Dit wordt meestal gedaan door op een specifieke toets te drukken, zoals F2, F10, Delete of Esc, afhankelijk van het merk van de computer. Er wordt meestal een kort bericht weergegeven op het scherm tijdens het opstarten om aan te geven welke toets u moet indrukken om het BIOS of UEFI te openen. Raadpleeg de handleiding van uw computer voor specifieke instructies als je niet zeker bent.
Eenmaal in het BIOS of UEFI, zoekt u naar de optie met de naam “Secure Boot” of iets vergelijkbaars. Deze optie kan zich meestal bevinden onder het tabblad “Security” (Beveiliging) of “Boot” in het BIOS- of UEFI-menu.
Selecteer de optie “Secure Boot” en wijzig de instelling van “Enabled” (Ingeschakeld) naar “Disabled” (Uitgeschakeld) of een vergelijkbare optie, afhankelijk van de beschikbare keuzes in de BIOS- of UEFI-firmware.

Sla de wijzigingen op en verlaat het BIOS- of UEFI-menu. Dit wordt meestal gedaan door de instructies op het scherm te volgen. Meestal moet u op een toets drukken (bijv. F10) om de wijzigingen op te slaan en het BIOS of UEFI te verlaten.
Nadat u Secure Boot hebt uitgeschakeld, start u de computer opnieuw op om te controleren of de wijzigingen van kracht zijn.
Ik hoop u hiermee geïnformeerd te hebben. Bedankt voor het lezen!


Help mee
Mijn computertips zijn gratis en bedoeld om andere mensen te helpen. Door deze pc-tip te delen op een website of social media, helpt u mij meer mensen te bereiken.Overzicht met computertips
Bekijk ook mijn uitgebreide overzicht met praktische computertips, overzichtelijk gesorteerd per categorie.Computerhulp nodig?
Loopt u vast met uw pc, laptop of software? Stel uw vraag op ons computerforum en krijg gratis computerhulp van ervaren leden en experts.