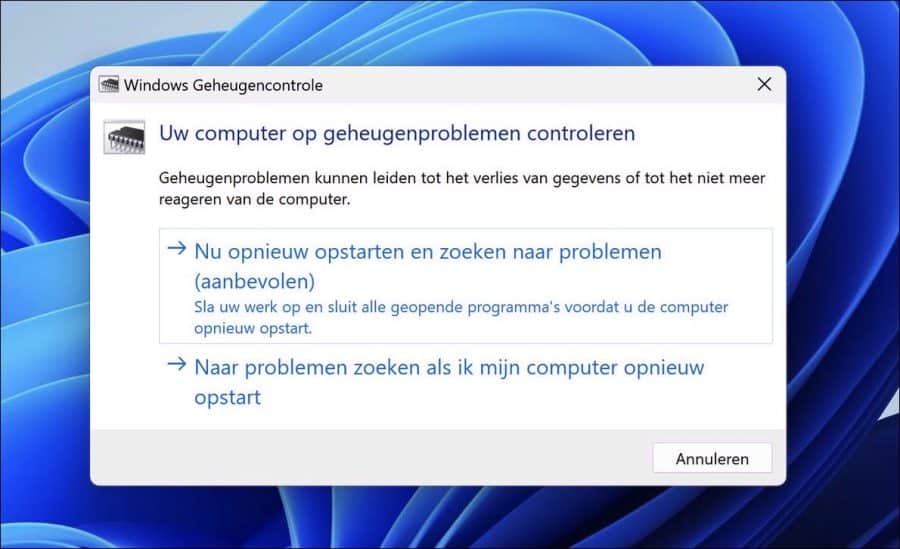
Een geheugentest, ook bekend als een (“RAM”) test, is een diagnostisch hulpmiddel dat u helpt bepalen of de geheugenmodules in een computer goed functioneren. In Windows 11 en 10 zijn er ingebouwde geheugentests die u kunt uitvoeren om de status van het geheugen in uw computer te controleren.
Geheugentests zijn vooral nuttig als u regelmatig last hebt van crashes, vastlopers of andere soorten systeemfouten. Deze problemen kunnen vaak worden veroorzaakt door gebrekkig of falend geheugen, en het uitvoeren van een geheugentest kan helpen bij het identificeren en oplossen van het geheugenprobleem.
Er zijn verschillende soorten geheugentests beschikbaar in Windows, waaronder de standaard app Windows geheugencontrole. In dit artikel leest u verschillende manieren waarop u Windows geheugencontrole kunt uitvoeren.
Meld u dan aan voor onze nieuwsbrief.
Als u vermoedt dat het RAM-geheugen van uw computer problemen veroorzaakt, is het uitvoeren van een geheugentest een eerste stap in het diagnosticeren en oplossen van het probleem.
Geheugentest uitvoeren in Windows 11 of Windows 10
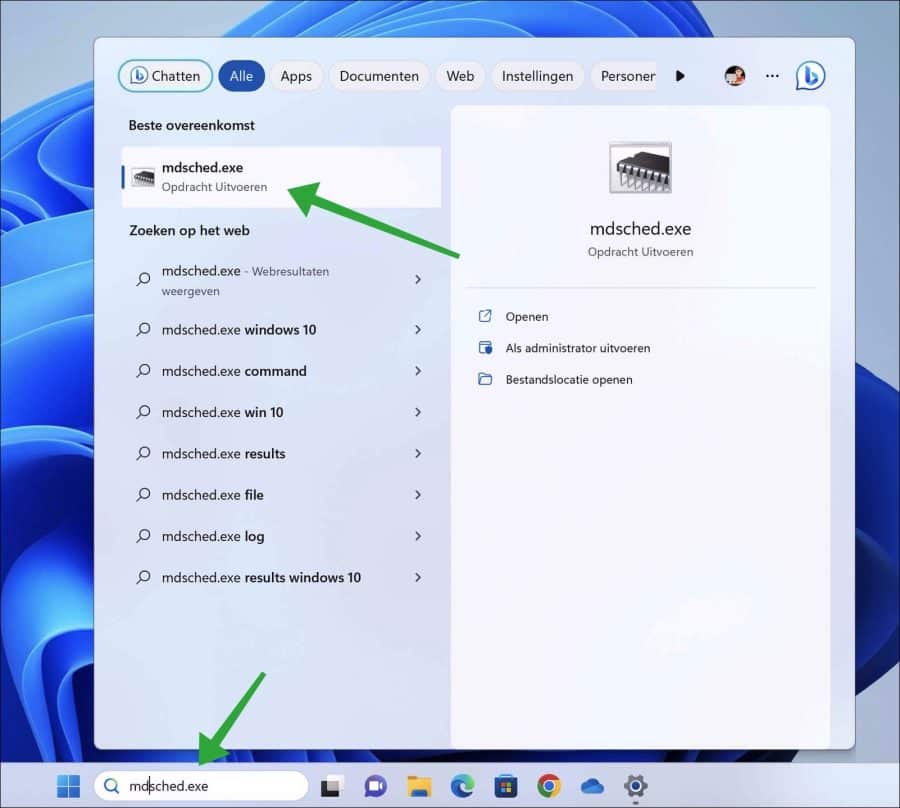
Geheugentest uitvoeren via Zoeken
In de taakbalk klik op zoeken. In het zoeken venster type: mdsched.exe.
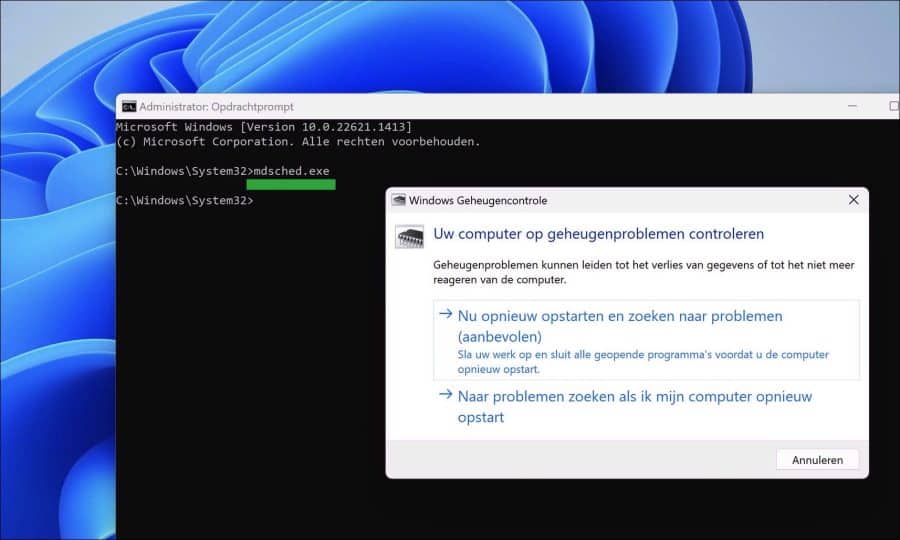
Geheugentest uitvoeren via Opdrachtprompt
Open een Opdrachtprompt als administrator. In het Opdrachtprompt type het commando:
mdsched.exe
Geheugentest uitvoeren via Instellingen
Open de instellingen van uw computer. In het zoek venster type: geheugenproblemen van uw computer vaststellen.
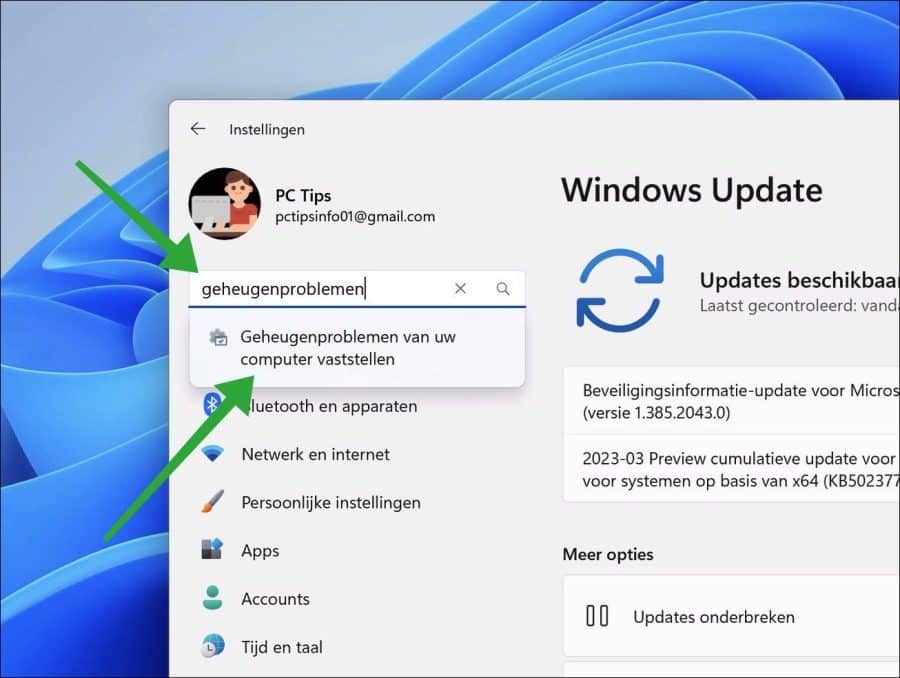
Klik op de link om Windows geheugencontrole uit te voeren.
Als uw geheugen niet slaagt voor een diagnostische test, betekent dit meestal dat er een probleem is met een of meer van de geheugenmodules in uw computer.
U kunt dan enkele dingen doen. Het eerste wat u kunt, is het geheugen fysiek controleren. Dit betekent uw computer behuizing losmaken en de inhoud controleren.
Soms kunnen geheugenmodules losraken of niet goed in hun aansluiting zitten, wat problemen kan veroorzaken. Schakel uw computer uit, haal de stekker eruit en open de behuizing. Zoek de geheugenmodules en haal ze uit de aansluiting. Plaats ze vervolgens weer stevig in de aansluiting en zorg ervoor dat ze vastklikken.
Als het opnieuw plaatsen van de geheugenmodules het probleem niet oplost, heeft u mogelijk een defecte geheugenmodule die moet worden vervangen. U kunt vaststellen welke module het probleem veroorzaakt door elke module afzonderlijk te testen. Verwijder één module tegelijk en voer de geheugentest opnieuw uit. Als de test bij de ene module slaagt en bij de andere niet, moet de defecte module worden vervangen.
Als er een geheugenmodule vervangen moet worden, neem de oude module dan mee naar de winkel en controleer als u een nieuwe koopt dat de specificaties overeenkomen. Hetzelfde type en mogelijk meer geheugencapaciteit. Als u niet heel technisch bent dan vraagt u ondersteuning in de winkel. Het plaatsen van verkeerd geheugen kan direct het geheugen beschadigen. Controleer voordat u nieuw geheugen aanschaft ook uw computerspecificaties en neem deze informatie ook mee.
Ik hoop u hiermee geholpen te hebben. Bedankt voor het lezen!
Help mee
Mijn computertips zijn gratis en bedoeld om andere mensen te helpen. Door deze pc-tip te delen op een website of social media, helpt u mij meer mensen te bereiken.Overzicht met computertips
Bekijk ook mijn uitgebreide overzicht met praktische computertips, overzichtelijk gesorteerd per categorie.Computerhulp nodig?
Loopt u vast met uw pc, laptop of software? Stel uw vraag op ons computerforum en krijg gratis computerhulp van ervaren leden en experts.