
De levensduur van de batterij is een cruciale factor voor mobiele apparaten zoals een laptop. Windows biedt een diagnose-instrument genaamd “SleepStudy”, dat inzicht biedt in het energieverbruik en het gedrag van het systeem tijdens de moderne slaapstand.
Wat is de Moderne Slaapstand?
Voordat we de diepte ingaan met SleepStudy, is het essentieel om de moderne slaapstand te begrijpen. Het is een energiezuinige staat waarin een Windows-apparaat snel kan ontwaken en tegelijkertijd verbonden kan blijven met het netwerk, vergelijkbaar met de slaapstand van smartphones. Hierdoor kan het apparaat achtergrondtaken uitvoeren, zoals bijvoorbeeld het bijwerken van updates, zonder de gebruiker te storen.
Wat is SleepStudy?
SleepStudy is een ingebouwd hulpmiddel in Windows 11 en 10 die het energieverbruik en de activiteit van het systeem tijdens de moderne slaapstand analyseert. Het doel is om te identificeren welke processen of hardwarecomponenten de meeste energie verbruiken tijdens deze periodes.
Meld u dan aan voor onze nieuwsbrief.
Door de activiteiten en het energieverbruik tijdens de slaapstand te begrijpen, kunnen gebruikers en IT-beheerders:
- Probleem applicaties of -processen identificeren die de batterij onnodig leeg laten lopen.
- De instellingen van het apparaat optimaliseren voor een langere batterijduur.
- Meer inzicht krijgen in het algehele energiebeheer van het systeem.
Hoewel SleepStudy een handig hulpmiddel is, werkt het alleen op apparaten die moderne slaapstand ondersteunen. Het is niet beschikbaar op oudere Windows-systemen of op systemen die deze specifieke slaapstandmodus niet ondersteunen.
Houdt er altijd rekening mee dat hoewel SleepStudy het energieverbruik tijdens de moderne slaapstand traceert, kan de werkelijke batterijduur ook worden beïnvloed door andere factoren zoals hardware, batterijconditie, externe apparaten en meer.
SleepStudy analyse maken in Windows 11 of 10
Om te beginnen opent u een Opdrachtprompt als administrator. Zoek op “cmd.exe” via de taakbalk. Klik vervolgens op “als administrator uitvoeren”.
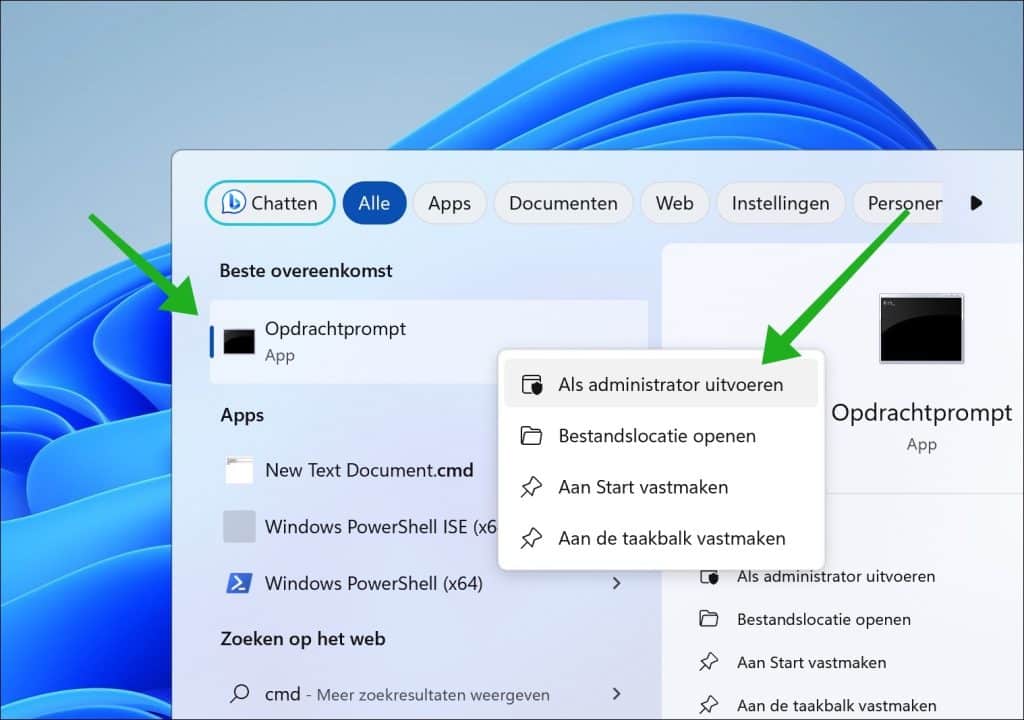
Kopieer en plak onderstaande regel in het Opdrachtprompt venster:
powercfg /SleepStudy /output %USERPROFILE%\Desktop\sleepstudy-analyse.html
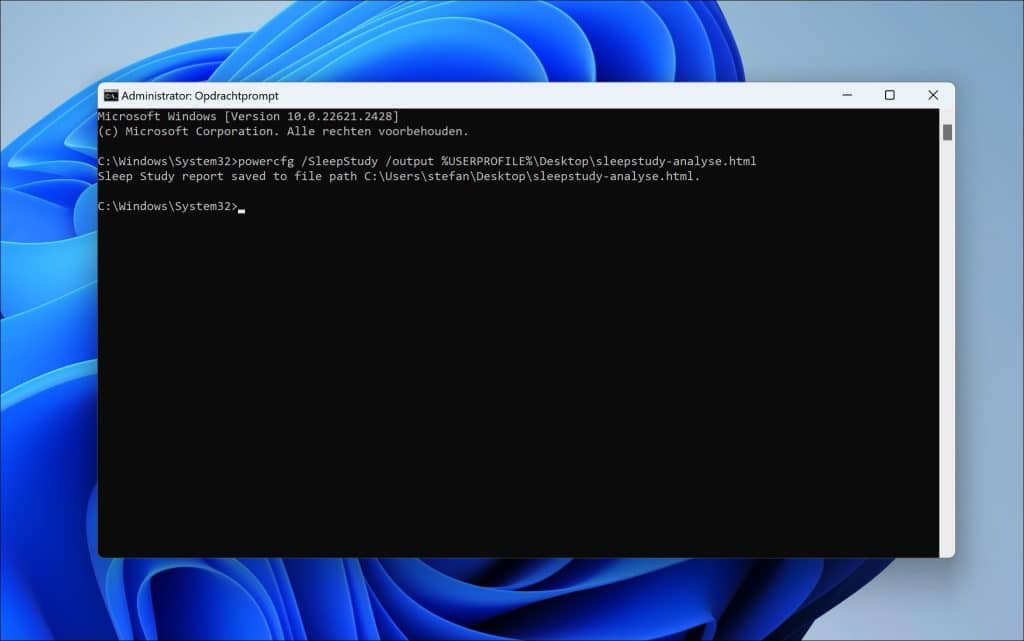
Er wordt nu een SleepStudy analyse geplaatst op het bureaublad van het profiel waarmee u bent ingelogd. Dit bestand heet “sleepstudy-analyse.html”.
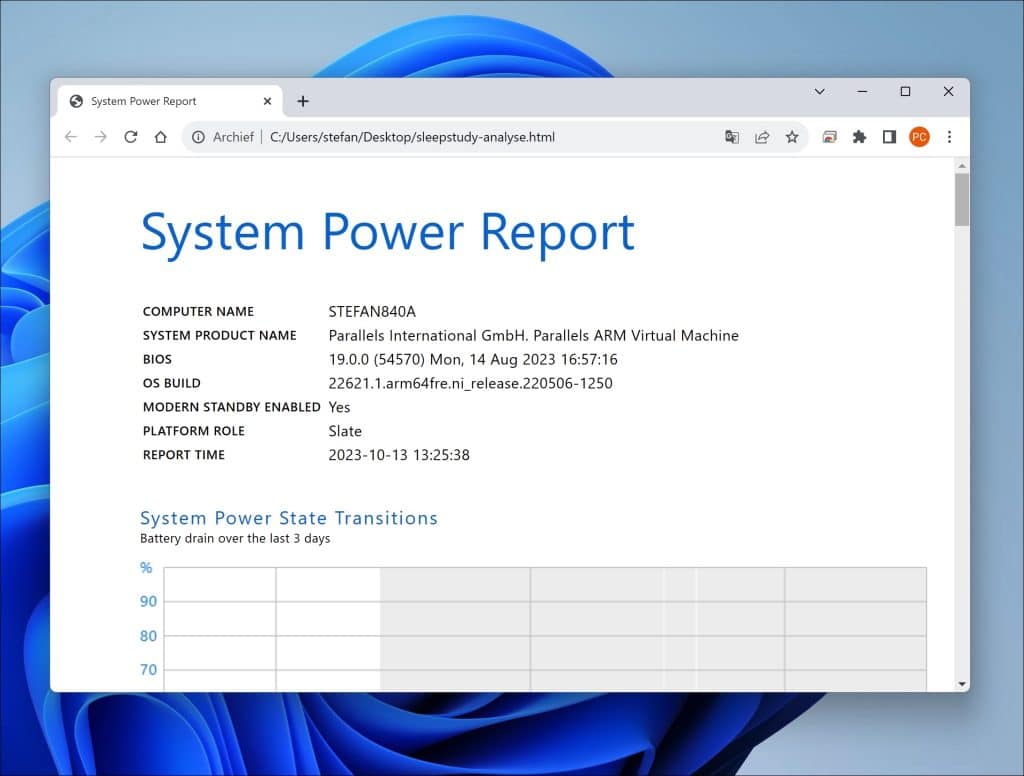
Rapport informatie
Het overzicht bevat de volgende basisinformatie:
- Sessienummer: Dit begint bij één en telt op voor elke sessie die in het rapport wordt vermeld. Standaard gaat dit overzicht over de laatste drie dagen.
- Starttijd: De datum en tijd wanneer een sessie begint, weergegeven als YYYY-MM-DD HH:MM:SS. Als er meerdere sessies op dezelfde dag zijn, wordt de datum niet herhaald.
- Duur: Hoe lang de computer in de moderne slaapstand was, aangegeven in uren, minuten en seconden.
- Energieverandering: Laat zien hoeveel energie (in milliwatt-uren) er is verbruikt en wat dit is als percentage van de batterijcapaciteit. Als er geen verandering in de batterij is, ziet u een streepje (-).
- Veranderingspercentage: Hoe snel de energie verandert, aangegeven in milliwatt, en of de computer aan het opladen (AC) was of de batterij gebruikte (DC).
- % Tijd in Laag Energieverbruik: Toont hoe lang de computer in de meest energiezuinige modus was. Dit is vooral relevant voor bepaalde computers met Intel of Qualcomm chips.
Het is ook goed om te weten dat:
- Sessies korter dan tien minuten worden niet weergegeven in het rapport.
- Als u de echte prestaties van de slaapstand wilt begrijpen, kijk dan naar sessies langer dan tien minuten. Sessies die langer dan een uur duren, geven een beter beeld van de gebruikerservaring.
- Energieverandering wordt niet bijgehouden wanneer de computer wordt opgeladen (AC). Dit komt omdat de energie-instellingen anders zijn wanneer de computer aan het stroomnet is aangesloten dan wanneer hij op de batterij werkt.
- Elke rij in het overzicht is een link die u meer details geeft over die specifieke sessie in het SleepStudy rapport.
Geavanceerde opties
Standaard beslaat het SleepStudy rapport de laatste drie dagen van de systeemwerking. Om de duur van het SleepStudy rapport te wijzigen, gebruikt u de /duration optie van de powercfg.exe tool. Met deze optie voegt u een extra parameter toe, namelijk het aantal dagen (tot een maximum van 28) dat het SleepStudy rapport moet bestrijken.
Bijvoorbeeld, om een SleepStudy rapport te genereren voor de laatste zeven dagen van systeemwerking, opent u een Opdrachtprompt als administrator en voert u het volgende commando in:
powercfg /sleepstudy /duration 7
Ik hoop u hiermee geïnformeerd te hebben. Bedankt voor het lezen!
Lees meer: Krijg Inzicht in het Windows Geheugengebruik met RAMMap.
Help mee
Mijn computertips zijn gratis en bedoeld om andere mensen te helpen. Door deze pc-tip te delen op een website of social media, helpt u mij meer mensen te bereiken.Overzicht met computertips
Bekijk ook mijn uitgebreide overzicht met praktische computertips, overzichtelijk gesorteerd per categorie.Computerhulp nodig?
Loopt u vast met uw pc, laptop of software? Stel uw vraag op ons computerforum en krijg gratis computerhulp van ervaren leden en experts.