
In Windows 10 kunt u de computer zo instellen dat er extern verbinding gemaakt kan worden via een VPN. Op deze manier kunt u de bestanden, mappen of andere computers raadplegen als u extern verbonden bent.
Om extern verbinding te maken met uw lokale netwerk moet u Windows 10 zo instellen dat het werkt als een VPN. De verbinding wordt dan via het internet versleuteld en stelt andere computers instaat via een VPN lokale bestanden, mappen e.d. op het privénetwerk te raadplegen.
* Enige technische kennis van netwerken, IP-adressen en routerinstellingen vereist.
Meld u dan aan voor onze nieuwsbrief.
Windows 10 instellen als VPN server
Als eerste moet u weten wat uw IP-adres is om er verbinding mee te kunnen maken. Dit heeft een extern IP-adres en is het IP-adres wat uw internetprovider heeft toegewezen aan uw router.
Extern IP-adres opzoeken
Open een browser. Ga naar “myip.com” en noteer wat uw extern IP-adres is.
PPTP poort openen in de router
Als u het extern IP-adres heeft genoteerd, dan dient u in de router instellingen de poort “1723” Point-to-Point Tunneling Protocol (PPTP) te openen (“port forwarding”). Deze instellingen wijzigt u in de router instellingen zelf. Hiervoor moet u dus eerst de beheerdersinstellingen van uw router openen via het router IP-adres.
Eventueel kunt u nog DDNS instellen om een hostnaam aan te maken in plaats van een IP-adres.
VPN server aanmaken
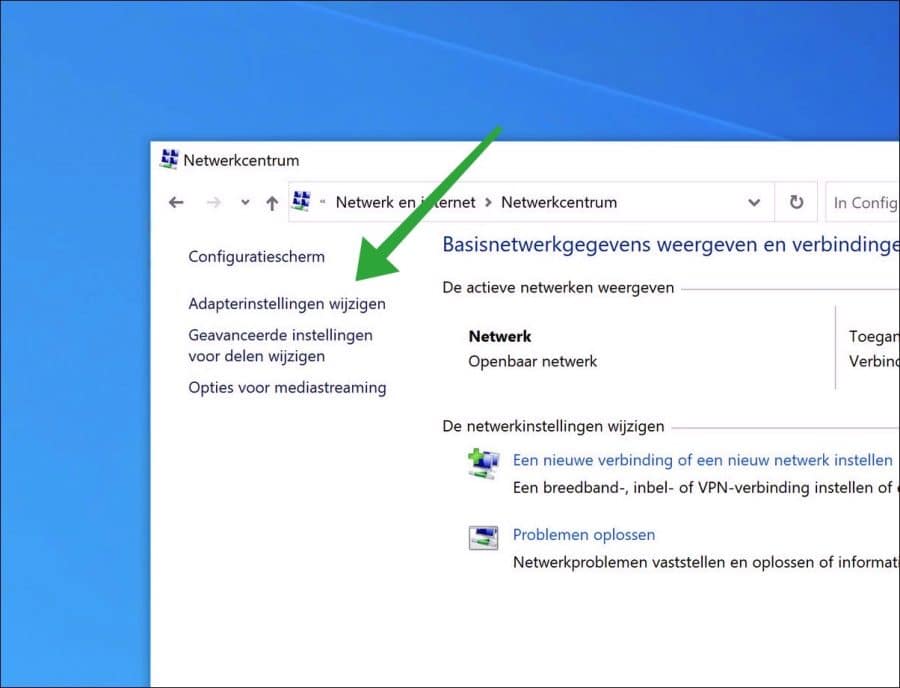
Om een VPN server aan te maken in Windows 10 opent u het Configuratiescherm. In het configuratiescherm klikt u op “Netwerk en internet” en vervolgens op “Netwerkcentrum”.
In het linkermenu klik op “Adapterinstellingen wijzigen”.
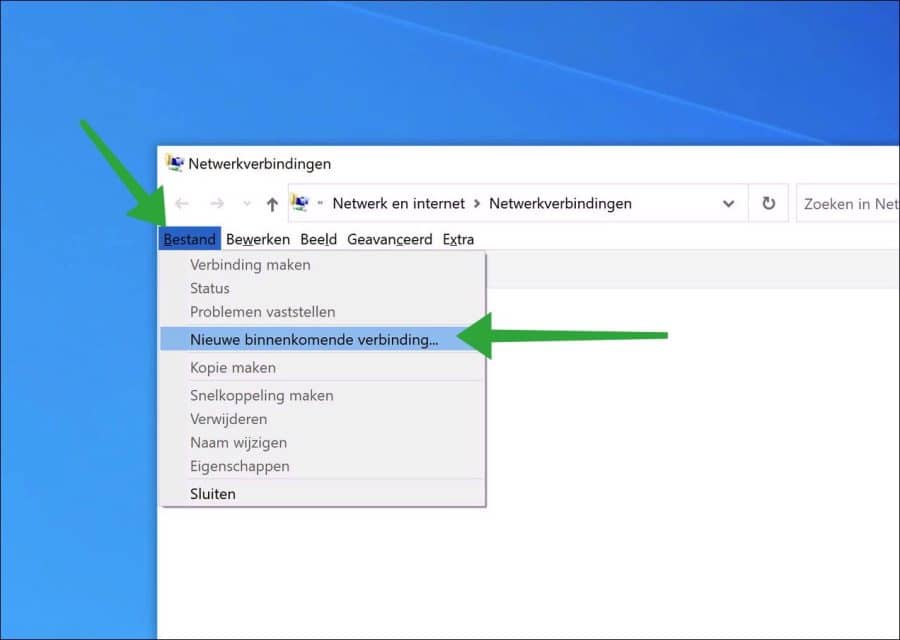
Druk nu op de ALT toets. U kunt nu in het menu op “Bestand” en vervolgens op “Nieuwe binnenkomende verbinding” klikken.
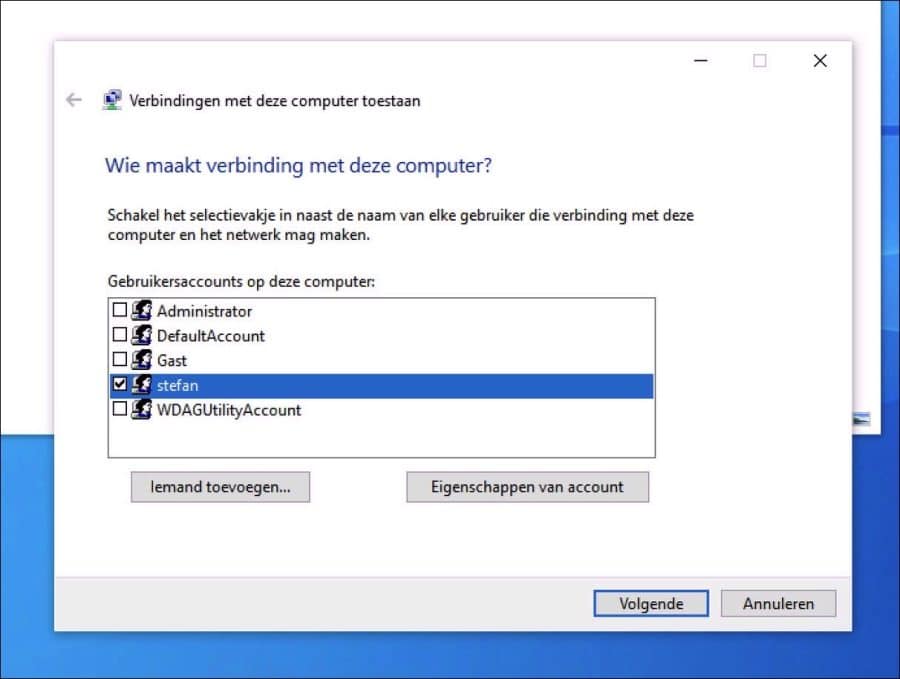
Selecteer nu de gebruiker(s) die verbinding mogen maken met deze computer en het netwerk. Als u een andere gebruikt wilt toevoegen klikt u op “Iemand toevoegen”.
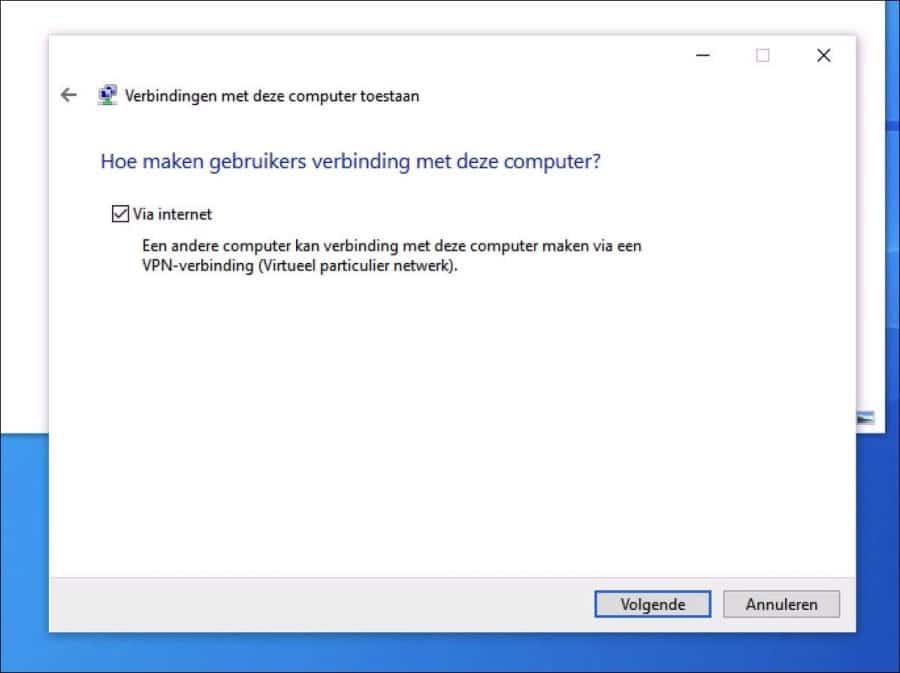
Selecteer de optie “via internet”. Hiermee kan een andere computer verbinden met deze computer via een VPN-verbinding.
Selecteer “Internet protocol versie 4” en klik op de “Eigenschappen” knop.
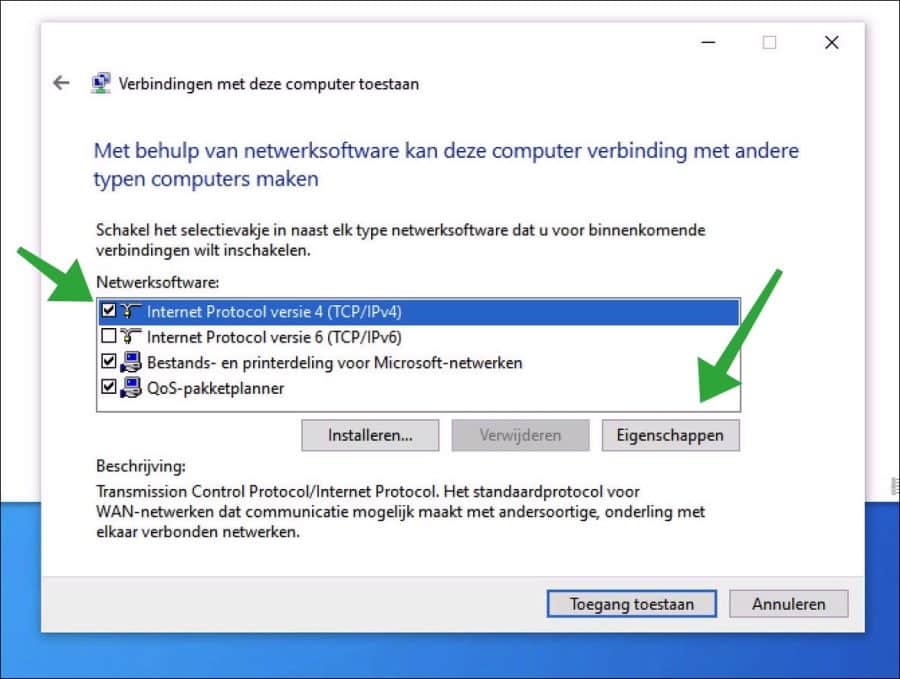
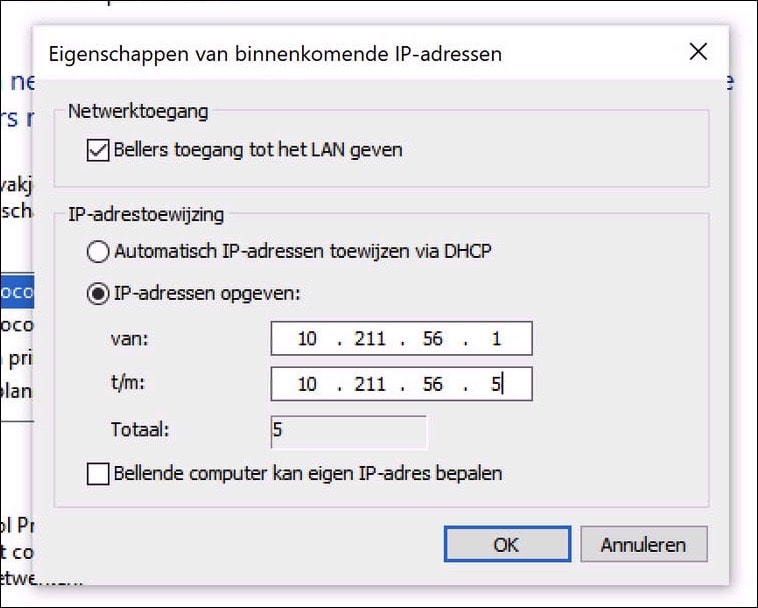
U kunt nu IP-adressen toewijzen aan “bellers” die toegang krijgen tot het LAN. Afhankelijk van hoeveel computers er mogen verbinden stelt u het een IP-adres reeks in. U ziet nu “totaal” het totaal aantal clients dat mag verbinden. Het IP-adres wordt vervolgens toegewezen aan de reeks die u heeft ingesteld.
Het is belangrijk dat u hier de correcte reeks van IP-adressen opgeeft om conflicten op uw netwerk te voorkomen. Heeft u router de reeks “10.211.55.1-255” kies dan altijd 1 reeks hoger, bijvoorbeeld (zoals in dit voorbeeld) “10.211.56.1-5”. Nogmaals, dit is een voorbeeld. Ook DHCP is mogelijk. Enige kennis van netwerken vereist.
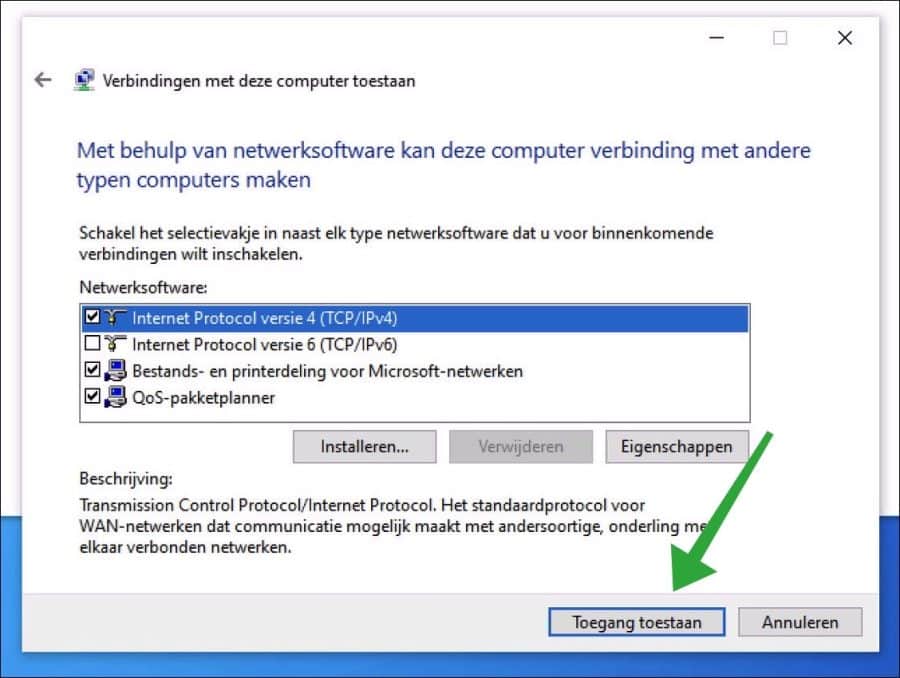
Bevestig door op de knop “Toegang toestaan” te klikken.
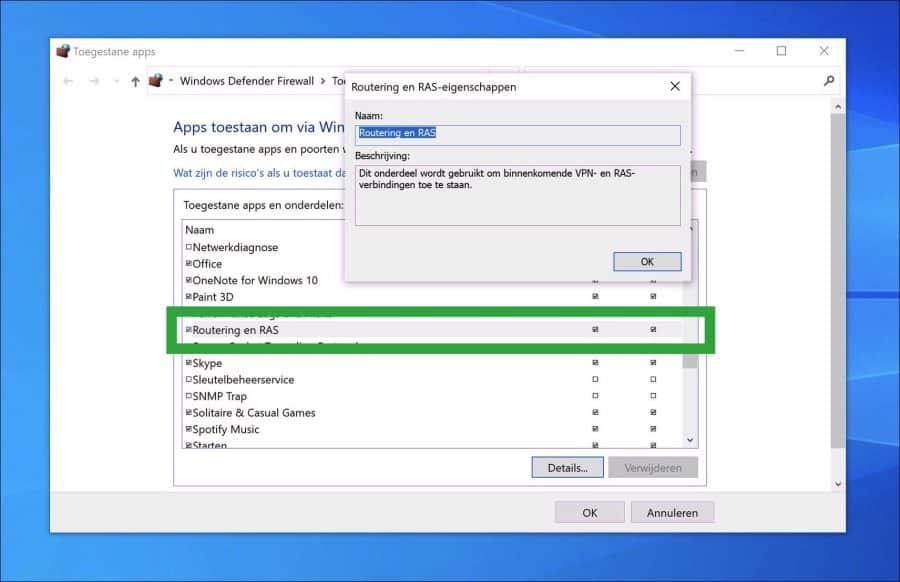
In de firewall is nu een uitzondering toegevoegd voor de “Routering en RAS” services. Deze zijn toegepast op het publiek en privé netwerkprofiel. Windows opent deze instellingen zelf en zorgt ervoor dat de firewall nu inkomende verbindingen kan accepteren.
Windows 10 is nu zo ingesteld dat het VPN verbindingen kan ontvangen.
VPN-verbinding aanmaken op client
Het instellen van de VPN-server vereist bepaalde netwerkinstellingen die afhankelijk van de geconfigureerde netwerkinstellingen inzicht vereist over hoe u LAN is ingesteld met router instellingen. U kunt deze gids dus gebruiken als referentie, maar niet precies overnemen.
U dient nu een VPN-verbinding aan te maken op de computer die gaat verbinden met deze VPN-server. Dit is hoe u een client instelt (een andere computer of apparaat).
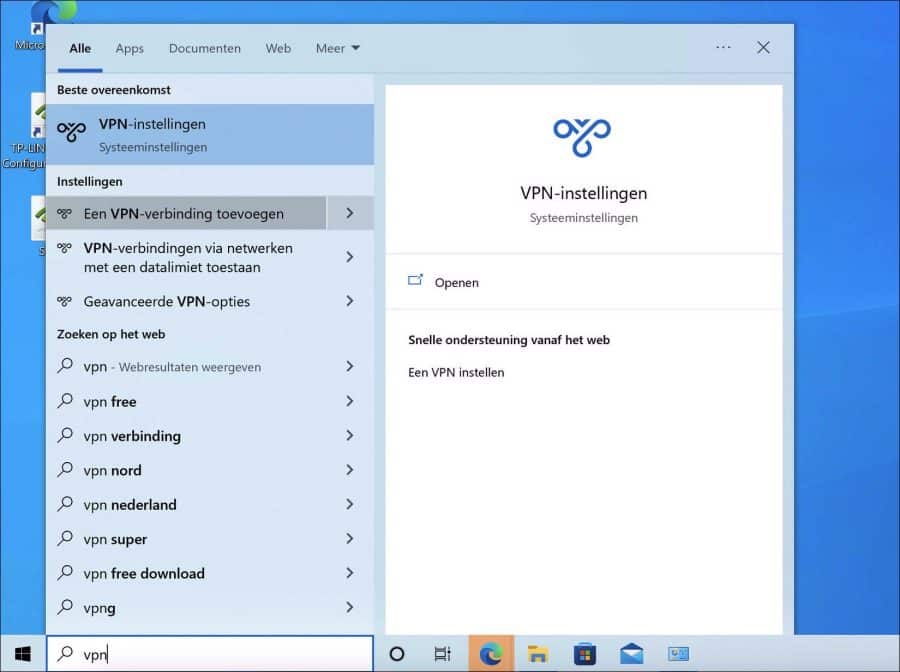
In de zoekbalk type: vpn. Klik op “een vpn verbinding” toevoegen.
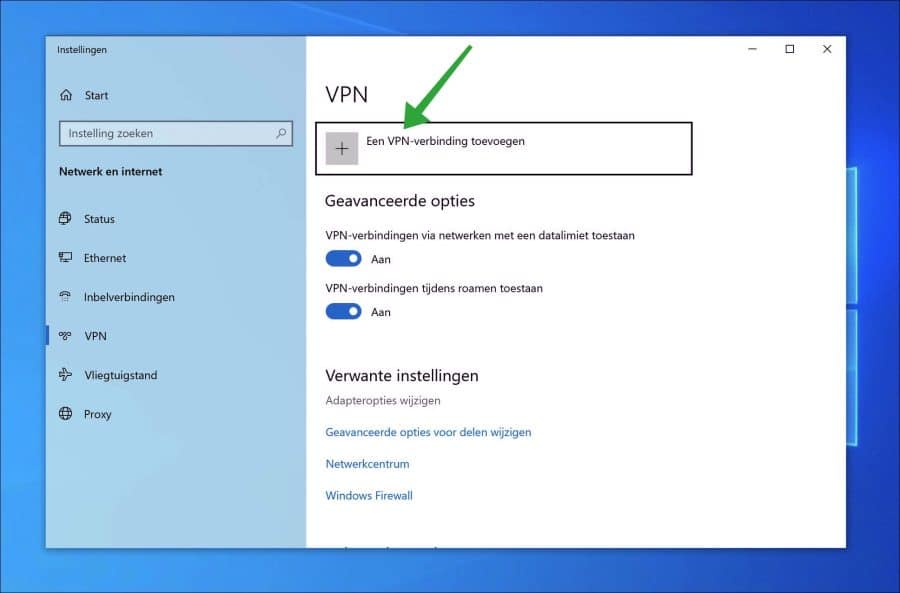
Klik nogmaals op de knop “Een VPN-verbinding toevoegen”.
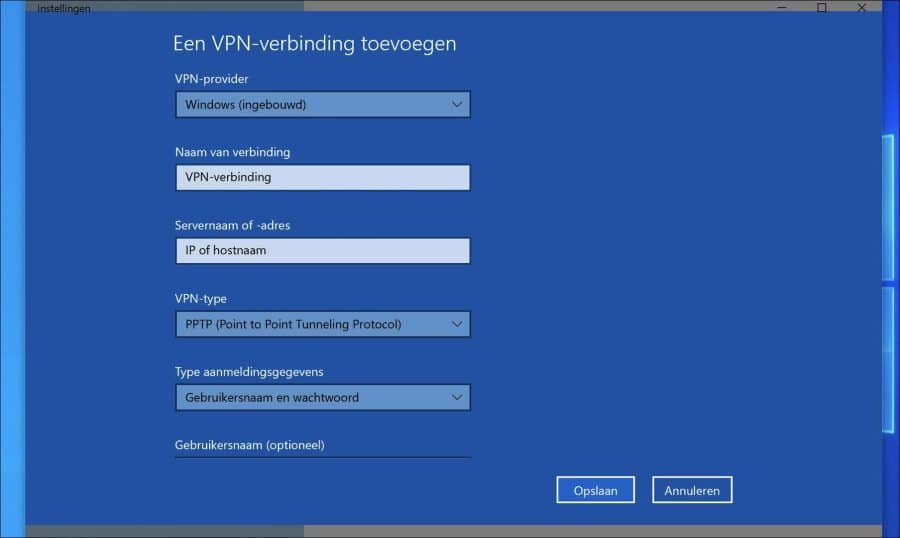
Geef de aanmeldingreferenties in om verbinding te maken met de VPN-server. Dit is een VPN provider, de zelf gekozen naam voor een de VPN-verbinding, de servernaam of het IP-adres en het VPN type (meestal PPTP).
Afhankelijk van de server specificaties stelt u de VPN-verbinding zo in dat er verbinding kan worden gemaakt. Klik op “Opslaan”.
Als u alles correct heeft ingesteld dan klikt u op “verbinding maken”. Er wordt nu verbinding gemaakt met de VPN-server.

Lees ook: VPN verbinding aanmaken in Windows 11.
Ik hoop u hiermee geholpen te hebben. Bedankt voor het lezen!
Help mee
Mijn computertips zijn gratis en bedoeld om andere mensen te helpen. Door deze pc-tip te delen op een website of social media, helpt u mij meer mensen te bereiken.Overzicht met computertips
Bekijk ook mijn uitgebreide overzicht met praktische computertips, overzichtelijk gesorteerd per categorie.Computerhulp nodig?
Loopt u vast met uw pc, laptop of software? Stel uw vraag op ons computerforum en krijg gratis computerhulp van ervaren leden en experts.