

Are you experiencing slow performance of your Windows computer and want to speed it up? A slow computer can be the result of several factors. It may be that your system has become overloaded with software over time, or that the hardware no longer meets today's requirements. There are countless reasons why a computer becomes slower. It is crucial to first identify the underlying causes of this delay before taking action.
Your hardware may not provide the performance you need, or Windows applications may be causing slowdowns. Before you jump to randomly adding or upgrading hardware, it's essential to accurately determine the specific cause of your computer's slowness. By tackling the problem at its root, you can implement targeted solutions without unnecessary expenditure.
In this comprehensive article, we will guide you through the steps to determine what is causing a slow Windows system. We discuss different methods to improve performance, from cleaning your system to upgrading hardware, and how to make your PC more efficient. With this information, you can not only speed up your computer, but also ensure a more sustainable and stable performance in the long term.
How to Speed Up Your Windows Computer (Detailed Instructions)
Identify software that slows down your Windows PC
To determine which processes are most taxing on your computer's performance, the Windows task management (Task Manager) an essential tool. This utility gives you a detailed overview of all running processes and how much system resources they consume.
You can open the Windows Task Manager by right-clicking on the taskbar and then selecting 'Task Manager' from the context menu. An alternative method is to use the key combination CTRL+ALT+DEL. After pressing these keys simultaneously, a screen will appear with several options, including 'Task Manager'. Choose this option to open the utility.
Once in the Task Manager, you can see a comprehensive overview of all running processes, including applications and background processes. Here you can observe which processes take up a significant portion of system resources such as CPU, memory, and disk usage. This information is crucial for determining which processes may be responsible for slowing down your computer and what actions you can take to improve efficiency.
To check which processes are putting a significant load on your CPU, you can follow these steps in Windows Task Manager:
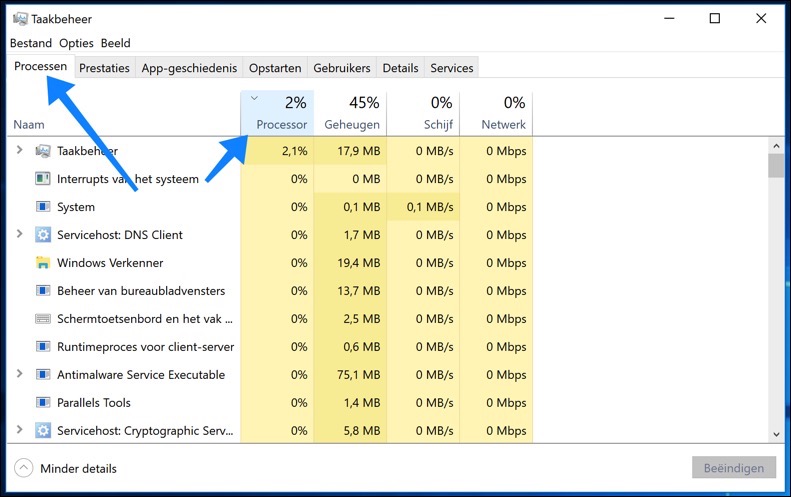
In Task Manager you will find several tabs. Select the 'Processes' tab.
Double-click the "CPU" column heading to sort the processes based on their CPU usage. By doing this, the processes that demand the most from your CPU will appear at the top of the list.
If you recognize a process that is using an excessive amount of CPU and you know that it is not critical to your system, you can select it and click 'End Task' to stop it. If the process is part of a program that you no longer need, consider uninstalling it from your computer.
For a more in-depth analysis of your computer's performance:
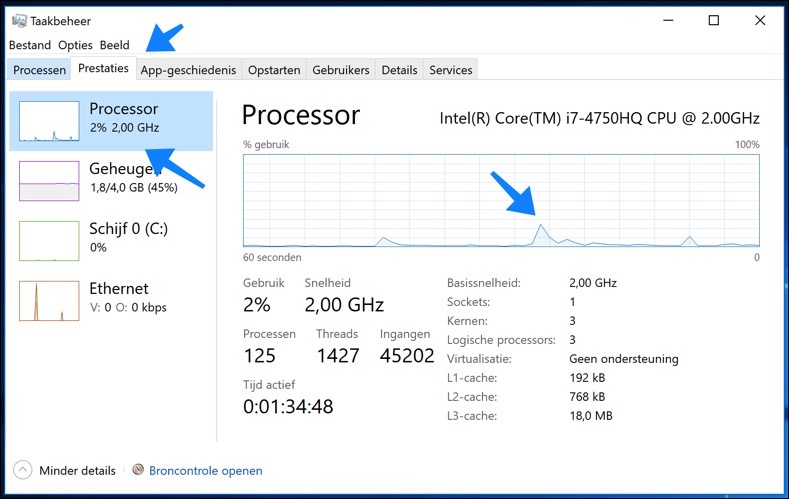
In Task Manager, select the 'Performance' tab.
Click on 'CPU' to get a detailed overview of CPU usage. Here you can see how much of the CPU capacity is being used and the number of active processes.
This information can help you determine if a slow Windows PC is indeed due to excessive CPU usage by certain software. Identifying these heavy processes is an important step in optimizing your computer's performance.
Identify slow Windows processes with Windows Resource Monitor
Start by opening the Task Manager by pressing CTRL+ALT+DEL and selecting "Task Manager," or right-click on the taskbar and choose "Task Manager." Once in the Task Manager, navigate to the 'Performance' tab. This tab provides an overview of the current state of various system resources, such as CPU, memory, and network.
For an even more detailed overview, you can open the Resource Monitor from the 'Performance' tab. At the bottom of this window you will find the option to 'Open Source Control'. This opens a new window that provides a more detailed insight into system resource usage.
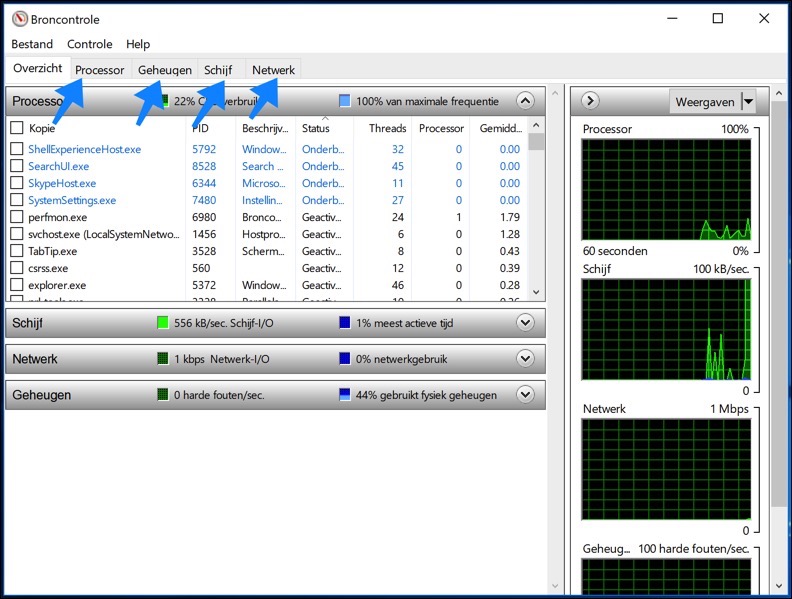
In the Resource Control window you can choose between several tabs: 'CPU', 'Memory', 'Disk', and 'Network'. Each tab shows detailed information about the usage of the respective system resource. For example:
- CPU tab: Here you can see which processes are consuming the most CPU resources. This is useful for identifying which applications or background processes may be slowing down your system.
- Memory tab: This tab shows how much of your physical memory (RAM) is in use by different processes. This will help you determine if your system would benefit from additional memory.
- Disk tab: Here you can check which processes perform the most reads and writes on your hard drive. This is especially useful to see if your hard drive is a bottleneck.
- Network tab: This provides insight into how much network traffic is generated by different processes, which can be useful in detecting unusual network behavior or identifying bandwidth-intensive applications.
Windows Resource Monitor allows you to monitor individual processes in detail and view their impact on your system resources. This is done via real-time statistics and graphs on the right side of the window. Suppose you identify a process that is making excessive demands on your system resources, such as CPU or memory. When you finish this process and then see a drop in resource usage as shown by the graphs, it indicates that this particular process had a significant impact on your computer's performance.
If you want more information about a particular process, such as an .EXE file, Windows Resource Monitor provides a useful feature. You can right-click on the process in question and select 'Search Online'. This will automatically open a web browser with a search for the selected file. This search can provide you with useful information about the purpose of the file, its origin, and whether it is associated with known software or potentially malicious programs.
This process of monitoring, analyzing, and investigating helps you better understand which processes are essential to your system and which processes may be redundant or even harmful.
Clean up Windows with Disk Cleanup
To clean your Windows PC efficiently and regularly, it is recommended to use the Windows Disk Cleanup tool. This tool helps free up disk space by deleting temporary files, system files and various unnecessary items stored by the system. This can significantly improve the overall speed and performance of your computer.
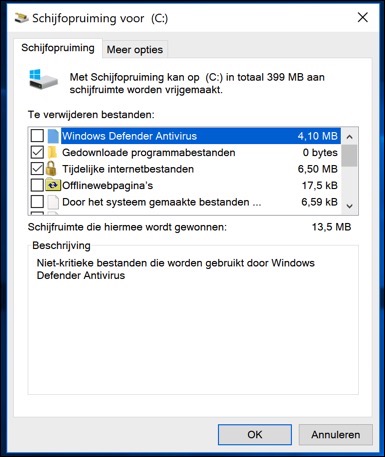
You can open Disk Cleanup by typing "Disk Cleanup" in the search bar of the Windows taskbar. Once you select 'Disk Cleanup' from the search results, a window will open. This window gives you an overview of file types that you can delete, such as temporary Internet files, system memory dumps, temporary Windows files, and Recycle Bin contents.
Each item is accompanied by a description so you can make an informed choice about what to delete. Once you have selected the items you want, click 'OK' to start the cleanup. Disk Cleanup first calculates how much disk space you will save and then asks for confirmation before deleting the selected files.
In addition to deleting temporary files, Disk Cleanup also offers the option to clean up old system files, including previous Windows installations, which can often take up a significant amount of space. This is especially useful after updating your system to a new version of Windows.
Defrag hard drive
In Windows operating systems, fragmentation can occur when files are stored in chunks in different locations of the hard drive rather than in a contiguous block. This results in slower access times because the drive's read/write head must make more movements to read or write the file fragments. To improve the performance of your PC, it is important to regularly check whether your hard drive is defragmented and optimized.
To check the status of defragmentation on your Windows computer and, if necessary, perform the defragmentation process manually, you can follow these steps:
Click the Start button, type "Defrag" in the search field and select "Defrag and Optimize Drives" from the search results. This will open the defrag utility.
In this utility you can see which drives are set for regular defragmentation. You can check the status of each drive and see when it was last optimized. If you find that a drive needs defragmentation, you can start this process manually.
However, it is important to note that SSDs (Solid State Drives) do not require defragmentation. SSDs store data in flash memory cells and have no moving parts, so access times are not affected by fragmentation like traditional hard drives. On the contrary, defragging an SSD can unnecessarily shorten the drive's lifespan due to excessive writing. Windows usually automatically recognizes an SSD and will disable the defragmentation option for these drives.
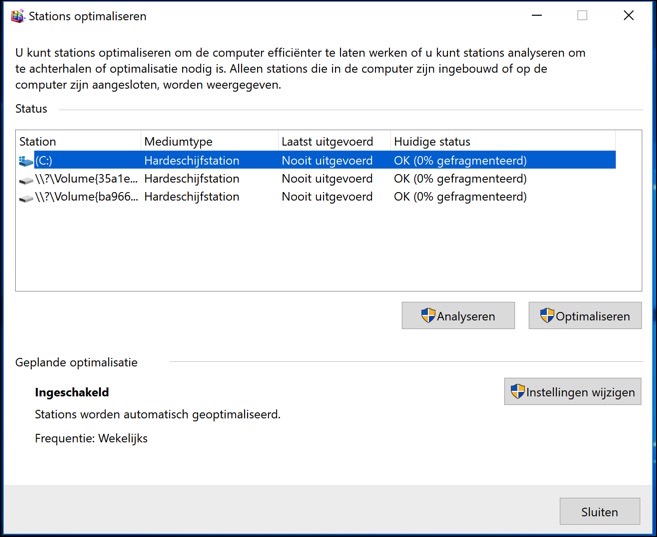
If the drive has a fragmentation score of 5% or higher, you should optimize the hard drive by pressing 'Optimize'.
Disable file indexing
Windows creates indices of files and folders to improve the speed of searches within the system. This feature is especially useful if you regularly search for files on your computer. However, the process of indexing itself can consume system resources, which can lead to a reduction in overall performance, especially on computers with limited hardware capabilities or when indexing large amounts of data.
If you want to improve your PC's performance by disabling indexing, follow these steps:
Click the File Explorer icon on your taskbar, or press the Windows key + E.
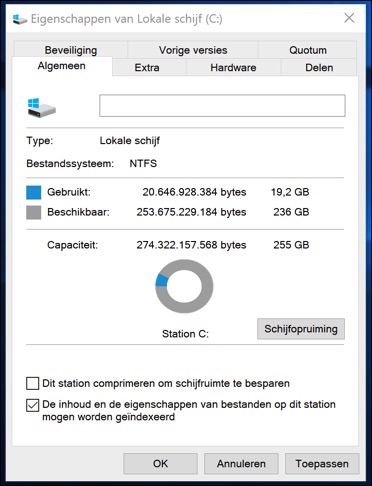
In Explorer, click on 'This PC' to see an overview of your available drives. Right-click on the drive where Windows is installed (usually the C: drive) and select "Properties" from the context menu.
In the window that opens, you will find a tab with detailed information about your hard drive. Uncheck the 'Allow the contents and properties of files on this drive to be indexed' box. Choose to apply this setting to all folders and subfolders. This may take some time depending on the amount of data on your drive.
Keep in mind that disabling indexing may lead to slower search results when you try to find files on your system. This is especially noticeable when searching for files within large folders or drives. Therefore, carefully consider whether the potential performance improvement outweighs the potentially slower search function.
In some cases, you can also choose to selectively disable indexing, where you disable indexing only for certain folders or drives that you use less frequently, while keeping indexing active for your most frequently used locations. This strikes a balance between improved system performance and maintaining fast search functionality where you need it most.
Improve visual performance
Windows offers several visual effects to make the user interface more attractive, such as animations when opening and closing windows, transparent borders, and shadow effects. While these effects contribute to a more aesthetically pleasing experience, they can also impact system performance, especially on older or less powerful computers. By reducing or disabling these effects, you can free up valuable system resources, resulting in smoother and more responsive interaction with your Windows system.
To make these adjustments, follow these steps:
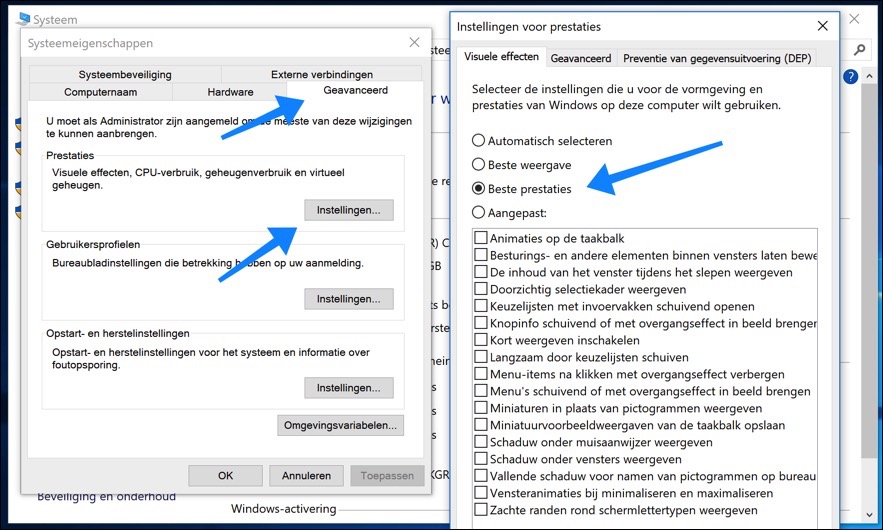
Click the Windows Start button and select "Control Panel," or type "Control Panel" into the search box in the taskbar. In the Control Panel, click 'System and Security' and then 'System'.
Locate and click on 'Advanced system settings', usually found on the left side of the window. In the 'System Properties' window that appears, go to the 'Advanced' tab and then click 'Settings' under 'Performance'.
You will now be taken to the 'Visual Effects' tab, where you can choose between different options for displaying visual effects. Select 'Best Performance' to disable all visual effects, which can improve the speed of your system. You can also select 'Custom' and manually choose which visual effects to keep and which to turn off.
It is important to remember that disabling visual effects will simplify Windows graphics. This can result in a less visually appealing, but functionally faster user experience. This tweak is especially effective for users who prioritize system performance over graphical flair, such as on older computers or for tasks that require a lot of system resources.
Disable Windows Tips and Suggestions
Windows 10 is designed to proactively help and guide users with suggestions and tips about the various features and capabilities of the operating system. These suggestions often appear as notifications or pop-ups and may include tips about new features, recommended settings, and other Windows-related information. However, for users who are already familiar with Windows 10 or prefer a less intrusive experience, these notifications may be annoying.
Disabling these suggestions and tips can help make the user interface less distracting and may also provide slight performance improvements by reducing the number of background processes the system needs to run. To disable this option, follow these steps:
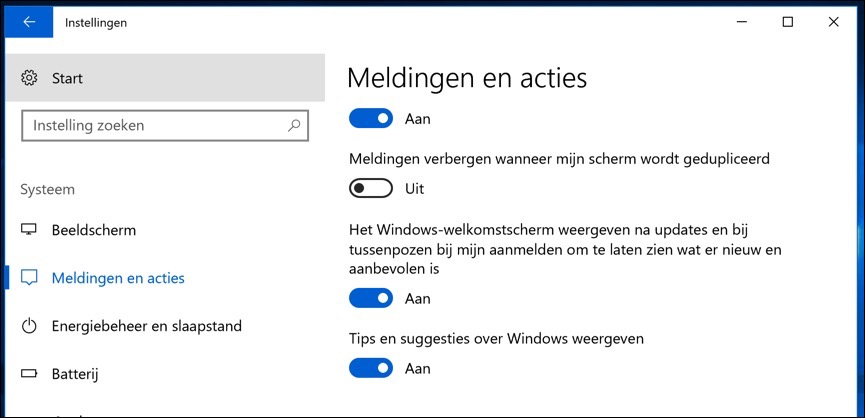
Click the Start button in the bottom left corner of your screen, where you'll find the gear icon for Settings. Click this icon to open Windows 10 settings.
In the settings menu, click on 'System'. On the left side of the screen you will find various options. Select 'Notifications and actions'.
In the 'Notifications and actions' window, scroll down until you find the option 'Show tips and suggestions about Windows'. Disable this option by toggling the switch next to it.
Disabling this feature will reduce the frequency of pop-up notifications and suggestions, which can contribute to a quieter, less distracting computing experience.
I hope this helped you. Thank you for reading!