
Als u de enige gebruiker bent van een computer, dan kunt u het aanmeldscherm uitschakelen. Door het aanmeldscherm uit te schakelen in Windows 10 wordt u direct aangemeld en hoeft u geen wachtwoord in te geven.
Houd er rekening mee dat het uitschakelen van het aanmeldscherm de beveiliging van uw computer kan verminderen, vooral als er gevoelige informatie op staat of als anderen fysieke toegang hebben tot de computer. Het is altijd een goed idee om een back-up van uw gegevens te maken voordat u dergelijke wijzigingen aanbrengt. Dit kunt u doen door een herstelpunt aan te maken.
Er zijn verschillende manieren om het aanmeldscherm uit te schakelen in Windows 10. De eerste manier is via Gebruikersbeheer, de tweede is via het Windows-register en de laatste is via een groepsbeleid. Alle manieren licht ik toe in dit artikel.
Aanmeldscherm uitschakelen in Windows 10
Via gebruikersbeheer
- Druk op de Windows-toets + R om het ‘Uitvoeren’ dialoogvenster te openen.
- Typ ‘netplwiz’ en druk op Enter.
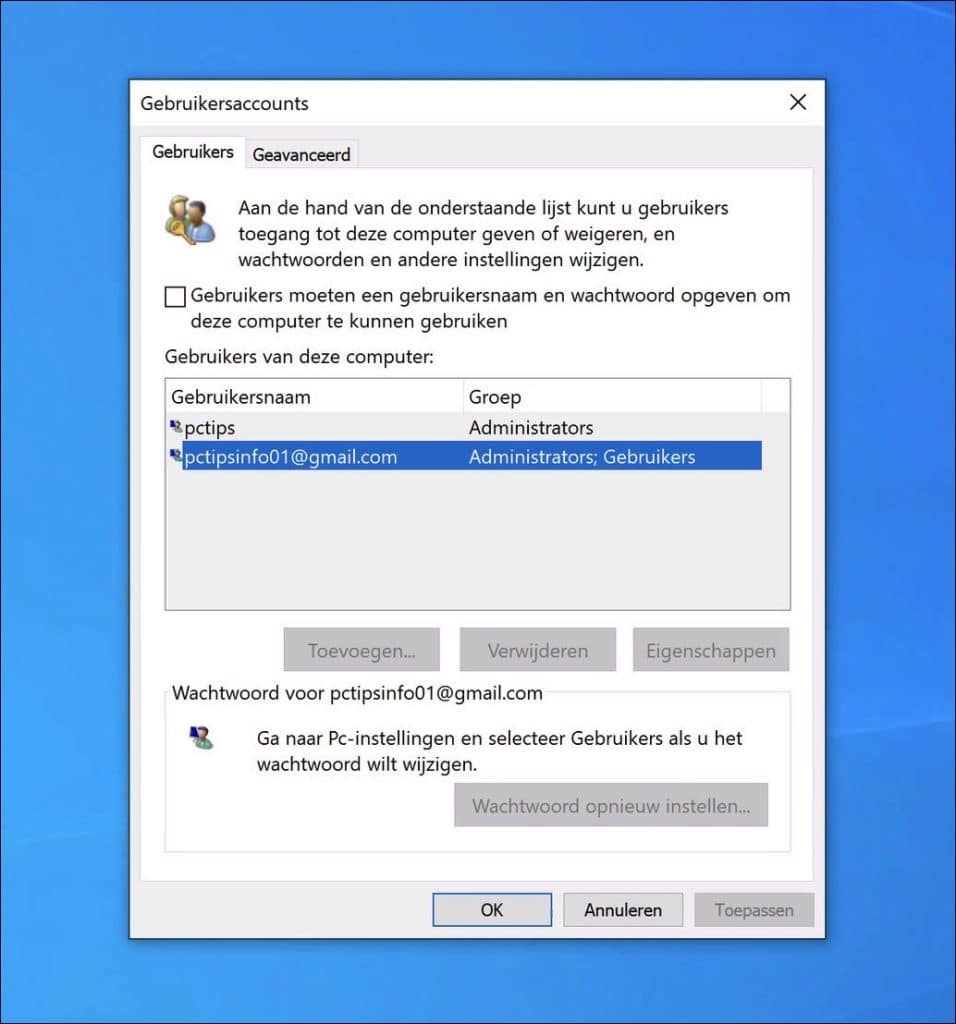
- Het venster “Gebruikersaccounts” opent zich. Hier ziet u een lijst met alle gebruikersaccounts op uw computer.
- Selecteer uw account waarvoor u het aanmeldscherm wilt uitschakelen.
- Bovenin het venster ziet u een optie die zegt “Gebruikers moeten een gebruikersnaam en wachtwoord opgeven om deze computer te gebruiken. Haal het vinkje weg bij deze optie.
- Klik op Toepassen of OK.
- U wordt nu gevraagd om het wachtwoord voor het geselecteerde account in te voeren ter bevestiging. Voer uw wachtwoord twee keer in en klik op OK.
- De volgende keer dat u uw computer opstart, wordt u automatisch aangemeld zonder dat u een wachtwoord hoeft in te voeren.
Via het Windows register
Let op: Het bewerken van het register kan riskant zijn. Maak altijd een back-up van uw systeem voordat u wijzigingen aanbrengt.
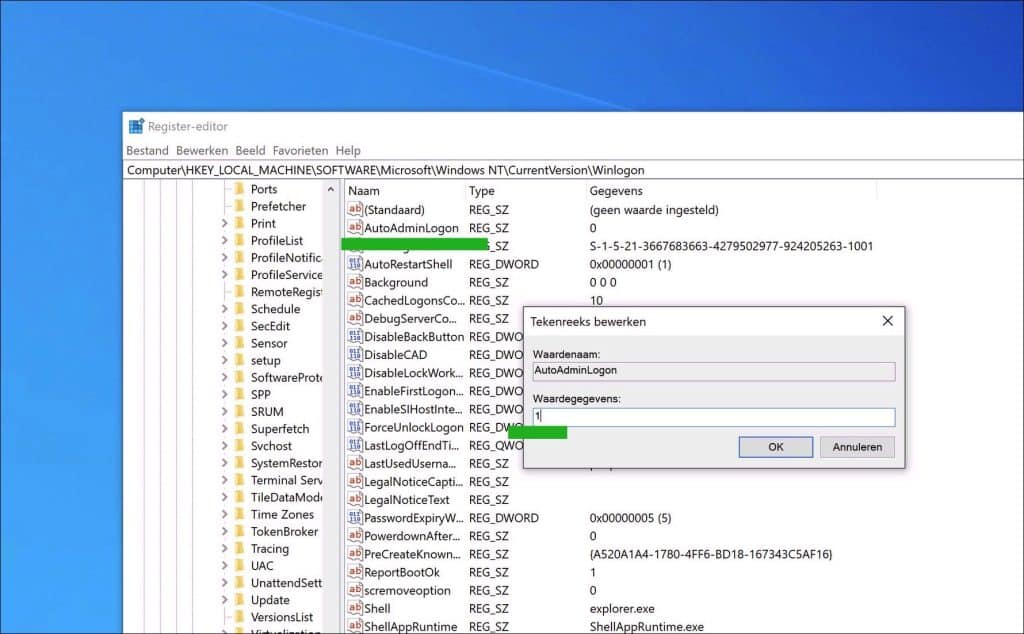
- Druk op Windows-toets + R en typ ‘regedit’. Druk op Enter.
- Navigeer naar:
HKEY_LOCAL_MACHINE\SOFTWARE\Microsoft\Windows NT\CurrentVersion\Winlogon
- Zoek aan de rechterkant naar een item genaamd ‘AutoAdminLogon’ en dubbelklik erop.
- Verander de waarde in 1 en klik op OK.
- Sluit de Register editor.
Via Groepsbeleid
- Druk op Windows-toets + R toetsencombinatie en typ gpedit.msc. Druk op Enter.
- Navigeer naar Computerconfiguratie > Windows-instellingen > Beveiligingsinstellingen > Lokaal beleid > Beveiligingsopties.
- Zoek naar “Interactieve aanmelding: gebruikersnaam niet weergeven op het aanmeldscherm” en zet deze op “Inschakelen”.

Interactieve aanmelding: gebruikersnaam niet weergeven op het aanmeldscherm
Met deze beveiligingsinstelling wordt bepaald of de gebruikersnaam van de persoon die zich bij de pc aanmeldt, wordt weergegeven op het inlogscherm van Windows nadat de referenties zijn ingevoerd en voordat het bureaublad verschijnt. Als dit beleid is ingeschakeld, wordt de gebruikersnaam niet weergegeven.
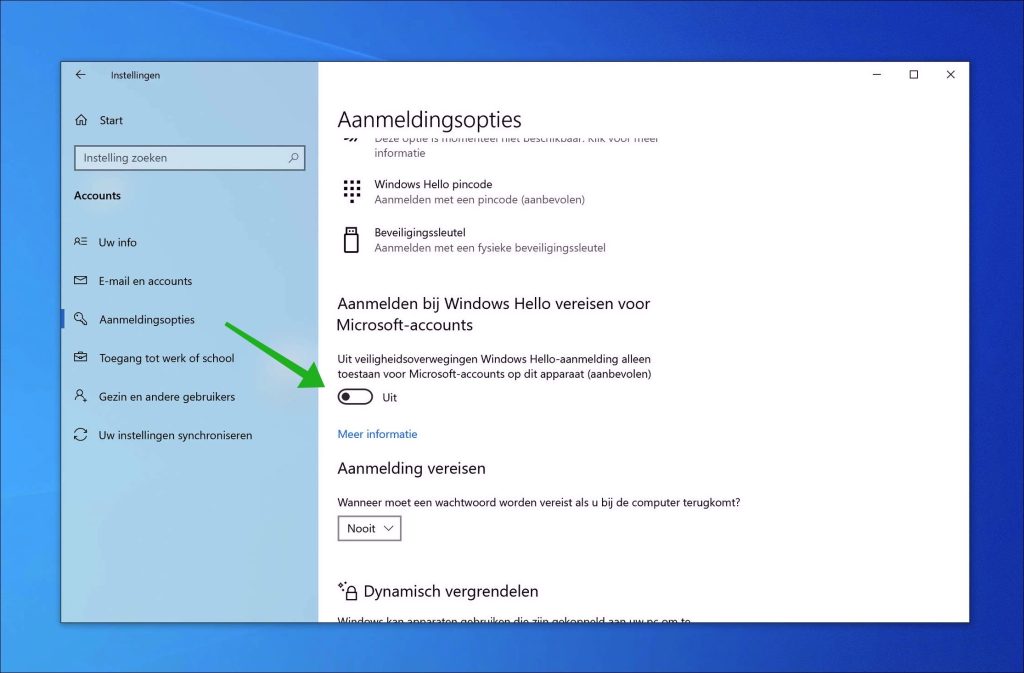
Gebruikers moeten een gebruikersnaam en wachtwoord opgeven om deze computer te gebruiken niet beschikbaar?
Wanneer de optie “Gebruikers moeten een gebruikersnaam en wachtwoord opgeven om deze computer te gebruiken” in netplwiz niet beschikbaar is, dan kunt u Windows Hello vereisen voor aanmelden uitschakelen. Zo werkt het.
- Open de instellingen.
- Klik op ‘Accounts’.
- Klik op ‘Aanmeldingsopties’.
- Schakel de optie ‘Aanmelden bij Windows Hello vereisten voor Microsoft-accounts’ uit.
Ik hoop u hiermee geholpen te hebben. Bedankt voor het lezen!
❤️ Help mee en deel
Voordat u verdergaat, zou ik het waarderen als u overweegt mijn werk te steunen. In tegenstelling tot veel grote websites is er op PC Tips geen betaalmuur die lezers blokkeert, maar daardoor is uw steun des te belangrijker.Als u onafhankelijke initiatieven zoals deze waardeert, overweeg dan alstublieft om mij te steunen, zodat ik kan blijven doen wat ik met plezier doe. Deel mijn website PC Tips op andere websites, social media of binnen uw eigen netwerk. Hartelijk dank.
🙂 Overzicht met computertips
Bekijk ook mijn uitgebreide overzicht met praktische computertips, overzichtelijk gesorteerd per categorie.