
Are you also concerned about your privacy on the Internet? In this article I will explain how to enable DNS over HTTPS in Google Chrome and Firefox.
DNS server stands for Domain Name Server and it is used on the Internet as a server to convert IP addresses to host names. In other words, if you type Google.com into your web browser, you will see an IP address. You will not see that IP address, but you will see the host name (Google.com). The DNS server ensures that Google.com is visible and not the IP address.
What does DNS do over HTTPS?
If you use your own provider's DNS server, it would in theory be possible for your internet provider to monitor which hostnames (websites) your browser is trying to connect to. I say in theory because it rarely happens that an internet provider actually does this.
DNS over HTTPS is recommended in countries where censorship is a problem, such as China, Russia, etc. These types of countries are known for manipulating internet connections on a large scale. DNS over HTTPS makes it a lot more difficult for an internet provider to monitor the websites someone visits.
If you use DNS over HTTPS, you use an external DNS server, not the DNS server of your own internet provider. At the moment these are the DNS servers of Cloudflare or NextDNS.
These external DNS servers have been designated by Mozilla, among others, as DNS administrators who do not manipulate your data. With CloudFlare or NextDNS as an external DNS provider you already have a little more privacy on the internet.
Enable DNS over HTTPS in Google Chrome
Open the Windows Control Panel. Click on Network and Internet. Open the Network and Sharing Center. In the left menu select Change adapter settings.
Select your adapter (Ethernet or Wifi) and right click, select properties. Click on “Internet Protocol version 4”. Open the Properties from the menu.
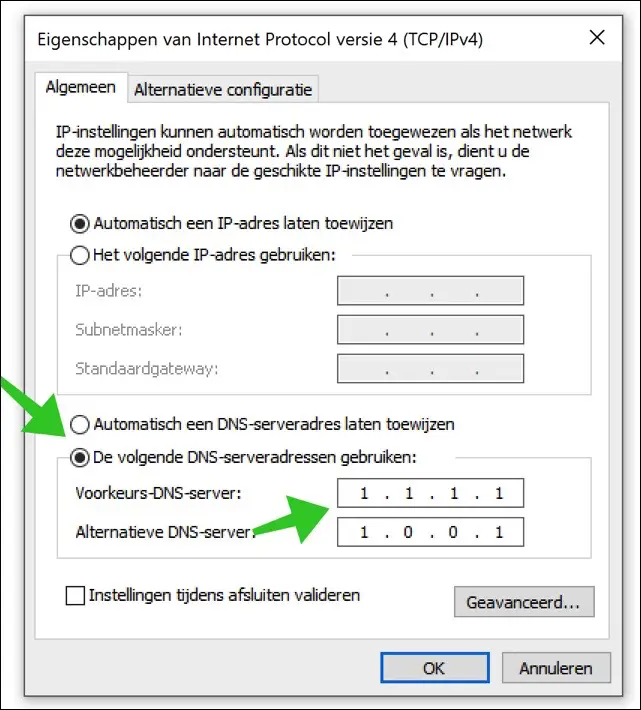
Change the DNS settings to
preferred DNS: 1.1.1.1 and alternate DNS 1.0.0.1. Click OK to save the settings.
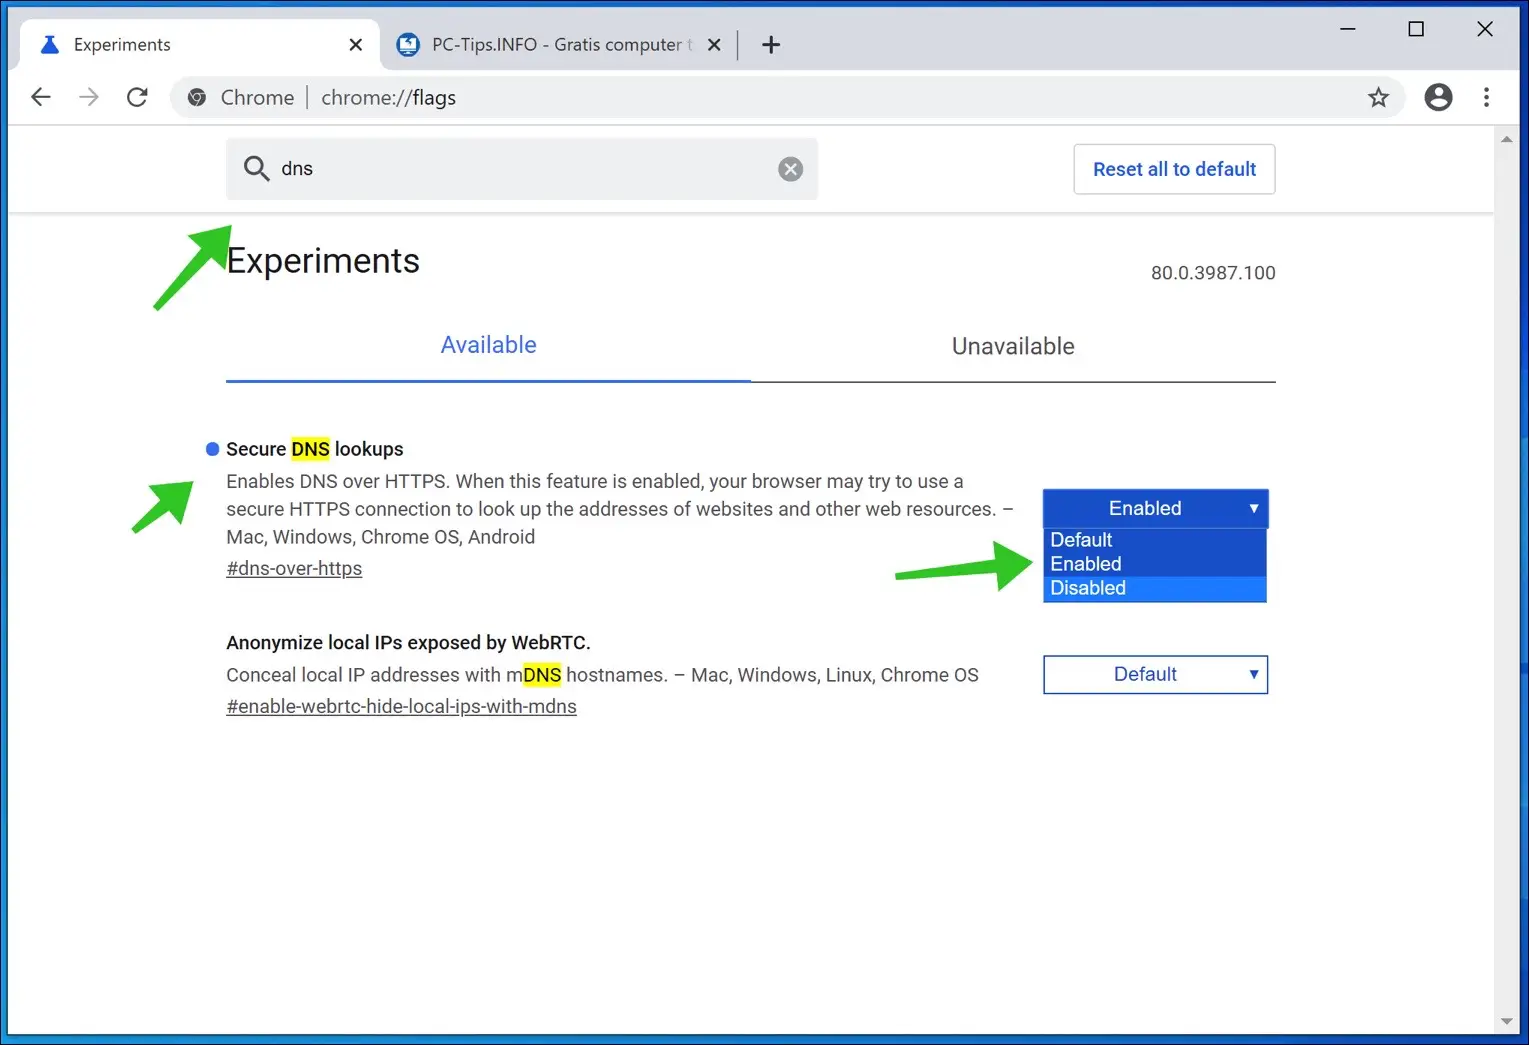
Now open Google Chrome, in the address bar type: chrome://flags/
Search for “Secure DNS lookups” in the search bar. Change the setting to Enabled instead of Default.
Google Chrome now starts with Cloudflare as the DNS server by default. You can select your own DNS server from the following list.
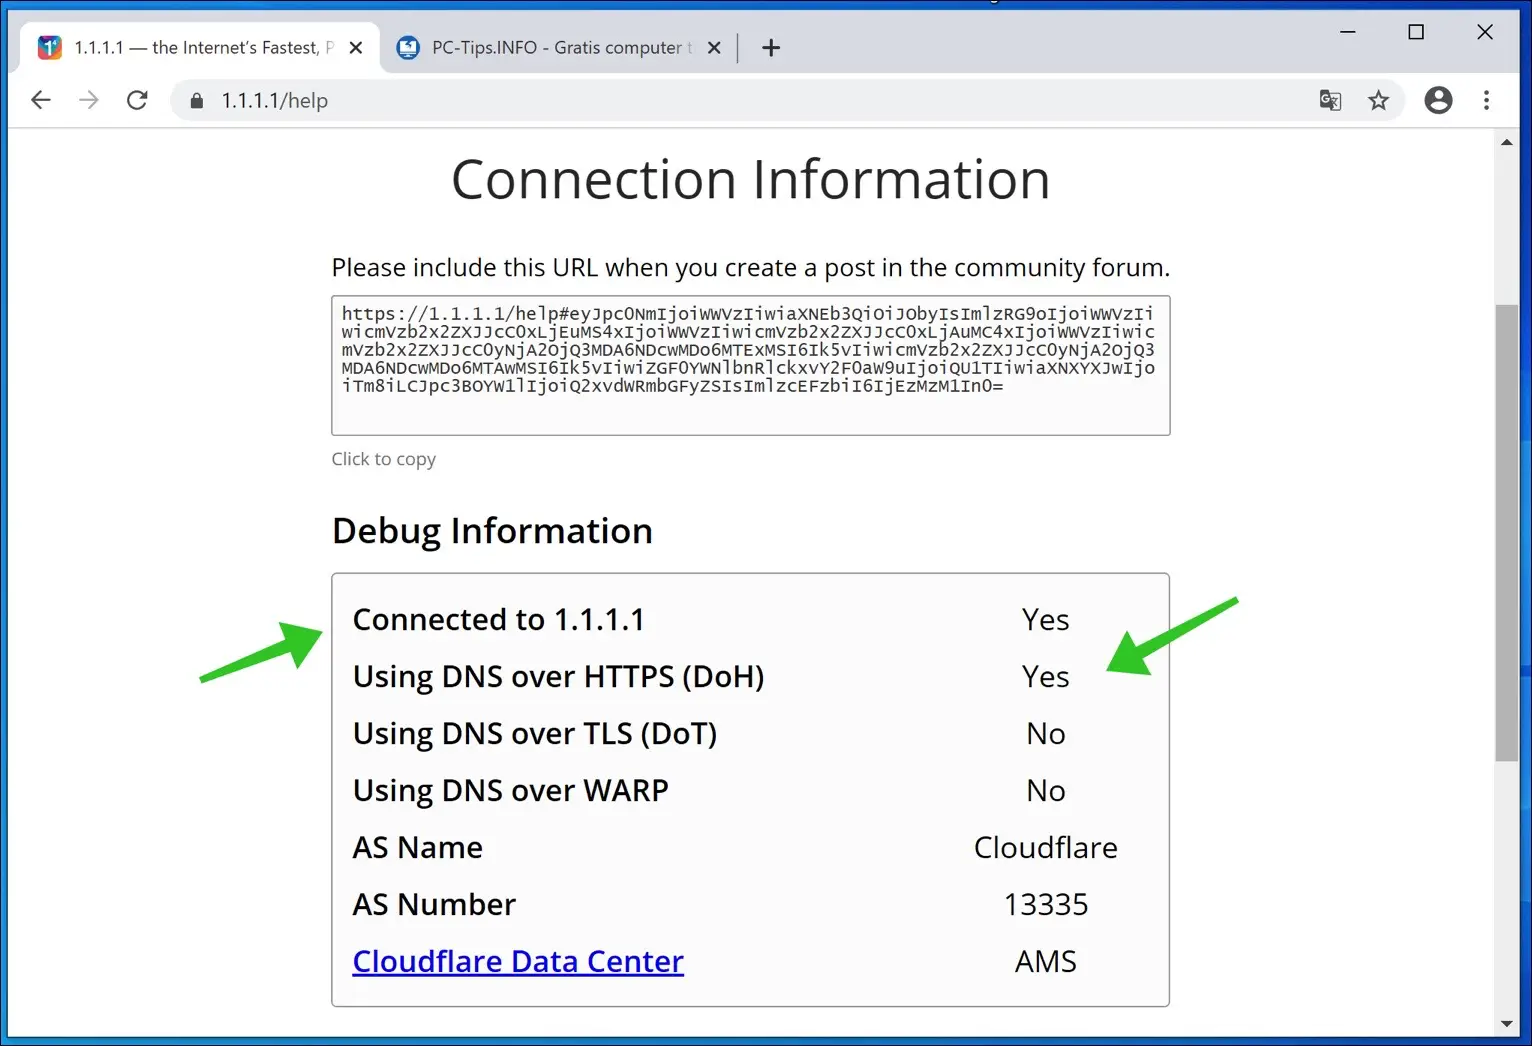
To check if Google has enabled Chrome (DoH), type https://1.1.1.1/help in the Google Chrome navigation bar. Check that “Using DNS over HTTPS (DoH)” shows yes. If so, DNS over HTTPS for Google Chrome is set up correctly.
Enable DNS over HTTPS in Firefox
Fortunately, setting DNS over HTTPS is a lot easier in Firefox. The DoH function is already officially baked in here.
At the time of writing this article, the function is available in Google Chrome, but still as an experimental function.
Open the Firefox web browser. Click on the menu icon, and click on options in the menu.
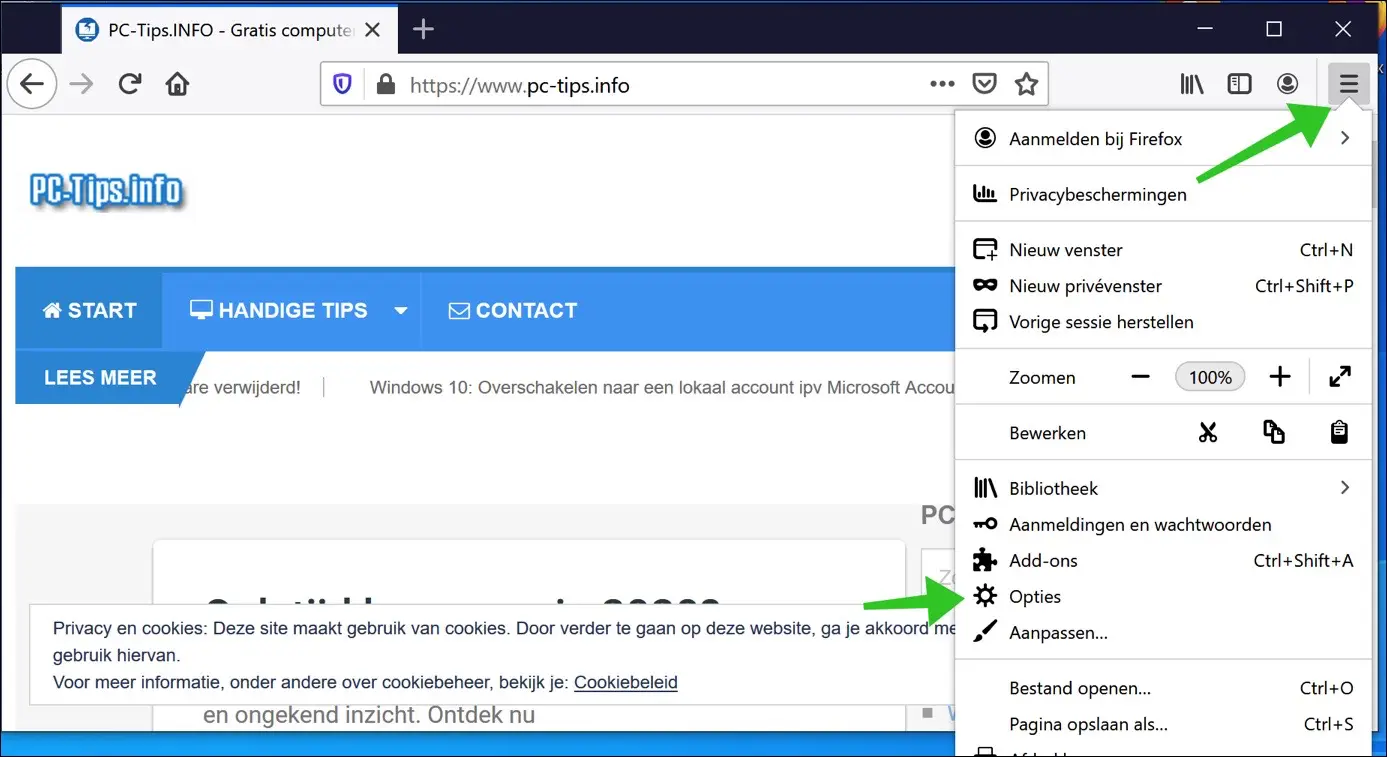
Navigate all the way down to network settings. Click Settings to open the network settings.
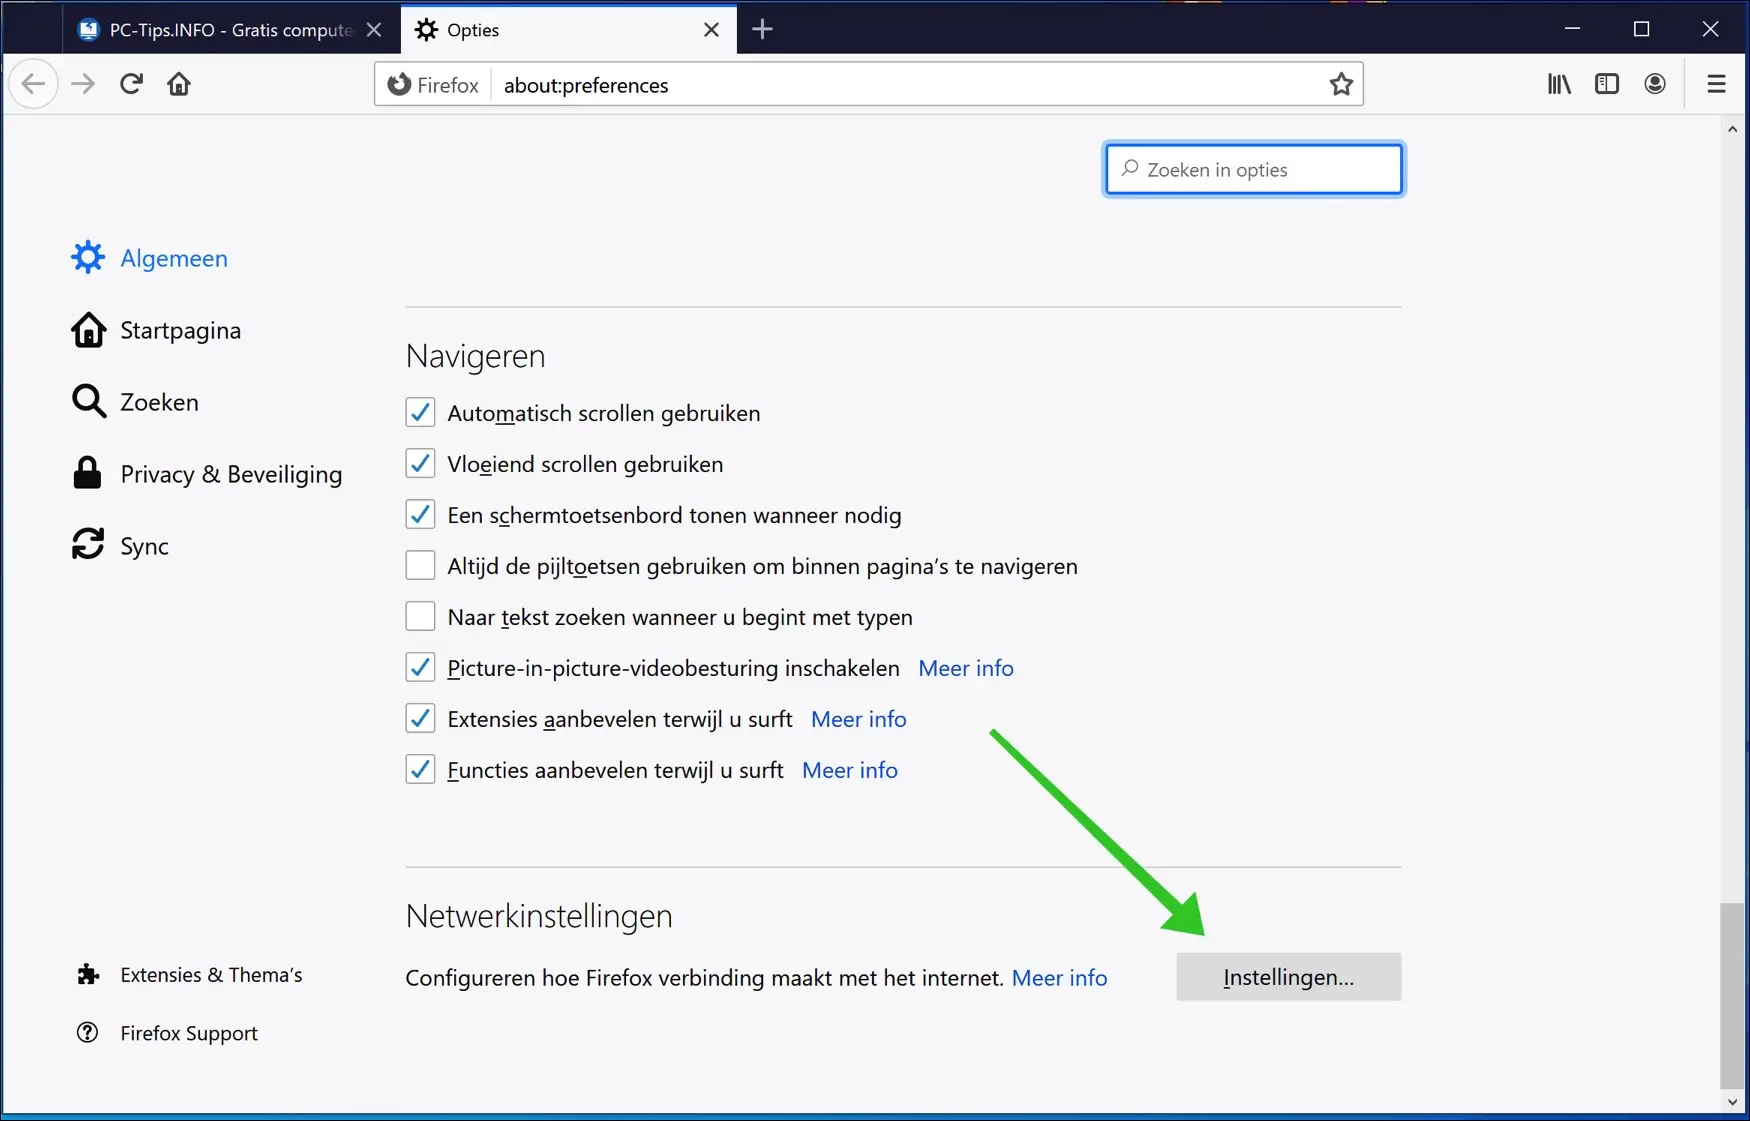
Navigate all the way down again in the Network Settings. Select and enable DNS over HTTPS in Firefox.
You can use Cloudflare or any custom DNS server settings you chose from this list.
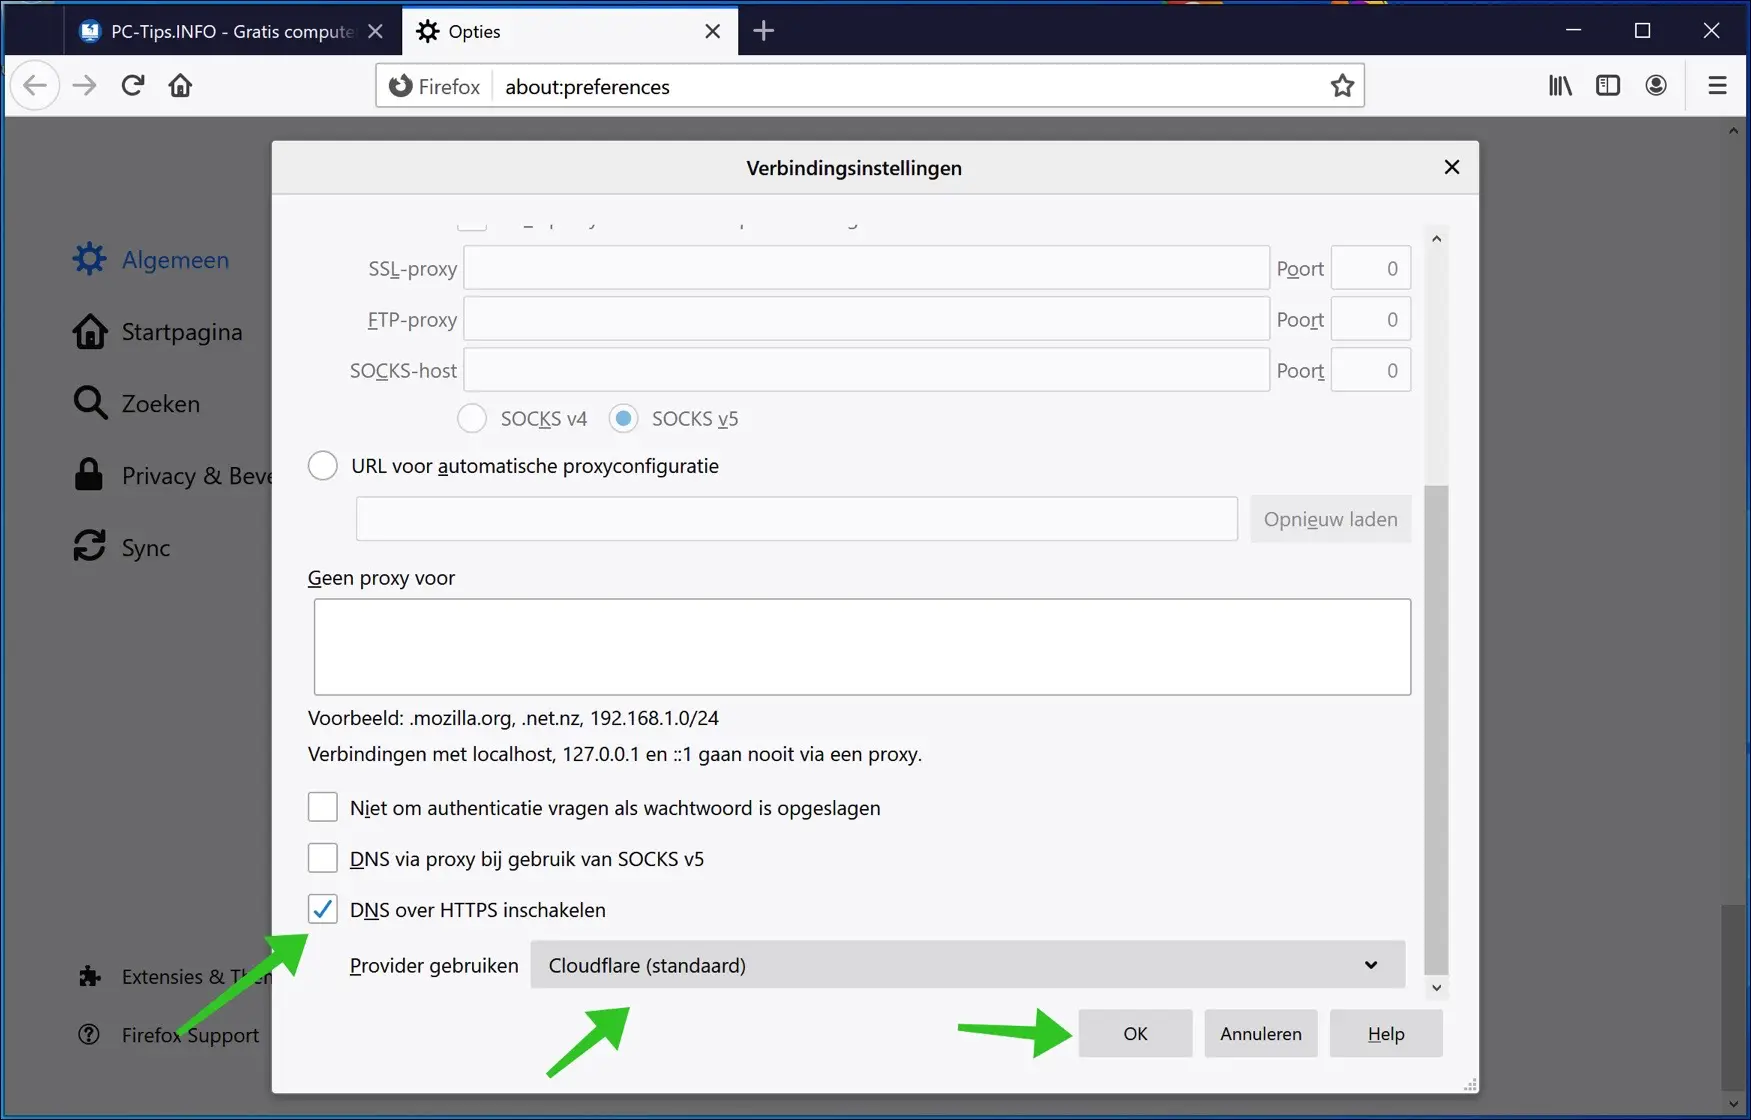
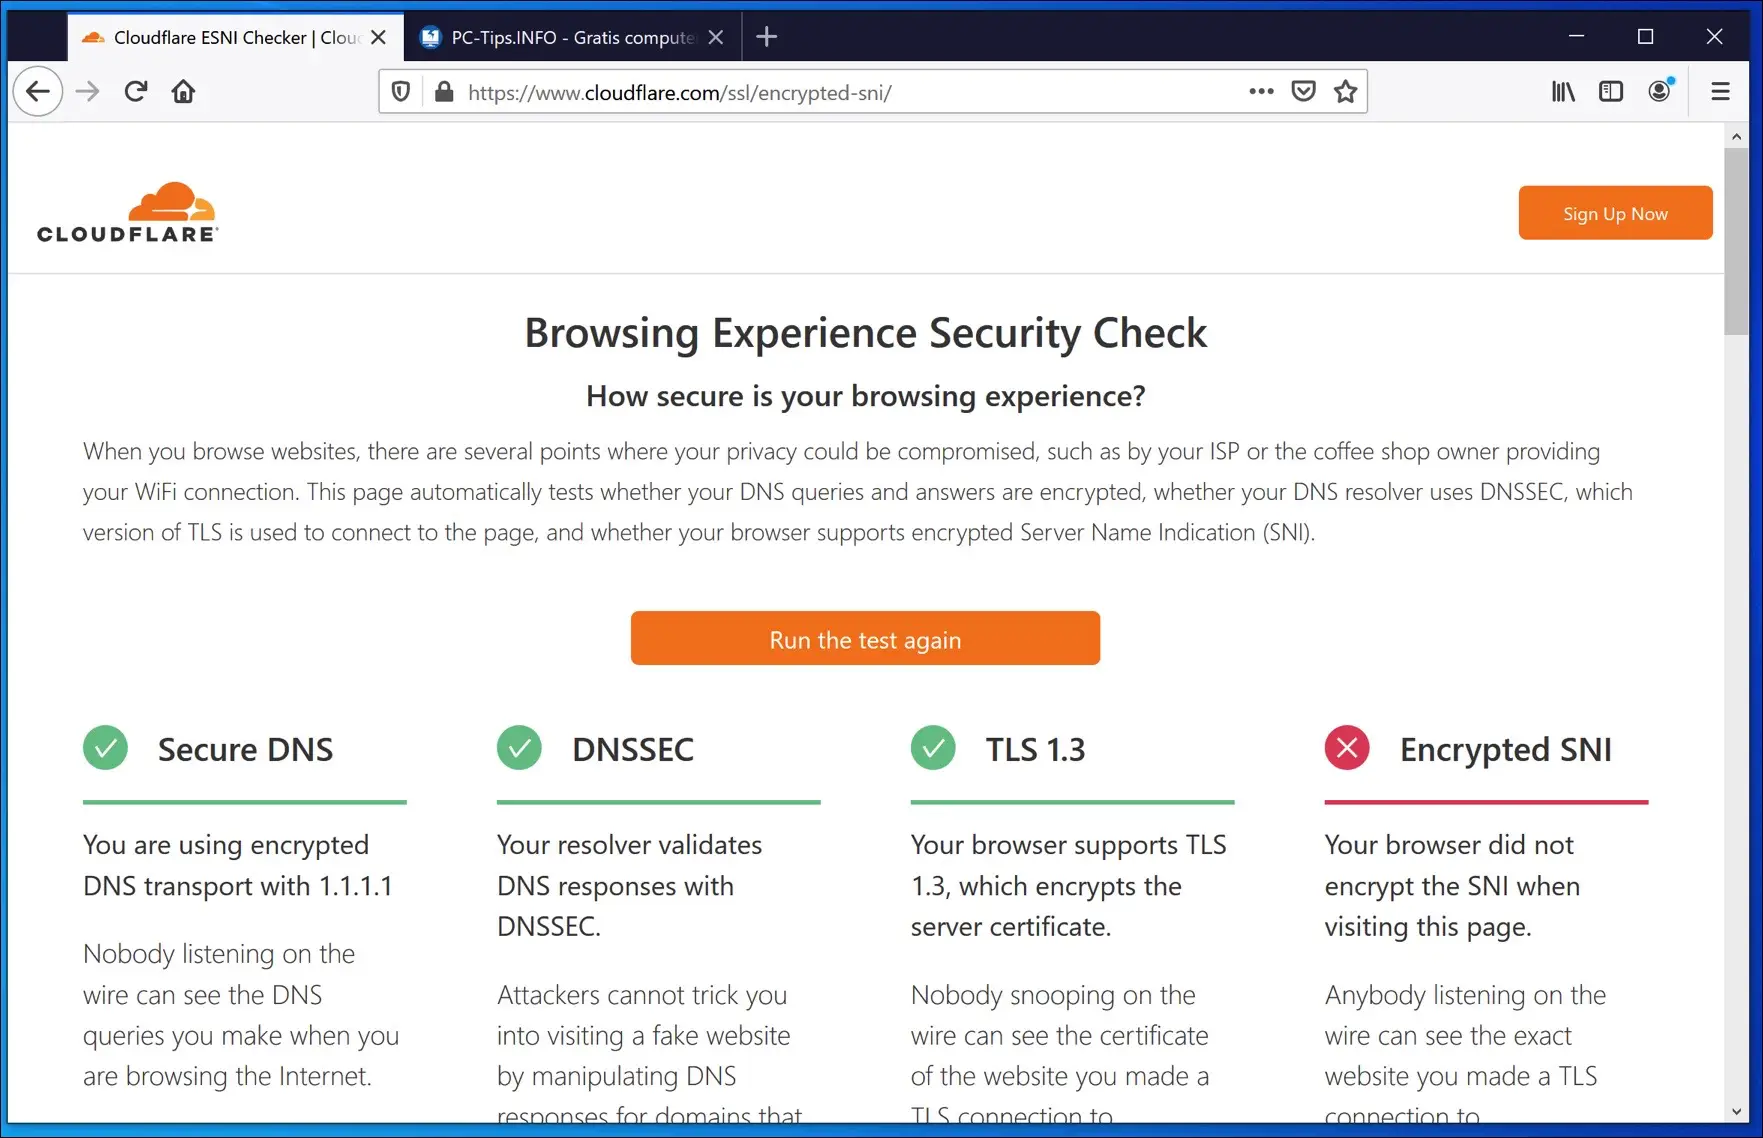
Click OK to save the settings. Restart the Firefox browser. Check if DNS over HTTPS is enabled in Firefox by moving on to the next Cloudflare test page to go in Firefox. Click on Check my browser.
If everything went well, “Secure DNS”, “DNSSec” and TLS 1.3 will turn green as shown in the image below.
Enable DNS Over HTTPS in Windows 10
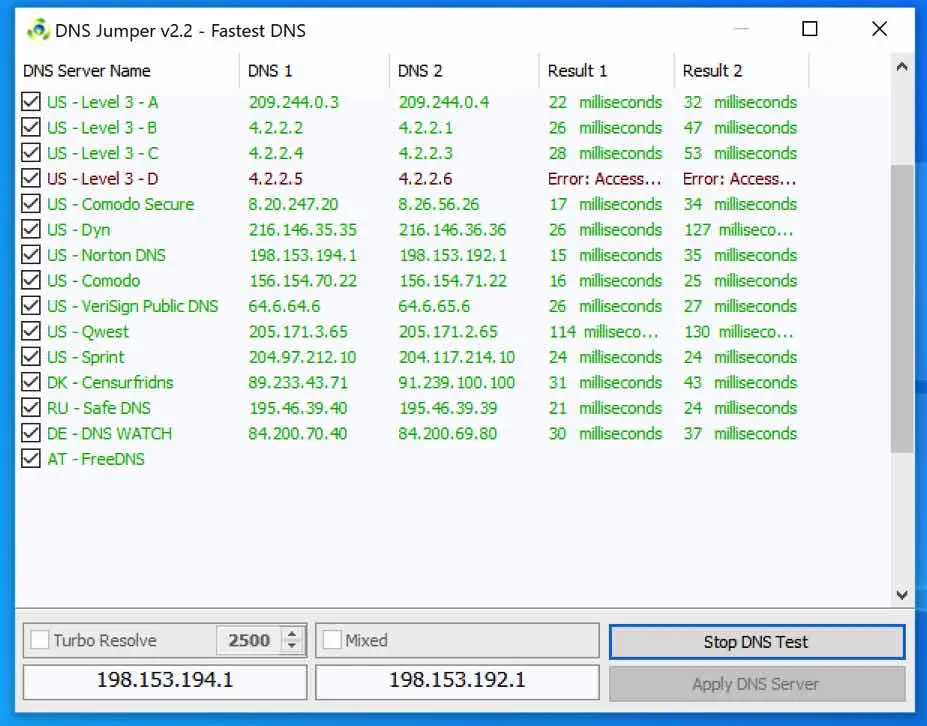
With DNS Jumper you can easily set up a DNS provider in Windows without having to adjust the network adapter configuration yourself. No DNS jumper installation is required.
Open DNS Jumper. Select your network adapter from the list. Then select the desired DNS server and click Apply DNS.
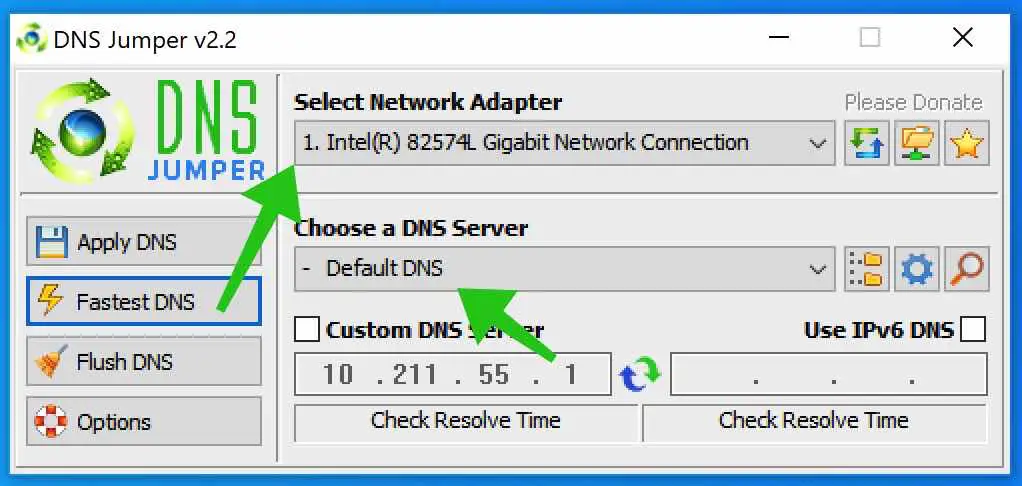
To determine the fastest DNS server setting for your internet connection, click Fastest DNS. Then click Start DNS test.
When the test is complete, click Apply DNS server.
Lees meer:
I hope this helped you! Thank you for reading.
Thank you Stefan. I have already found several tips that have helped me enormously
Hello Ed, thank you for your message. Glad I could help! Greetings Stefan