
Als u uw computer voor een langere tijd niet gebruikt dan wordt automatisch onderhoud gestart. Automatisch onderhoud wordt meestal om 2:00 ‘s nachts gestart, maar kan, afhankelijk van wanneer de computer wordt gebruikt, ook op andere momenten worden uitgevoerd.
Automatisch onderhoud zorgt ervoor dat uw computer regelmatig onderhouden wordt zonder dat u handmatig actie hoeft te ondernemen. Dit onderhoud houdt uw computer veilig, up-to-date en zorgt ervoor dat het soepel blijft werken. Het bestaat uit verschillende taken die op de achtergrond uitgevoerd worden, vaak dus op momenten dat u uw computer niet gebruikt, om te garanderen dat er minimale verstoring voor u is.
- Uw computer controleert en installeert automatisch updates voor Windows en geïnstalleerde apps, waardoor zeker wordt gesteld dat de nieuwste beveiligingspatches en prestatieverbeteringen worden toegepast.
- Windows Defender en andere beveiligingstools voeren regelmatig scans uit om malware, virussen, en andere bedreigingen te detecteren en te verwijderen.
- Windows controleert op systeemfouten of problemen die de prestaties kunnen beïnvloeden en probeert deze indien mogelijk automatisch te herstellen.
- Als onderdeel van onderhoudstaken kan Windows de harde schijf defragmenteren (indien nodig) om de bestandsopslag te optimaliseren en de toegangssnelheid te verbeteren.
- Om ruimte vrij te maken en de systeemprestaties te verbeteren, verwijdert Windows automatisch tijdelijke bestanden en andere onnodige bestanden.
Hoewel automatisch onderhoud bedoeld is om u minimale verstoring te bezorgen, kunt u ervoor kiezen om het uit te schakelen om meer controle te hebben over wanneer en hoe uw systeem wordt bijgewerkt of onderhouden. U kunt het dan alsnog zelf handmatig starten. Het is echter belangrijk om te onthouden dat het uitschakelen van automatisch onderhoud kan leiden tot verouderde software, onopgeloste systeemfouten en een verhoogd risico op beveiligingsproblemen.
Meld u dan aan voor onze nieuwsbrief.
Automatisch onderhoud uitschakelen in Windows 11 of 10
U kunt automatisch onderhoud uitschakelen via het Windows-register.
Automatisch onderhoud uitschakelen via Windows-register.
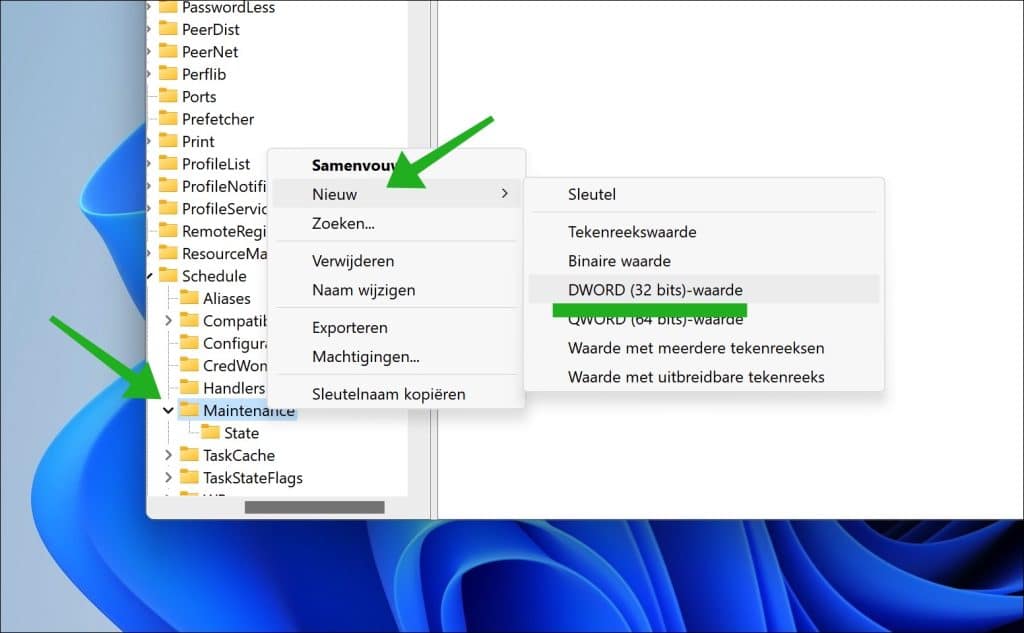
Om te beginnen opent u het Windows-register. Ga vervolgens naar sleutel:
HKEY_LOCAL_MACHINE\SOFTWARE\Microsoft\Windows NT\CurrentVersion\Schedule\Maintenance
Klik met de rechtermuisknop op “Maintenance” en klik op “nieuw” en vervolgens op “DWORD (32-bit) waarde”.
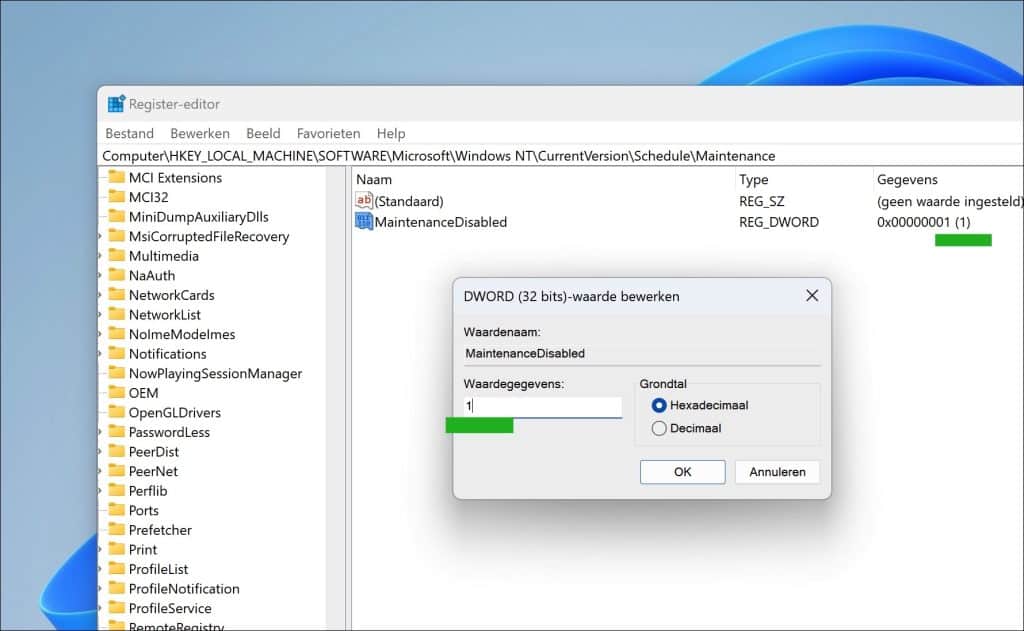
Geef deze waarde de naam:
MaintenanceDisabled
Dubbelklik op “MaintenanceDisabled” en stel de waardegegevens in op “1” om automatisch onderhoud uit te schakelen.
Herstart nu uw computer om automatisch onderhoud uit te schakelen.
Handmatig automatisch onderhoud starten
Eventueel kunt u er zelf altijd voor kiezen om automatisch onderhoud handmatig te starten wanneer het u uitkomt.
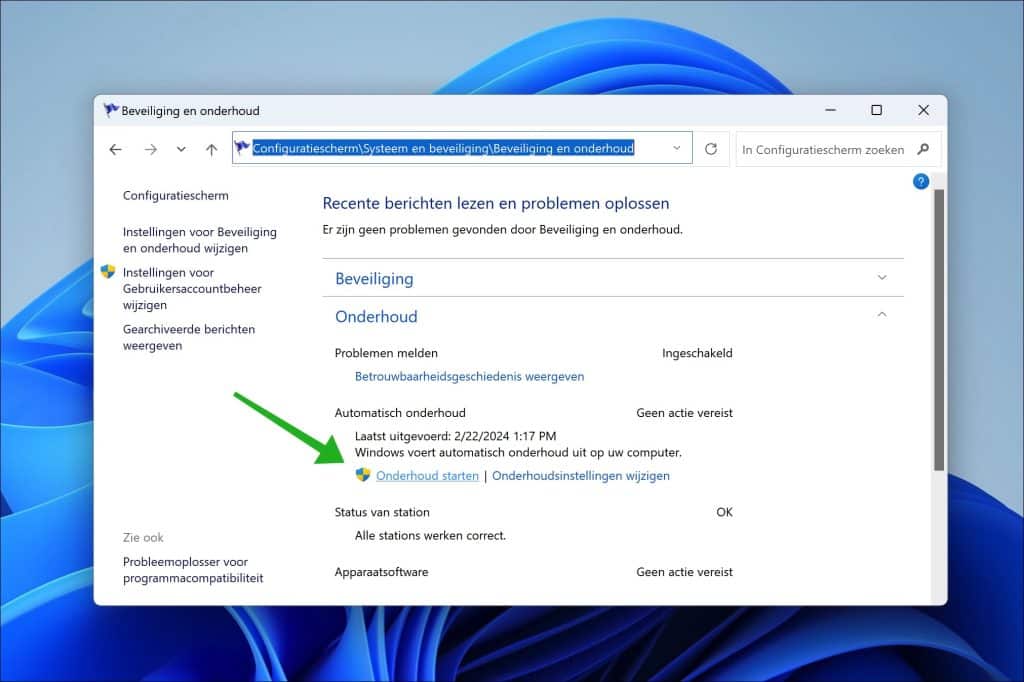
Open het Configuratiescherm. Ga naar Systeem en beveiliging > Beveiliging en onderhoud > Onderhoud en klik op “Onderhoud Starten”.
Ik hoop u hiermee geholpen te hebben. Bedankt voor het lezen!
Lees verder: 16 tips voor de Windows Verkenner.
Help mee
Mijn computertips zijn gratis en bedoeld om andere mensen te helpen. Door deze pc-tip te delen op een website of social media, helpt u mij meer mensen te bereiken.Overzicht met computertips
Bekijk ook mijn uitgebreide overzicht met praktische computertips, overzichtelijk gesorteerd per categorie.Computerhulp nodig?
Loopt u vast met uw pc, laptop of software? Stel uw vraag op ons computerforum en krijg gratis computerhulp van ervaren leden en experts.