
Windows Defender beschermt uw computer terwijl u werkt met de computer. Het controleert uw computer bij het wijzigen of openen van bestanden.
Als u de computer niet gebruikt, of als een geplande scan op bepaalde dagen wilt instellen dan is dit standaard niet mogelijk met Windows Defender. Om een geplande scan uit te voeren moet er zelf een taak worden aangemaakt.
Na het aanmaken van een taak kunt u instellen wanneer deze taak moet worden uitgevoerd. In dit artikel leest u hoe u met de taakplanner een geplande scan met Windows Defender kunt aanmaken en uitvoeren.
Meld u dan aan voor onze nieuwsbrief.
Geplande scan instellen met Windows Defender
U kunt een geplande scan instellen met Windows defender op een Windows 11 of 10 computer. Een vereiste is dat u beheerder bent van de computer, dat u bent ingelogd met een administrator account.
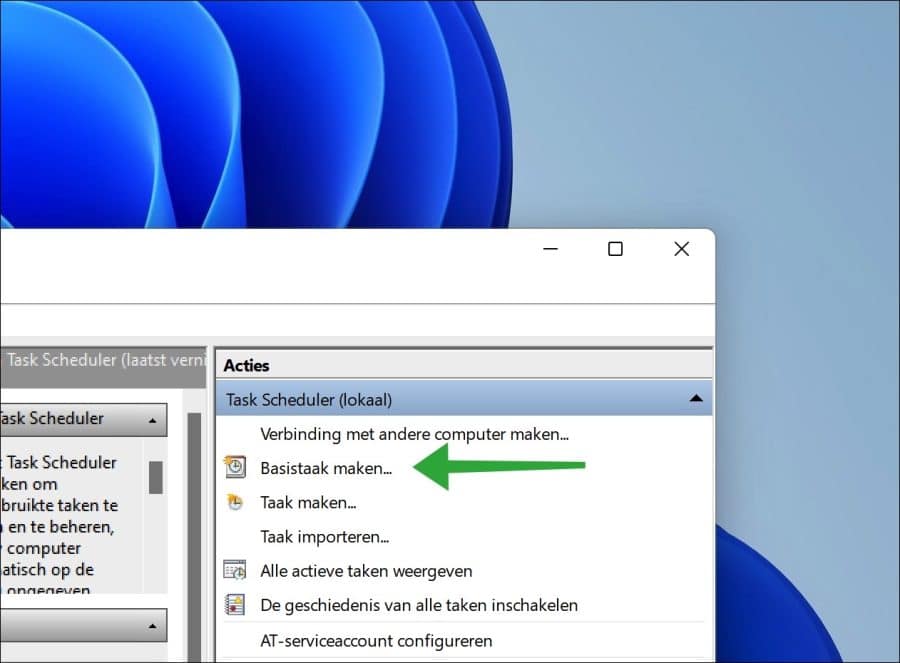
Klik met de rechtermuisknop op de Startknop. In het menu klik op “uitvoeren”. In het uitvoeren venster type: taskschd.msc
U heeft nu de taakplanner geopend. Klik rechtsbovenin op “Basis taak maken”.
Geef een duidelijke en herkenbare naam in voor de geplande Windows Defender scan. Ook kunt u een beschrijving toevoegen. Klik op volgende.

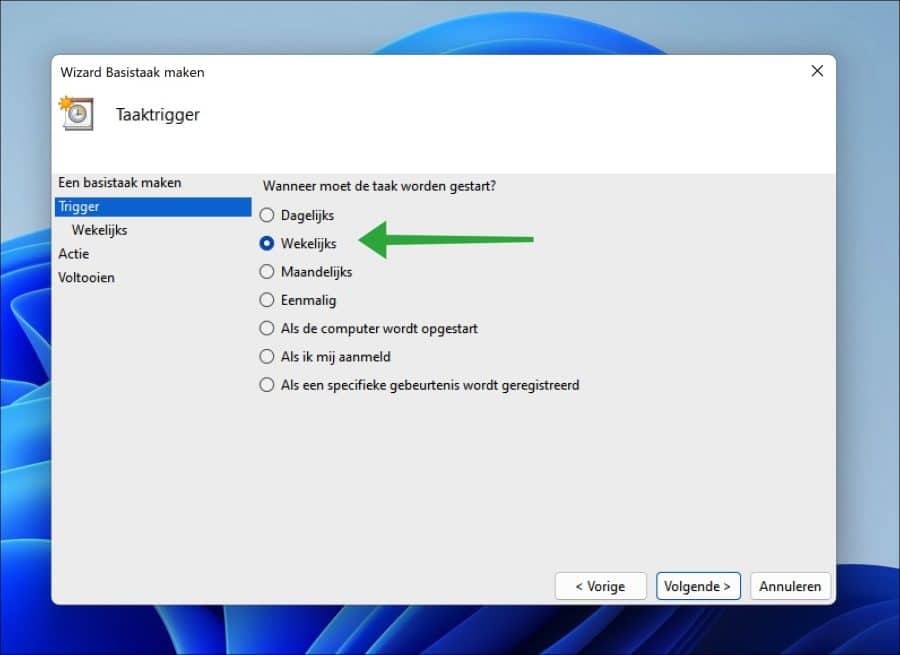
U kunt nu aangeven wanneer de geplande scan moet worden uitgevoerd. In mijn geval heb ik ervoor gekozen om wekelijks een geplande scan uit te voeren met Windows defender. Maak u keuze en klik op volgende.
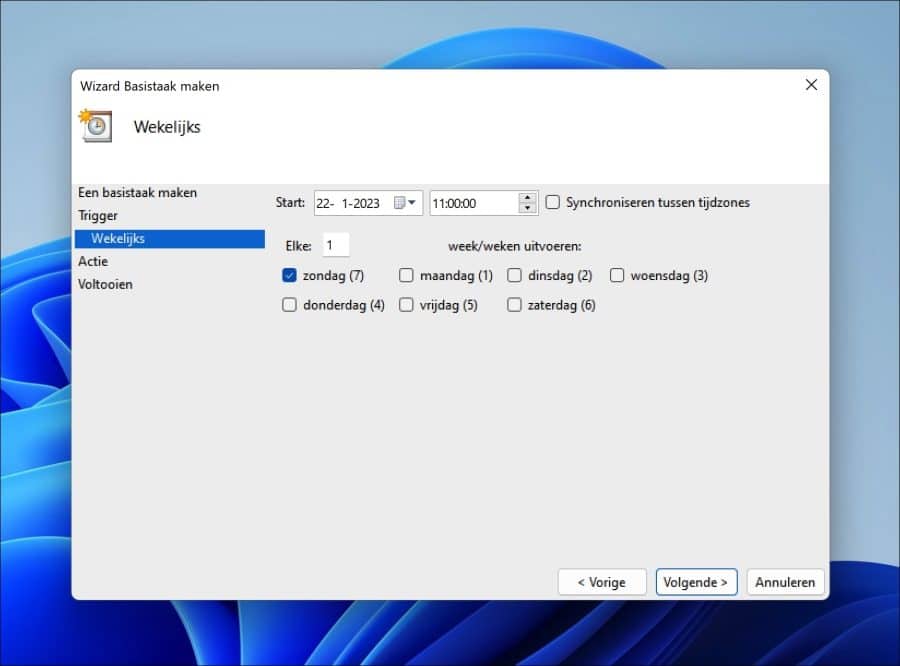
Geef een startdatum in een tijd. Hierna geeft u aan wanneer de taak moet worden uitgevoerd. De startdatum en tijd liggen in de toekomst en worden gebruikt om de taak uit te voeren. Als u hier zondag 11:00 zoals in het voorbeeld ingeeft, start de geplande scan dus op zondag, elke week om 11:00 in de ochtend.
Maak uw keuze en klik op volgende.
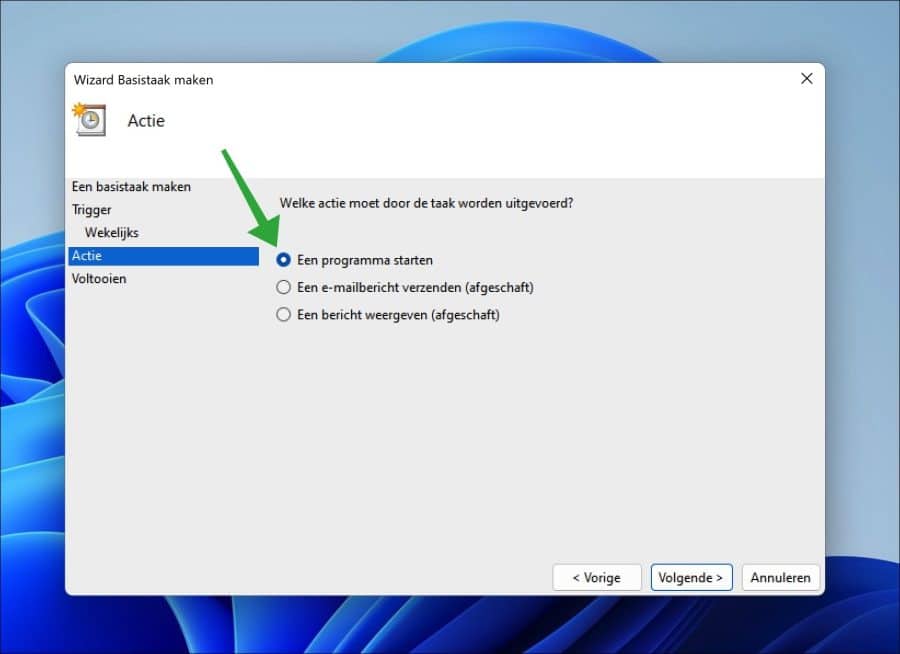
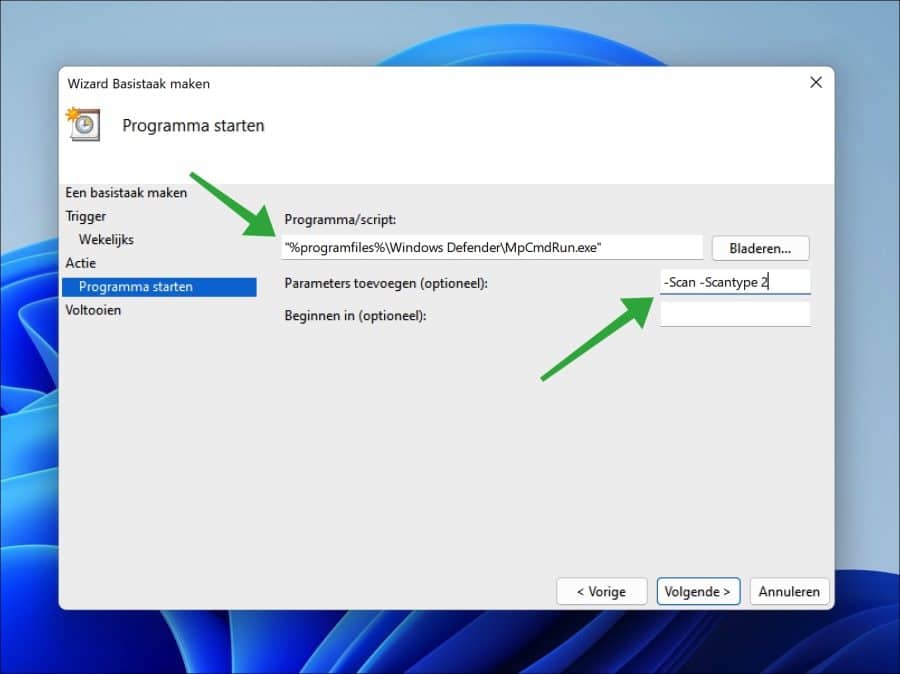
Klik op “een programma starten”. We gaan namelijk de command-line versie van Windows defender gebruiken om een geplande scan uit te voeren.
In het programma/script geeft u het volgende pad in, tussen quotes.
"%programfiles%\Windows Defender\MpCmdRun.exe"
In de parameter geeft u de parameters in om de scan te starten. U kunt kiezen uit het type scan dat u wilt uitvoeren.
-Scan -Scantype 2
Dit is een volledige scan. Dit duurt langer, maar zorgt er wel voor dat heel uw computer gescand wordt met Windows Defender.
-Scan -Scantype 1
Dit is een snelle scan. Deze scan duurt korter en gebruikt minder systeemprocessen.
-Scan -Scantype 3 -File "C:\Map\"
Als u alleen een bepaald pad wilt scannen dan kunt u scantype 3 gebruiken. Zorg er wel voor dat u “C:\Map” vervangt door het gewenste pad.
Indien u het gewenste scantype heeft ingevuld in de parameter klik dan op volgende.
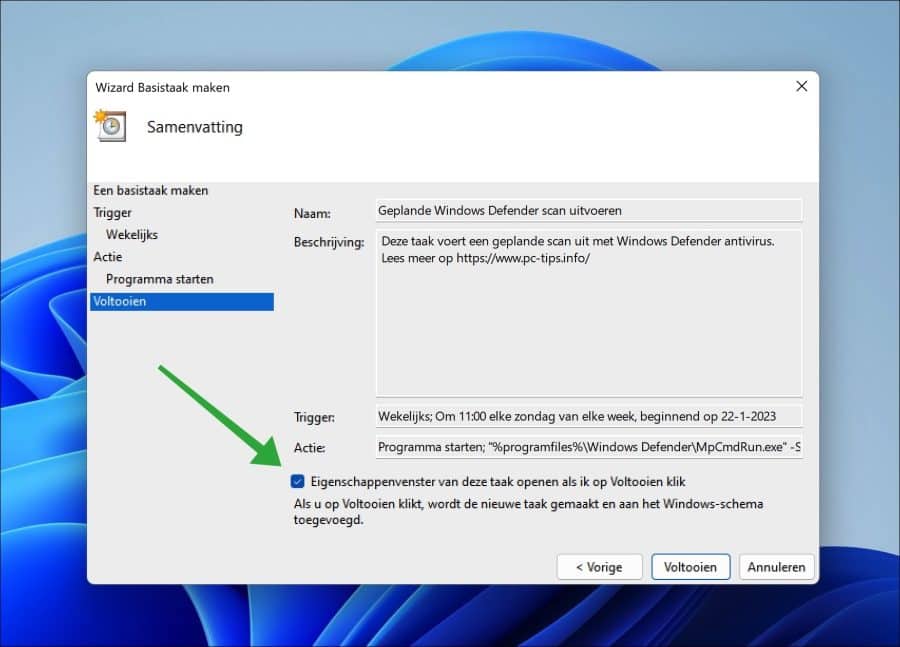
U krijgt nu een samenvatting van de geplande Windows defender scan taak. Schakel onderin de optie “Eigenschappenvenster van deze taak openen als ik op voltooien klik” in. Klik op voltooien.
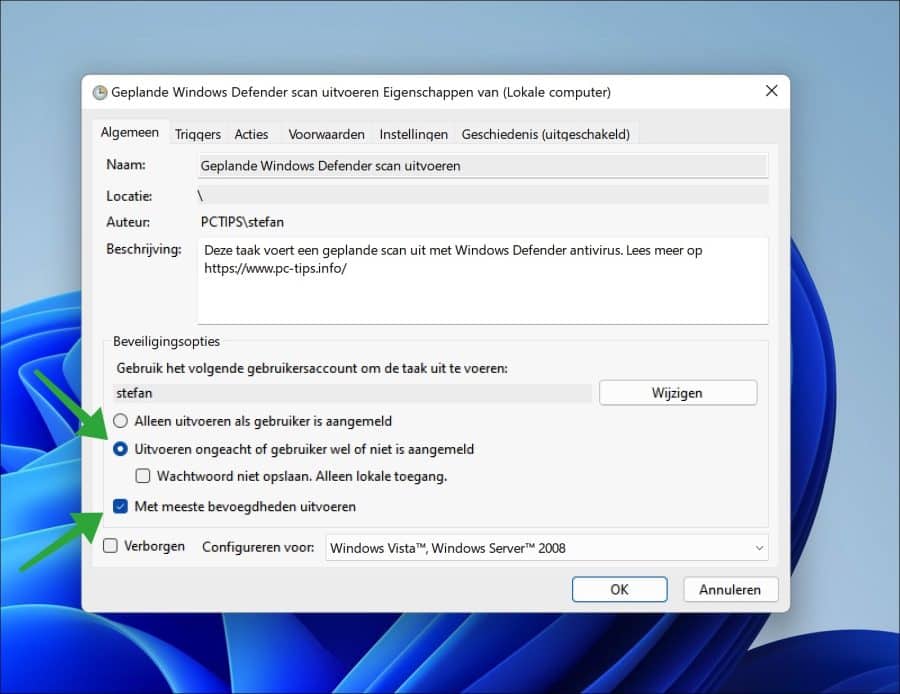
In de taak eigenschappen schakelt u de volgende opties in; “Uitvoeren ongeacht of gebruiker wel of niet is aangemeld”. Hiermee wordt de scan altijd uitgevoerd op de ingestelde datum en tijd (indien de PC aanstaat).
Schakel ook de optie “Met meeste bevoegdheden uitvoeren” in. Hiervoor is wel een gebruikersnaam en wachtwoord nodig. Klik op “OK”.
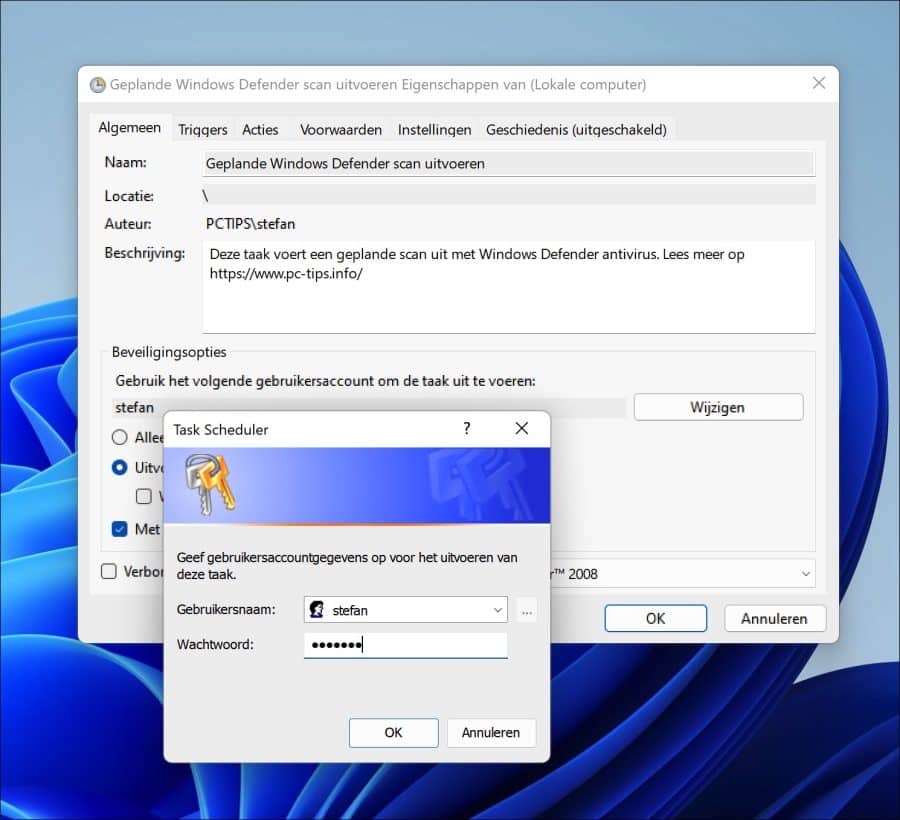
Geef de gebruikersnaam en wachtwoord in van uw account als dit een account met administrator rechten betreft. Klik op “OK”.
U heeft nu een geplande scan met Windows Defender aangemaakt. Deze geplande scan wordt nu automatisch uitgevoerd.
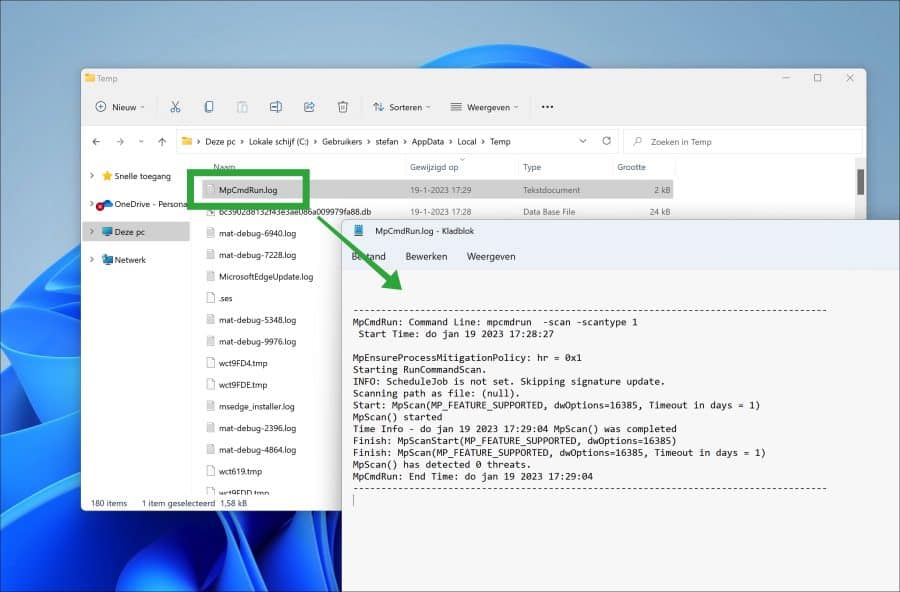
Als u wilt weten wat de resultaten zijn, dan kunt u het logbestand opvragen. Deze vindt u op de volgende locatie. Dit pad kunt u plakken in de Windows verkenner.
C:\Users\%UserName%\AppData\Local\Temp\MpCmdRun.log
Lees ook: Ransomware bescherming inschakelen in Windows Defender Antivirus.
Problemen met Windows defender? Dit is hoe u Windows defender opnieuw kunt installeren.
Ik hoop hiermee geholpen te hebben. Bedankt voor het lezen!
Help mee
Mijn computertips zijn gratis en bedoeld om andere mensen te helpen. Door deze pc-tip te delen op een website of social media, helpt u mij meer mensen te bereiken.Overzicht met computertips
Bekijk ook mijn uitgebreide overzicht met praktische computertips, overzichtelijk gesorteerd per categorie.Computerhulp nodig?
Loopt u vast met uw pc, laptop of software? Stel uw vraag op ons computerforum en krijg gratis computerhulp van ervaren leden en experts.