
Als u Windows gebruikt, zoals Windows 11 dan wordt er standaard in Windows geheugen gereserveerd, meer specifiek RAM-geheugen.
Door geheugen als cache te reserveren wordt de prestaties van uw computer verbeterd. Het stelt Windows in staat om bestanden in het RAM-geheugen te cachen, hierdoor kan Windows sneller toegang krijgen tot deze informatie dan wanneer het elke keer van de harde schijf gelezen moet worden. Dit verhoogt de algehele systeemprestaties en reactiesnelheid.
De belangrijkste redenen om RAM-geheugen te reserveren is dus om stabiliteit, snelheid en beveiliging te waarborgen. Windows zorgt er op deze manier voor dat verschillende processen en services altijd het nodige RAM-geheugen hebben om goed te functioneren.
Meld u dan aan voor onze nieuwsbrief.
Er zijn echter verschillende redenen waarom het automatisch reserveren van RAM-geheugen niet ingeschakeld moet worden. Op dat moment kunt u het gereserveerde RAM-geheugen uitschakelen. U kunt het automatisch gereserveerde RAM-geheugen uitschakelen door in te stellen dat Windows 11 maar een maximum aan geheugen mag alloceren. In dit artikel leg ik uit hoe dit werkt.
Gereserveerd RAM-geheugen wijzigen in Windows 11
Het is belangrijk dat u weet waar u aan begint en wat de implicaties kunnen zijn van het instellen van een maximum aan geheugen. Tenzij er duidelijke aanwijzingen zijn van een configuratieprobleem of hardwarecompatibiliteitskwestie, kan het proberen om het gereserveerde geheugen te verminderen onbedoelde gevolgen hebben.
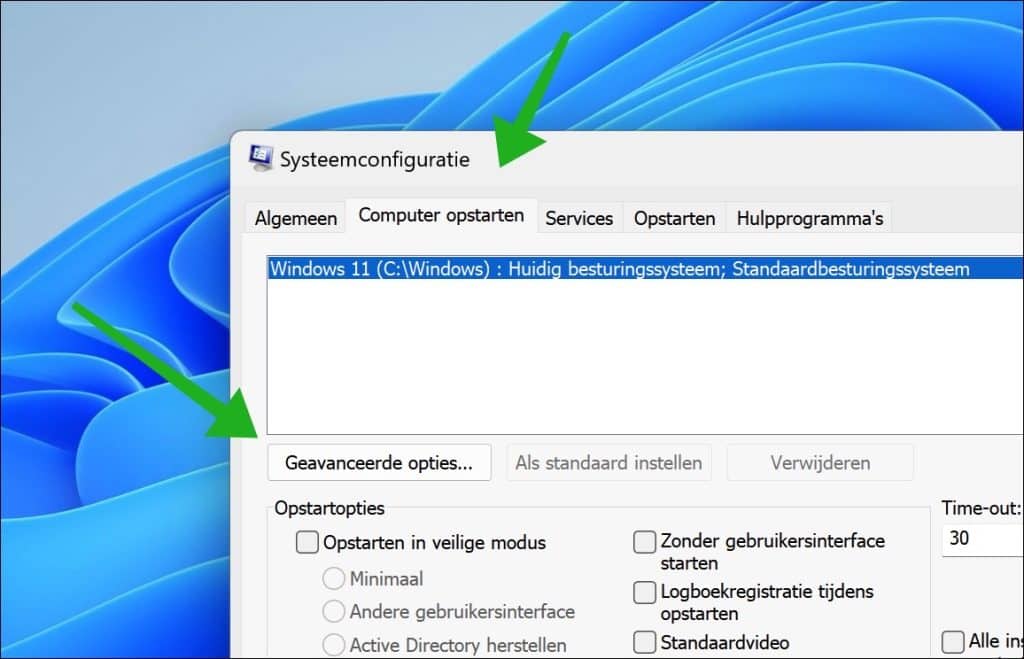
Klik met de rechtermuisknop op de Startknop. Klik vervolgens op “uitvoeren” in het menu. In het uitvoeren venster, type: msconfig.

Klik op tabblad “Computer opstarten” en vervolgens op de knop “Geavanceerde opties”.
Selecteer de optie “Maximaal geheugen” om het maximale geheugen te specificeren wat Windows 11 mag gebruiken. Als u deze optie uitschakelt, dan bepaald Windows 11 zelf het geheugenverbruik. De standaard optie is uitgeschakeld.
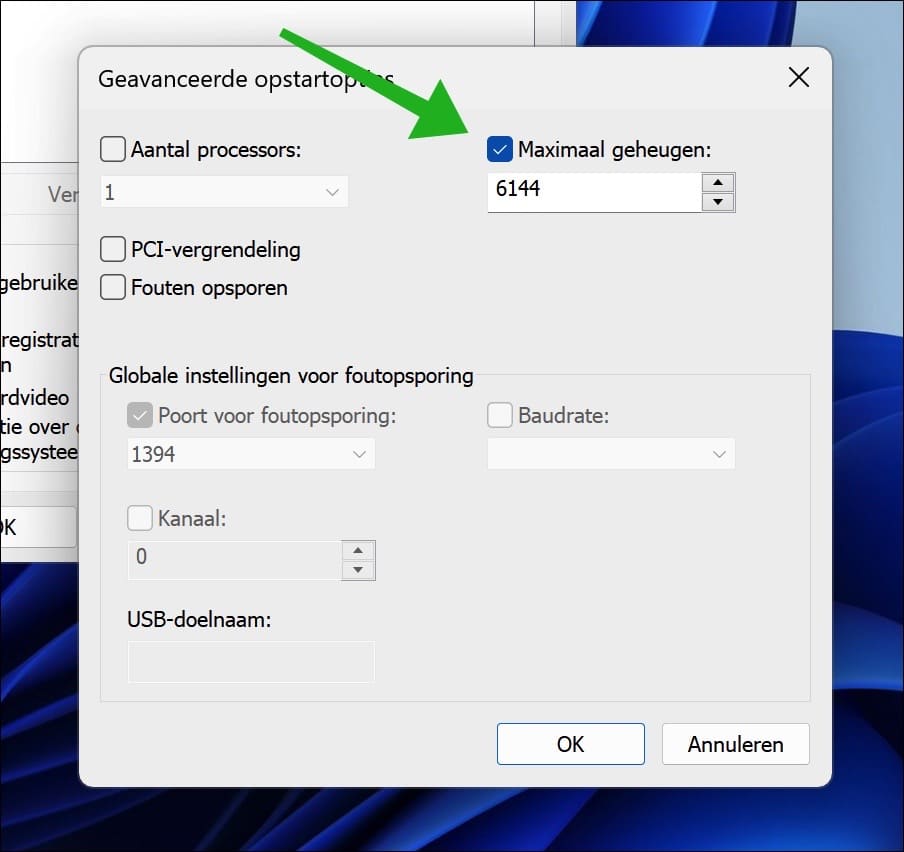
Houdt er altijd rekening mee dat u voldoende maximaal geheugen specificeert voor Windows 11. Doet u dit niet dan ontstaan er verschillende RAM-geheugenfoutmelding. Deze instelling is vaak alleen nuttiger als diagnostisch hulpmiddel dan als permanente oplossing. Wanneer u problemen ondervindt die u ertoe brengen deze instelling te wijzigen, zoek dan naar de onderliggende oorzaak. Dit kan onder andere door het geheugen te testen.
Ik hoop u hiermee geïnformeerd te hebben. Bedankt voor het lezen!
Gerelateerd: Virtueel geheugen opschonen bij afsluiten Windows 11 of 10
Help mee
Mijn computertips zijn gratis en bedoeld om andere mensen te helpen. Door deze pc-tip te delen op een website of social media, helpt u mij meer mensen te bereiken.Overzicht met computertips
Bekijk ook mijn uitgebreide overzicht met praktische computertips, overzichtelijk gesorteerd per categorie.Computerhulp nodig?
Loopt u vast met uw pc, laptop of software? Stel uw vraag op ons computerforum en krijg gratis computerhulp van ervaren leden en experts.