Hyper-V is een hulpmiddel voor virtualisatietechnologie van Microsoft die standaard alleen beschikbaar is op Windows Windows 11- 10 Professional, Windows 11-10 Enterprise en Windows 11-10 Educatie edities.
Met Microsoft Hyper-V kunt u één of meerdere virtuele machines maken om verschillende besturingssystemen op één Windows 11 of 10 computer te installeren en uit te voeren. Het hebben van de juiste Windows 10-versie is niet het enige wat uw pc nodig heeft. Zo heeft uw computer ook de volgende hardware vereisten nodig voor het kunnen draaien van virtuele machines via Hyper-V in Windows.
Uw computer dient te beschikken over een 64- bit processor, 4GB minimum aan RAM-geheugen en de processor moet ondersteuning bieden voor de VM Monitor Mode Extension.
Meld u dan aan voor onze nieuwsbrief.
Hyper-V is dus niet beschikbaar voor Windows 11- 10 Home. Tenminste, dat is standaard zo. In dit artikel leg ik u stap voor stap uit hoe u Hyper-V toch kunt installeren in Windows 10 Home editie zonder te upgraden naar een Windows 10 professional of hoger editie.
Hyper-V installeren in Windows 11 of Windows 10 Home
Ga naar het Windows bureaublad en klik met de rechtermuisknop op een vrije ruimte in het Bureaublad.
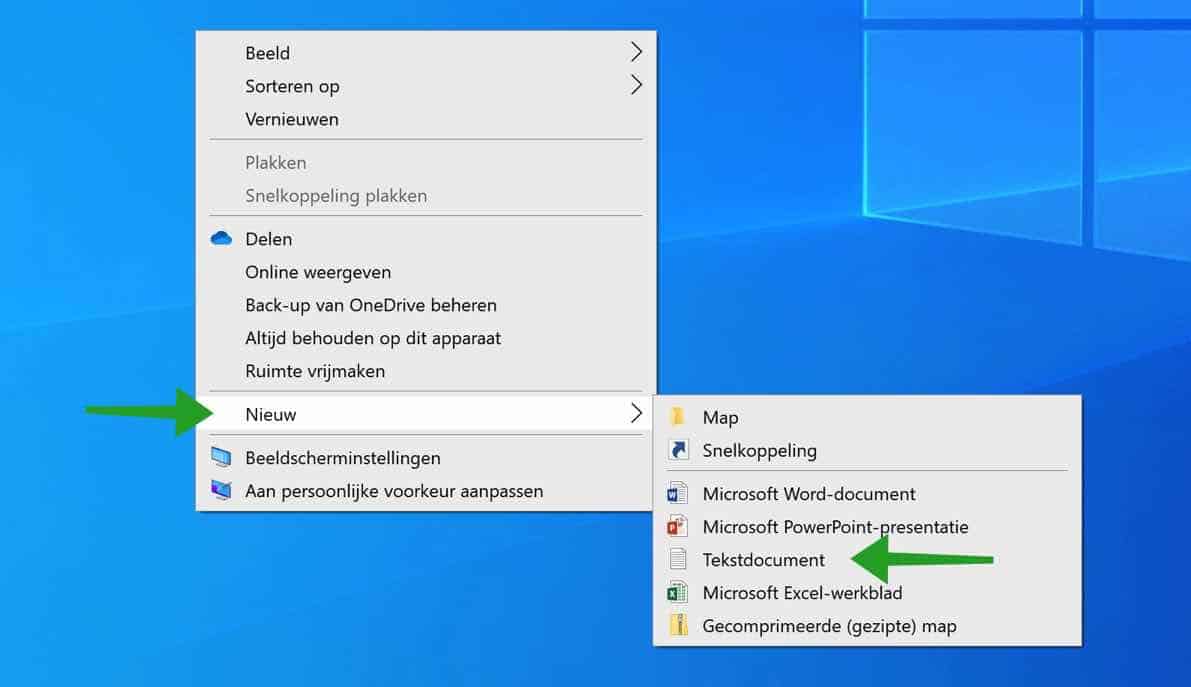
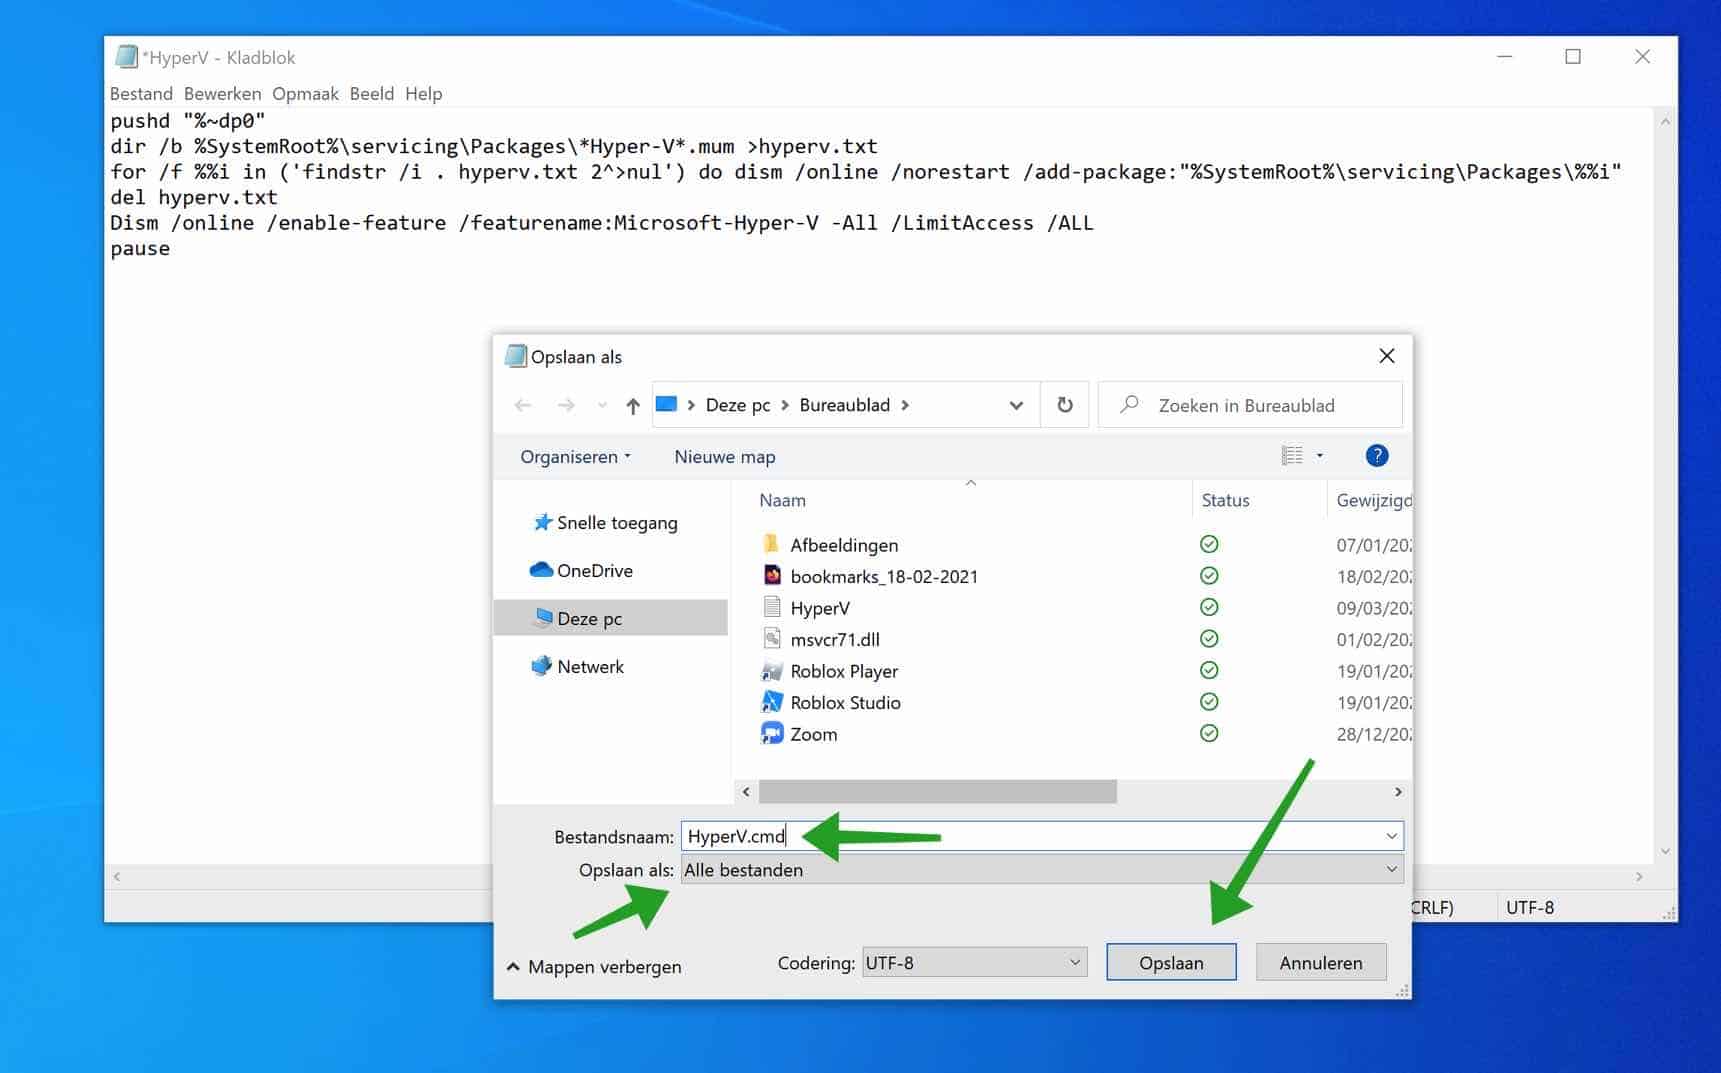
Maak een nieuw tekstbestand aan en kopieer en plak de volgende onderstaande tekst in het zojuist nieuw aangemaakte tekstbestand.
pushd "%~dp0"
dir /b %SystemRoot%\servicing\Packages\*Hyper-V*.mum >hyperv.txt
for /f %%i in ('findstr /i . hyperv.txt 2^>nul') do dism /online /norestart /add-package:"%SystemRoot%\servicing\Packages\%%i"
del hyperv.txt
Dism /online /enable-feature /featurename:Microsoft-Hyper-V -All /LimitAccess /ALL
pause
Ga naar bestand in de tekstbewerker die u gebruikt en klik op Opslaan Als. Sla het bestand op als HyperV.cmd.
Ik raad u aan voordat u doorgaat om een Windows 10 herstelpunt te maken.
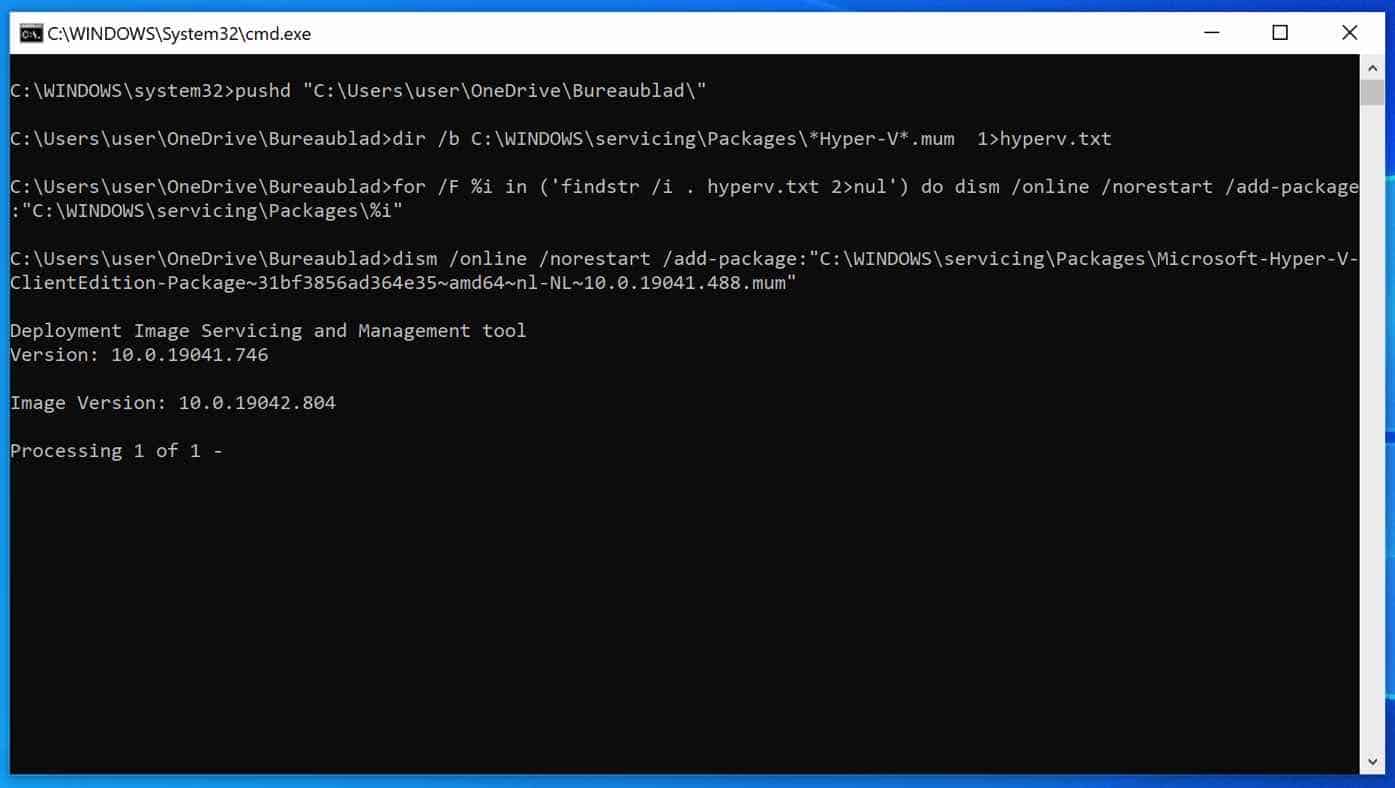
Klik met de rechtermuisknop op het HyperV.cmd bestand en kies voor Als Administrator uitvoeren.
Er wordt nu een nieuw Opdrachtprompt venster geopend die stappen doorloopt om Hyper-V te installeren in Windows 10 home editie.
Dit Hyper-V installatieproces kan een paar minuten duren.
Als het bestand klaar is wordt gevraagd om uw computer te herstarten. Sla uw werk op en herstart uw computer.
Sla deze website op om terug te keren voor de Hyper-V installatie vervolg stappen.
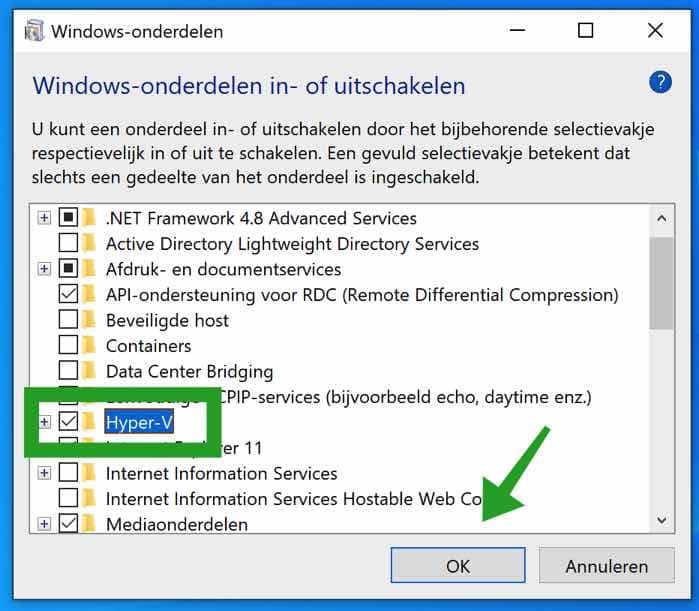
In de Windows zoekbalk type: optionalfeatures. Klik op Optionele onderdelen toevoegen in Windows.
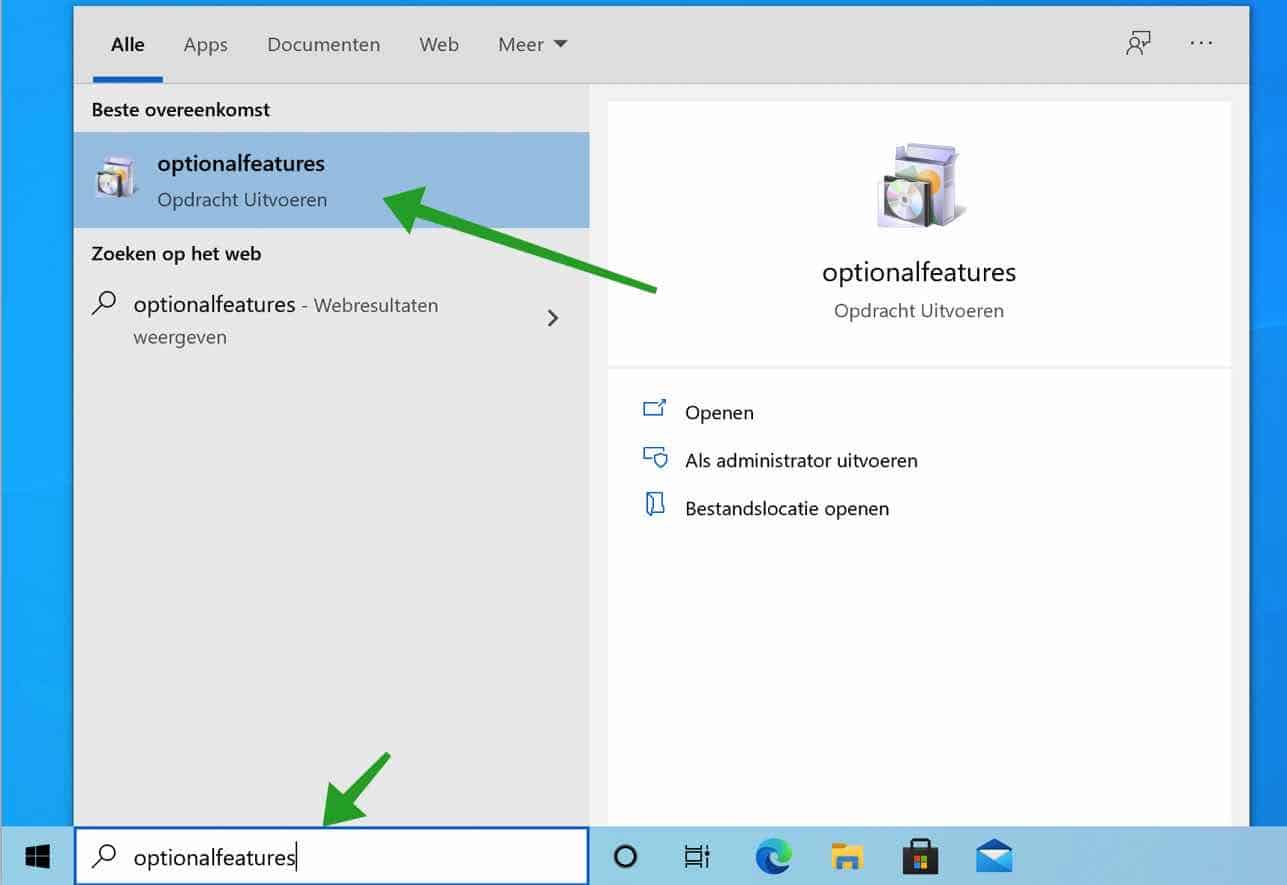
In de Windows onderdelen in- of uitschakelen instellingen klik op Hyper-V en schakel de optie in. Klik daarna op OK om Hyper-V in te schakelen in Windows 10 Home editie. Een herstart van Windows 10 is nodig om de Hyper-V installatie te voltooien.
Ik hoop u hiermee geholpen te hebben. Bedankt voor het lezen!
Bedankt Stefan! Computernerd hier maar super helder uitgelegd en gelukt, dankjewel! Misschien een suggestie: ik vond optionalfeatures niet en heet bij mij Apps en onderdelen.
Hallo, fijn dat het is gelukt. Bedankt voor uw reactie! Groet, Stefan
Ik heb het bestandje HyperV.cmd aangemaakt maar ik kan hem niet runnen als administrator (die optie staat er niet bij als ik rechtermuistoets klik).
Hallo Ronald, probeer eens SHIFT ingedrukt te houden terwijl u met de rechtermuisknop op het bestand klikt. Ik ga ervan uit dat u beheerder bent in Windows. Groet, Stefan