
Als u over een modern snelle computer met Windows 11 beschikt, dan zijn animaties vaak geen probleem. Animaties maken Windows 11 mooier, vloeiender en zorgen voor een betere gebruikerservaring.
Ik raad dan ook aan om de animaties ingeschakeld te laten. Echter, als u Windows 11 op een oudere PC heeft geïnstalleerd, die bijvoorbeeld niet voldoet aan de Windows 11 minimale systeemvereisten, dan kunt u overwegen om animaties uit te schakelen.
Het uitschakelen van animaties in Windows 11 helpt om de impact op de systeembronnen te beperken. Windows 11 gebruikt dus minder processen en RAM geheugen en wordt daarmee een stukje sneller. Het nadeel is dat de gebruikerservaring minder wordt. Zo wordt het bewegen van vensters en het groter of kleiner maken van een venster houterig, minder vloeiend.
Meld u dan aan voor onze nieuwsbrief.
Het is dus belangrijk als u animaties gaat in- of uitschakelen dat u eerst gaat testen of dit het gewenste effect heeft. In dit artikel leest u hoe u op verschillende manieren de animaties kunt wijzigen in Windows 11.
Animatie effecten uitschakelen of inschakelen in Windows 11
Animatie effecten in- of uitschakelen via Instellingen
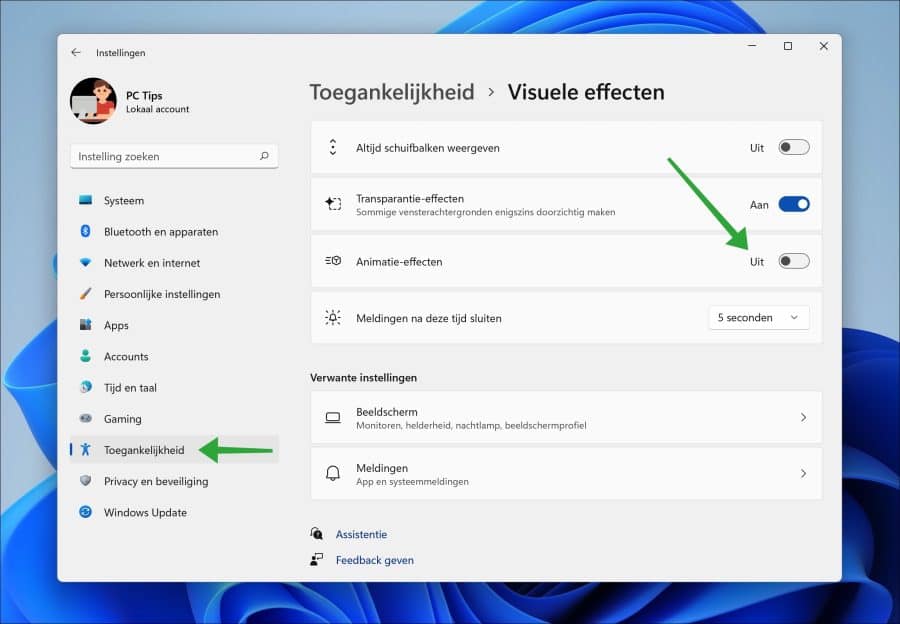
De instellingen in Windows 11 biedt inzicht in allerlei functies en onderdelen in Windows. Zo kunt u via de instellingen de animatie-effecten snel in- of uitschakelen.
Open Instellingen. Klik vervolgens op “Toegankelijkheid” en hierna op “Visuele effecten”. In de visuele effecten vindt u de optie om de animatie-effecten in- of uit te schakelen door de schuif te wijzigen naar “uit” of “aan”.
De wijzigingen zijn direct effectief. U hoeft de computer niet te herstarten.
Animatie effecten in- of uitschakelen via prestatie instellingen
In Windows 11 kunt u voorgedefinieerde prestatie instellingen toepassen om de beste prestaties, beste weergave in te stellen. Als u een bepaalde instelling selecteert worden functies wel of niet ingesteld en dit helpt om – of de beste visuele prestaties uit uw computer te halen of om de beste visuele weergave te bereiken.
Naast de voorgedefinieerde begint Windows met een automatisch weergave plan, ook is er een mogelijkheid om een aangepast weergave plan in te stellen. Dit aangepaste weergave plan gaan we instellen om de animatie-effecten in- of uit te schakelen.
Klik op Zoeken in de taakbalk. Zoek op “weergave en prestaties”. Klik vervolgens op het “De weergave en prestaties van Windows aanpassen” resultaat.

In de “Instellingen voor prestaties” schakelt u de volgende drie opties uit om de visuele animatie-effecten te wijzigen:
- Animaties op de taakbalk.
- Besturings- en andere elementen binnen vensters laten bewegen.
- Vensteranimaties bij minimaliseren en maximaliseren.

Klik op “toepassen” en hierna op “OK”.
Lees het volgend artikel om meer visuele effecten aan te passen: transparantie effecten uitschakelen in Windows 11.
Ik hoop u hiermee geholpen te hebben. Bedankt voor het lezen!
Ik heb windows 11 pro 22H2 op mijn desktop. ik kan niet de ” deze pc ” vast maken op de talkbalk.
kan je me helpen aub
bij voorbaat dank u wel
Didier
Hallo, daarvoor moet u een extra handeling verrichten, standaard is dit namelijk niet mogelijk.
Klik op Nieuw → Snelkoppeling.
Hiermee moet het lukken. Succes!