
Als u in Windows een nieuw gebruikersaccount aanmaakt, dan wordt er een profielmap aangemaakt in de “Gebruikers” map op uw PC.
Als u een lokaal account aanmaakt dan wordt de volledige naam gebruikt als de naam voor de profielmap. Als u een Microsoft-account gebruikt of aanmaakt dan worden de eerste 5 karakters uit uw Microsoft-account naam gebruikt.

Meld u dan aan voor onze nieuwsbrief.
U kunt in Windows niet zomaar de naam van de profielmap wijzigen. Hiervoor moet u een aantal stappen uitvoeren.
Het wijzigen van de profielmap is mogelijk, maar kan alleen worden uitgevoerd door de stappen in dit artikel te volgen. Er is geen officiële manier om dit te doen, bijvoorbeeld via de instellingen.
Ik raad u aan voordat u verder gaat om een Windows herstelpunt aan te maken.
Naam van profielmap wijzigen in Windows 11 of Windows 10
Om te beginnen moet u aanloggen met een ander administrator account dan waarvan u de profielmap naam wilt wijzigen. Er moet dus een tweede administrator account beschikbaar zijn of u moet er een aanmaken.
Log daarna in met dit tweede administrator account. Nu gaan we het SID opvragen van het account waarvan u de profielmap naam wilt wijzigen. Een SID is een (“Security identifier”) dat is een unieke waarde die wordt gebruikt om elke beveiligingsentiteit te identificeren die door het Windows-besturingssysteem kan worden geauthenticeerd.
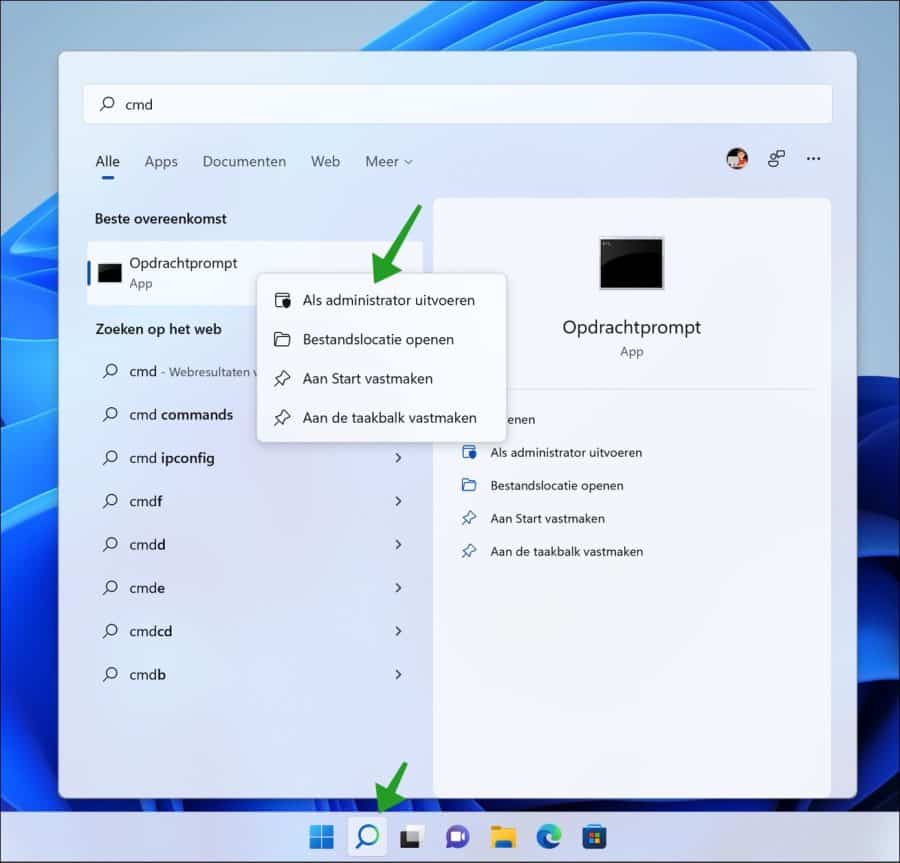
Open het Opdrachtprompt als administrator. In de taakbalk zoek op “Opdrachtprompt” en klik erop met de rechtermuisknop. In het menu klik op “Als administrator uitvoeren”.
Houdt er rekening mee dat alle volgende schermafbeeldingen ter illustratie zijn en dus voorbeelden.
In het Opdrachtprompt type:
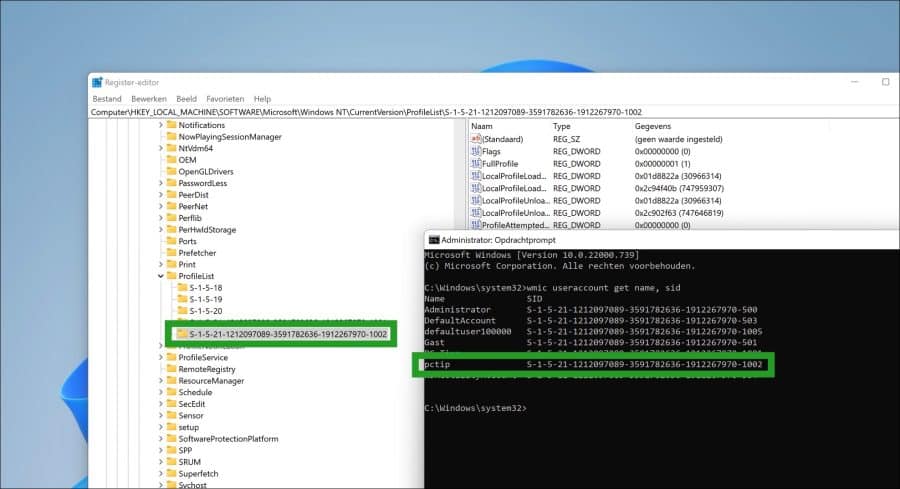
wmic get useraccount get name, sid
Controleer de SID van het gebruikersaccount waarvan u de naam van de profielmap wilt wijzigen.

In dit voorbeeld ziet u de SID in de kolom SID. Deze SID moet u kopiëren en tijdelijk opslaan. Deze SID hebben we later nodig.
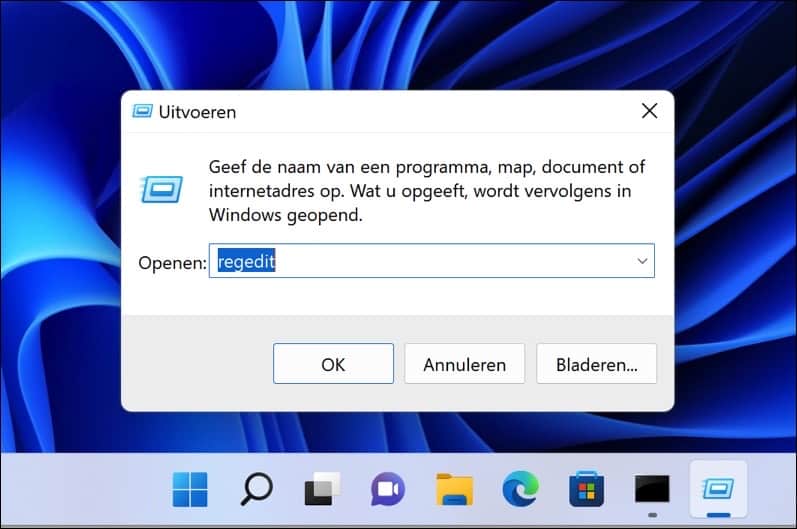
Open nu het Windows-register. Klik met de rechtermuisknop op de Startknop. In het menu klik op uitvoeren. In het uitvoeren venster type: regedit.exe
In de register bewerker ga naar de sleutel:
HKEY_LOCAL_MACHINE\SOFTWARE\Microsoft\Windows NT\CurrentVersion\ProfileList
Zoek in de lijst van SID’s in de “ProfileList” naar een identieke SID die we eerder hebben opgeslagen. Klik erop. Nogmaals dit is een voorbeeld.
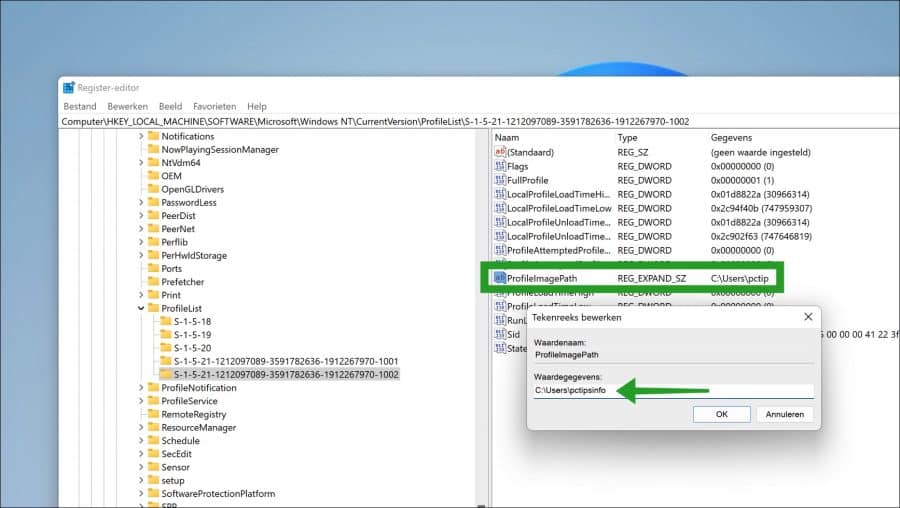
Dubbelklik op “ProfileImagePath”. Wijzig nu de profielmap naam. U laat “c:\users\” intact en wijzigt alleen de profielmap naam naar een nieuwe.
In mijn voorbeeld heb ik “c:\users\pctip” gewijzigd naar “c:\users\pctipsinfo“. Klik op OK.
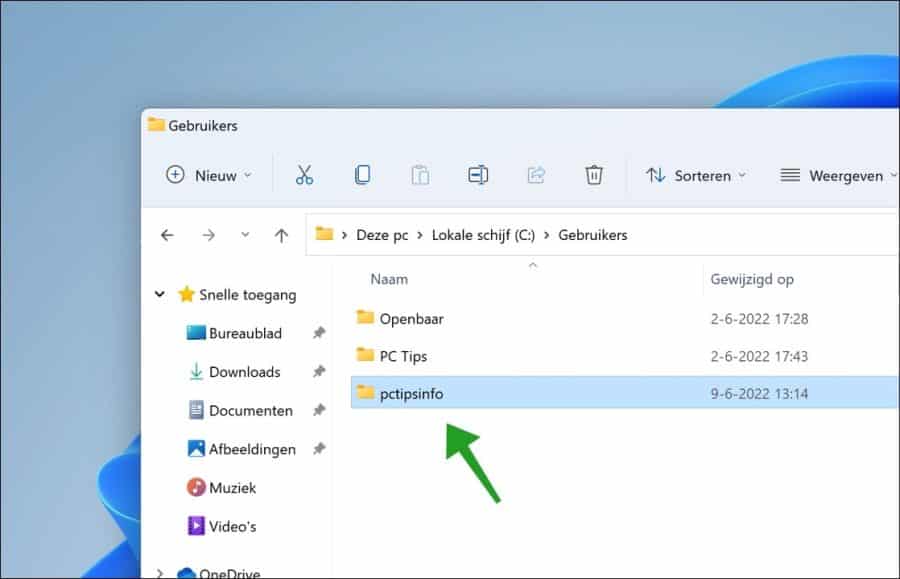
Open nu de Windows verkenner. Ga naar de map C:\Gebruikers\ en klik op de profielmap naam die u wilt wijzigen. Geef de nieuwe naam in die u ook heeft aangepast in het register.
In dit voorbeeld wijzig ik dus “pctip” naar “pctipsinfo”.
Log nu aan met het de gebruiker waarvan u de profielmap naam heeft gewijzigd.
U heeft nu succesvol de naam van de profielmap gewijzigd in Windows 11 of Windows 10. Bedankt voor het lezen!
Gerelateerd: Downloads map wijzigen naar een andere locatie.
Help mee
Mijn computertips zijn gratis en bedoeld om andere mensen te helpen. Door deze pc-tip te delen op een website of social media, helpt u mij meer mensen te bereiken.Overzicht met computertips
Bekijk ook mijn uitgebreide overzicht met praktische computertips, overzichtelijk gesorteerd per categorie.Computerhulp nodig?
Loopt u vast met uw pc, laptop of software? Stel uw vraag op ons computerforum en krijg gratis computerhulp van ervaren leden en experts.