
Als u iemand bent die graag controle houdt over wat er in Windows 11 actief is en niet, dan kunt u de achtergrond apps uitschakelen.
Een applicatie die op de achtergrond actief blijft, neemt systeemprocessen in beslag. Een hoop van deze niet gebruikte processen actief op de achtergrond kan uw computer vertragen. Ook verkort het de duur van een batterij als uw laptop niet op het stroomnet is aangesloten.
Het is dus aan te raden om zelf te bepalen of een applicatie op de achtergrond actief mag blijven of niet. Door zelf te bepalen welke app wel of niet op de achtergrond actief is, kunt u aanzienlijk geheugen besparen en verkort u de duur van het opstarten van de computer.
Meld u dan aan voor onze nieuwsbrief.
Achtergrond apps uitschakelen in Windows 11
Als u achtergrond apps wenst uit te schakelen dan kunt u dit doen via de instellingen.
Achtergrond apps uitschakelen via instellingen
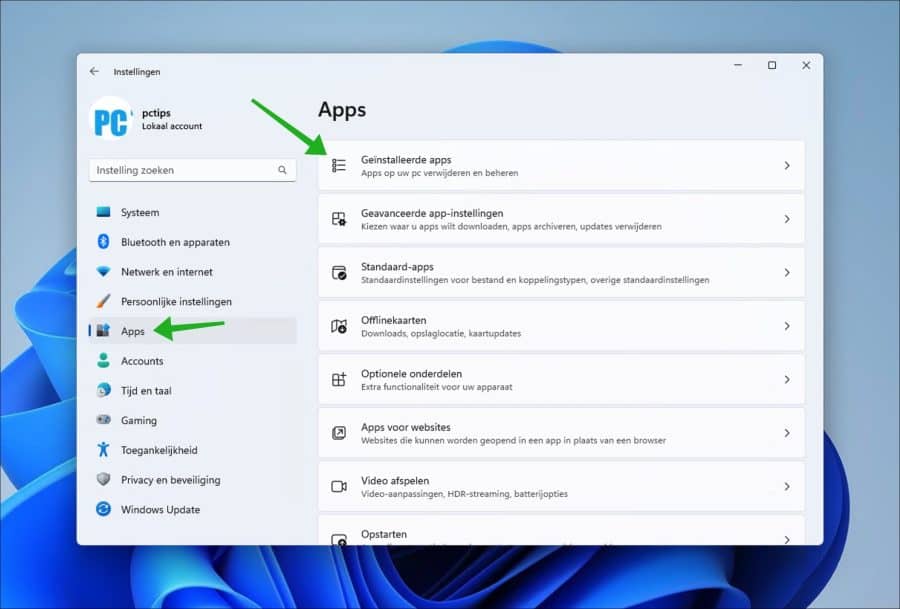
Open de instellingen. In de instellingen klikt u op “apps” en vervolgens op “geïnstalleerde apps”.
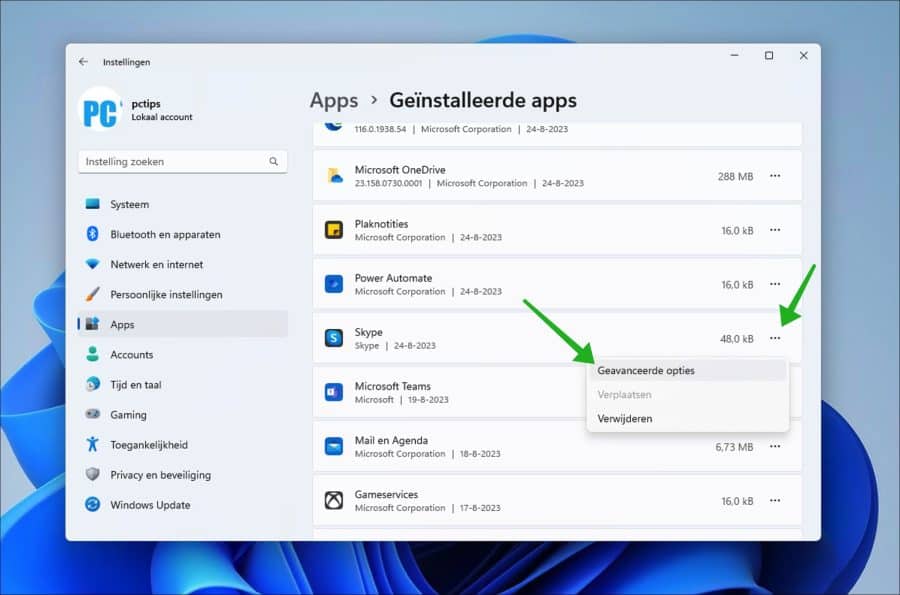
In de lijst van geïnstalleerde apps dient u alle apps waarvan u het achtergrond proces wilt uitschakelen te wijzigen.
Dit doet u door rechts naast de app op de drie verticale puntjes te klikken. In het menu klikt u vervolgens op “geavanceerde opties”. U doet dit dus voor elke app afzonderlijk.
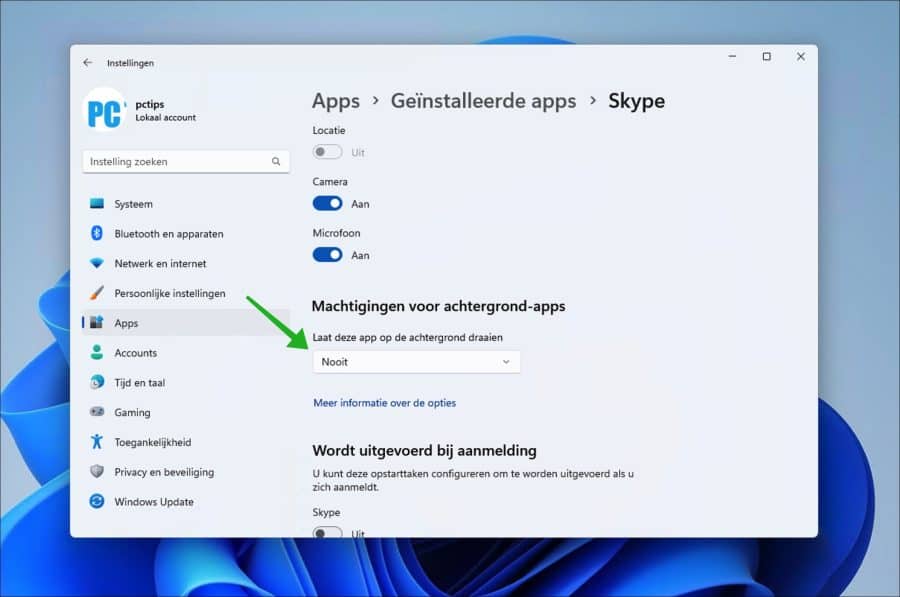
Om de achtergrond app uit te schakelen, wijzigt u de instelling “Laat deze app op de achtergrond draaien” naar “Nooit”.
Er zijn nog twee andere opties. Dit is de “Altijd” optie, die spreekt voor zich. De ander is de “Stroom geoptimaliseerd” optie. Hiermee wordt de app beperkt in CPU en geheugengebruik. Dit optimaliseert Windows 11 zelf afhankelijk van gekozen energieplan en of de computer of laptop is aangesloten aan het stroomnet.
Achtergrond apps uitschakelen via Windows register
Als u alle achtergrond apps in één keer wilt uitschakelen en hiermee wilt voorkomen dat er überhaupt achtergrond apps actief zijn, dan kunt u het Windows register gebruiken.
Houd er rekening mee dat bepaalde apps niet meer goed werken als ze niet op de achtergrond actief zijn. Ik raad deze optie niet aan voor iemand die niet precies weet wat hij of zij doet. Gaat u door, volg dan de stappen precies, het aanpassen van het Windows register is riskant.
Open het Windows register. Ga naar de sleutel:
HKEY_LOCAL_MACHINE\SOFTWARE\Policies\Microsoft\Windows\
Klik met de rechtermuisknop op “Windows” en klik op “Nieuw” en vervolgens op “Sleutel”. Geef deze sleutel de naam “AppPrivacy”.
Klik nu opnieuw met de rechtermuisknop op de “AppPrivacy” sleutel en klik op “Nieuw” en vervolgens op “DWORD 32-bit waarde”. Geef deze waarde de naam “LetAppsRunInBackground”. Dubbelklik erop en stel de waardegegevens in op “2”.
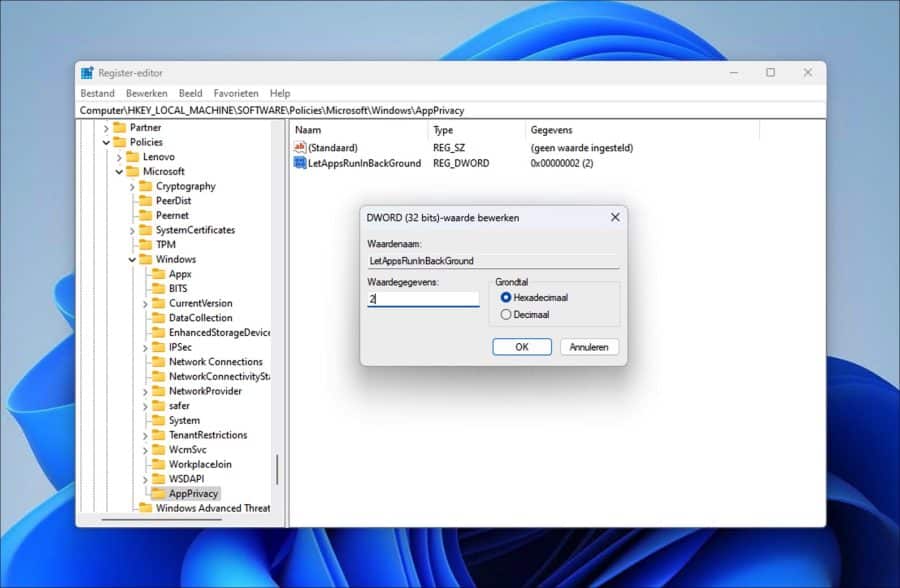
Herstart uw computer om het beleid actief te maken. Er worden nu geen apps meer uitgevoerd op de achtergrond.
Lees verder: Opstart apps uitschakelen in Windows 11.
Ik hoop u hiermee geïnformeerd te hebben. Bedankt voor het lezen!
Op mijn bureaublad zijn alle pictogrammen (apps aanduidingen) verdwenen. Hoe krijg ik ze terug op mijn bureaublad?
Hallo, mogelijk helpt dit artikel: https://www.pc-tips.info/tips/windows-tips/bureaublad-pictogrammen-verdwenen-dit-is-de-oplossing/
Succes!
Heel hartelijk bedankt Stefan. Het is gelukt volgens jouw tip. Alle pictogrammen staan terug op het bureaublad.
Vriendelijke groetjes