

Do you have some documents and would you like to convert them into PDF (Portable Document Format) form? In this article, learn how to create a PDF file in Windows 11.
Windows 11 not only allows you to print a notepad or Wordpad document to PDF. You can create a PDF file from any web page or document that can be printed. All this is possible thanks to the built-in Microsoft Print to PDF function.
Previously, Microsoft had the Microsoft XPS Document Writer printer introduced that did not last long. Now Microsoft has an alternative such as PDF.
Using this “Microsoft Print to PDF” virtual printer, you can create a PDF file from any document. You must open the document and press Ctrl + P to display the Print dialog box. Then select the built-in “Microsoft Print to PDF” printer and make your printout as a PDF. This is how it works.
Create PDF file in Windows 11
As mentioned above, you can create or convert any document/webpage to PDF format using Windows' built-in virtual PDF printer. There is no need to download and install a third-party application to create a PDF file.
Open the document, file or website that you want to create a PDF file from. Press CTRL + P on your keyboard to open the printer dialog. Depending on the app and file it is CTRL + P but you can always go to file then print.
Select “Microsoft Print to PDF” as the printer and click Print.
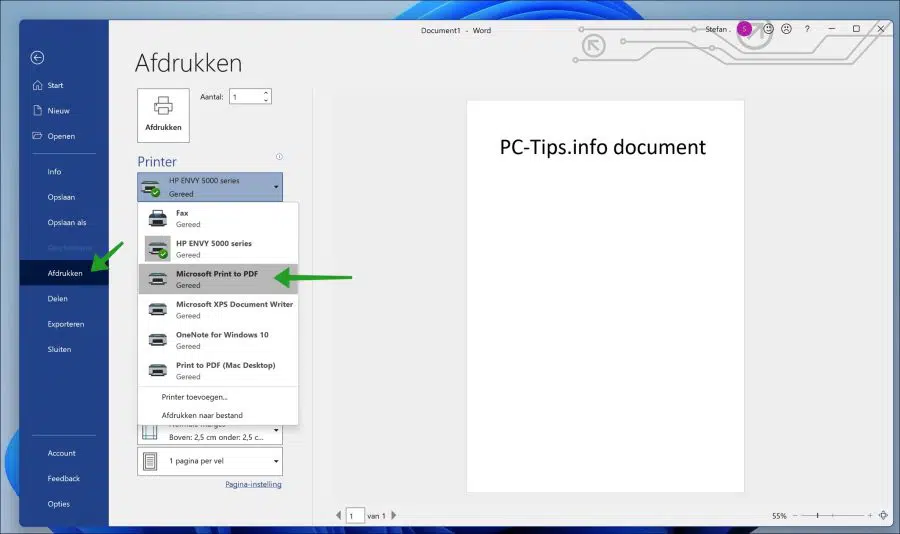
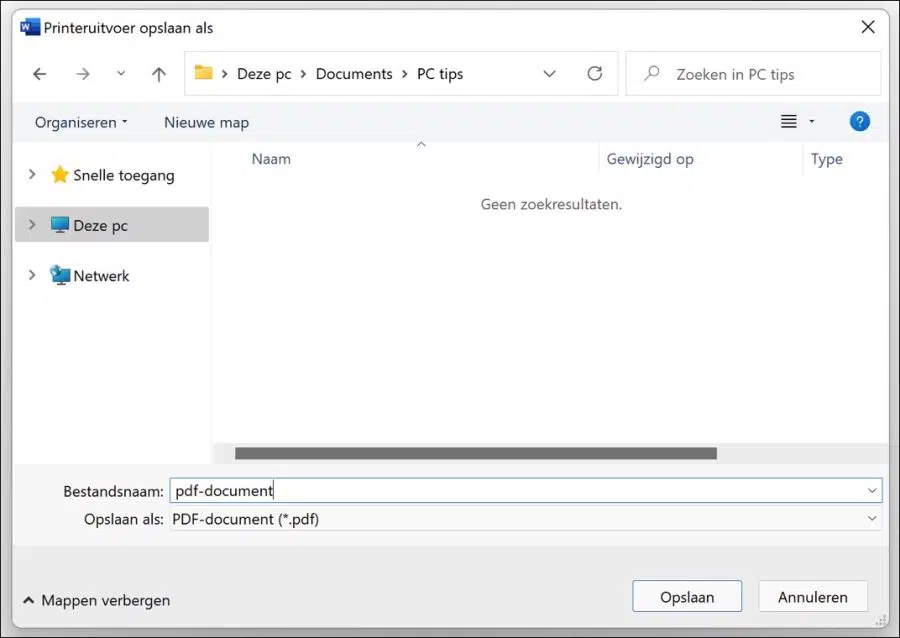
A dialog will open where you can save the document as a PDF file. Give the PDF file a name and click Save.
You have now created a PDF file from any document, text file, website without the use of any third party software.
Lees meer:
- Merge a PDF.
- Take a screenshot of an entire page.
- Change default browser in Windows 11.
- 14 tips for Windows Explorer in Windows 11
- Install Windows 11 on an unsupported PC.
- Clean Windows 11 registry? This is how!
- 8 tips to make Windows 11 faster.
I hope this helped you. Thank you for reading!
I have 3 invoices in PDF that I want to format into one form and then send as one file. How do I do that.
Hello, you can read how to merge PDF files here: https://www.pc-tips.info/tips/windows-tips/pdf-samenvoegen/
Success!
Addresses (file with contacts) In Windows 10. After selecting 3 addresses (on 1 A4) and printing (HP printer), a window appears as an intermediate step to save the print job in a file with a name. After opening this file, I see the selection of the addresses to be printed (print example), which will be printed on an A4 after the print order. So much for Windows 10.
I recently got Windows 11.
The aforementioned method does not work in Windows 11.
If I want to print the 3 addresses, no intermediate step appears to save the print order in a file. When you print the command, only a blank page appears stating that no example is available. How can I print the addresses on an A4 (3 pieces)? Thank you in advance.
Bart.
Hello, you can try to restore the old printer dialog from Windows 10:
https://www.pc-tips.info/tips/windows-tips/nieuw-printer-dialoog-in-windows-11-uitschakelen/
I'm not entirely sure if it still works in the latest Windows 11.
Before you start, I recommend creating a restore point. You can then restore this if the dialogue did not work:
https://www.pc-tips.info/tips/windows-tips/windows-herstelpunt-maken-en-terugzetten-uitgebreide-instructie/
Success!
Stephen,
Thank you very much for your suggestion.
I will try.
Bart
Dear Stephen,
I'm running into the following:
After regedit.exe and HKEY_Current_USER/Software/Microsoft and right mouse button on Microsoft, New Key and New I see Key 1 Name is “default” REG_SZ (no value set).
Change in Print does not work: neither the name key 1 nor the name standard, I get the message editor cannot change name.
What am I doing wrong?
Bart
Hello, I advise you to read carefully. You don't appear to be creating a new “key”. You must create the key “print”. If it already exists, open it and continue.
The path then becomes:
HKEY_CURRENT_USER\Software\Microsoft\Print\UnifiedPrintDialogwith value “PreferLegacyPrintDialog” set to “1”. Good luck!