
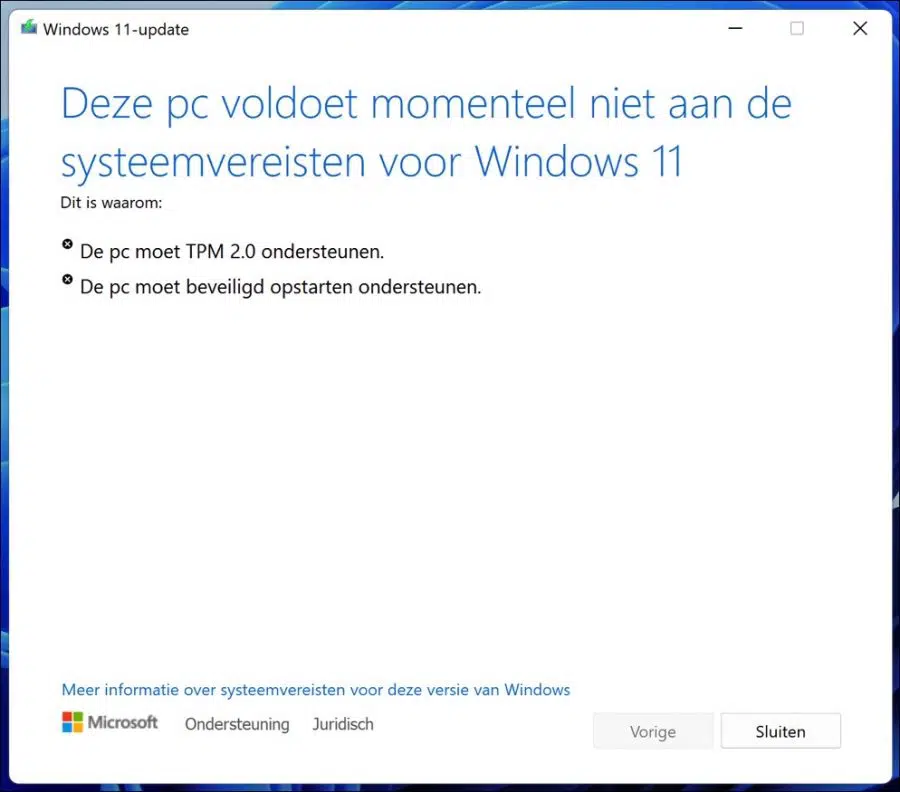
If you want to install Windows 11 on your computer, your computer must meet a number of requirements. If your computer does not meet the requirements, you will receive the following message “This PC does not currently meet the system requirements for Windows 11”. You may see this message from a Windows 11 installation or via the PC HealthCheck available.
Two of these requirements are a TPM 2.0 chip and Secure Boot, also known as “Secure Boot”.
What is TPM 2.0? TPM is short for Trusted Platform Module, and TPM 2.0 is its latest version. TPM is a specific type processor that has a clear purpose. It performs hardware cryptographic operations to secure the encryption and prevent malicious attacks from attacking your hardware and the boot process.
What is Secure Boot? Secure boot is a security standard designed to ensure that a computer only boots with software that is trusted by the Original Equipment Manufacturer (OEM). If the signatures are valid, the PC boots up, and the firmware gives control to the operating system.
Read here how Enable TPM and Secure Boot in the EUFI (BIOS) if your computer supports it.
If you have an older computer then it is possible that you Windows 11 cannot be installed according to Microsoft because it does not meet the above requirements. However, there is a way to bypass this check on TPM 2.0 and Secure Boot. This way you can still install Windows 11.
Install Windows 11 without TPM 2.0 and Secure Boot
There are now five ways to install Windows 11 without these requirements. The first way is to install an unsupported Windows 10 computer with Windows 11. The second way is to add exceptions to the Windows 10 registry during the Windows 11 installation process. You first create an ISO file on a USB and with this USB you can install Windows 11. During the installation, you change a number of keys in the registry so that you can still install Windows 11. The third way is to adjust Windows 10 to be able to install the Windows 11 update.
This fourth way is to modify the ISO file used to install Windows 11. This method is long lasting and no longer relevant at the moment. I have also added a fifth method that allows you to create a Windows 11 installation USB without TPM via EaseUS Win11Builder.
This article contains all possible ways – to date – to install Windows 11 on an incompatible PC.
Option 1: Install Windows 11 on unsupported Windows 10 computer (recommended)
Do you have a Windows 10 computer that, according to Microsoft, does not meet the minimum system requirements to install Windows 11? Good news, you can now install Windows 11 on an unsupported computer. Click on the link to read the article.
Option 2: Install Windows 11 without TPM from Windows 11 iso installation
Download the Windows 11 iso file. Place the ISO file on a USB and restart. Try to install Windows 11 from the created Windows 11 installation USB. If your PC doesn't meet the hardware requirements, you'll see a message that says "This PC can't run Windows 11."
From this screen, press Shift + F10 to open the Command Prompt window.
Type 'regedit' and press enter.
The Windows Registry Editor will now open. Type in the address bar
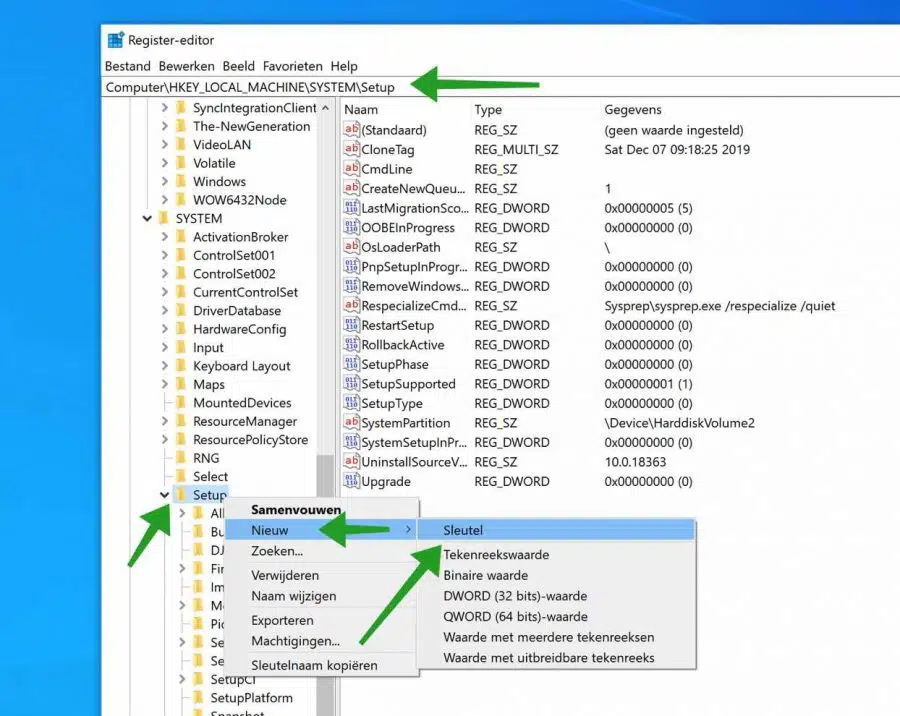
HKEY_LOCAL_MACHINE\SYSTEM\Setup
and press enter.
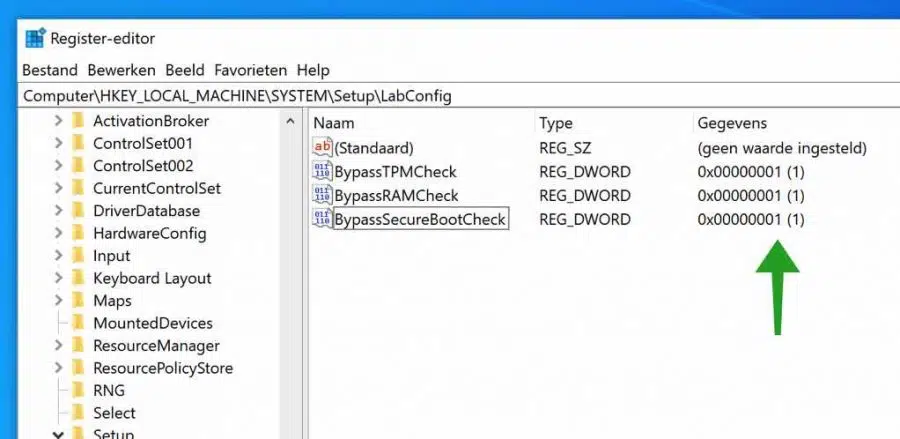
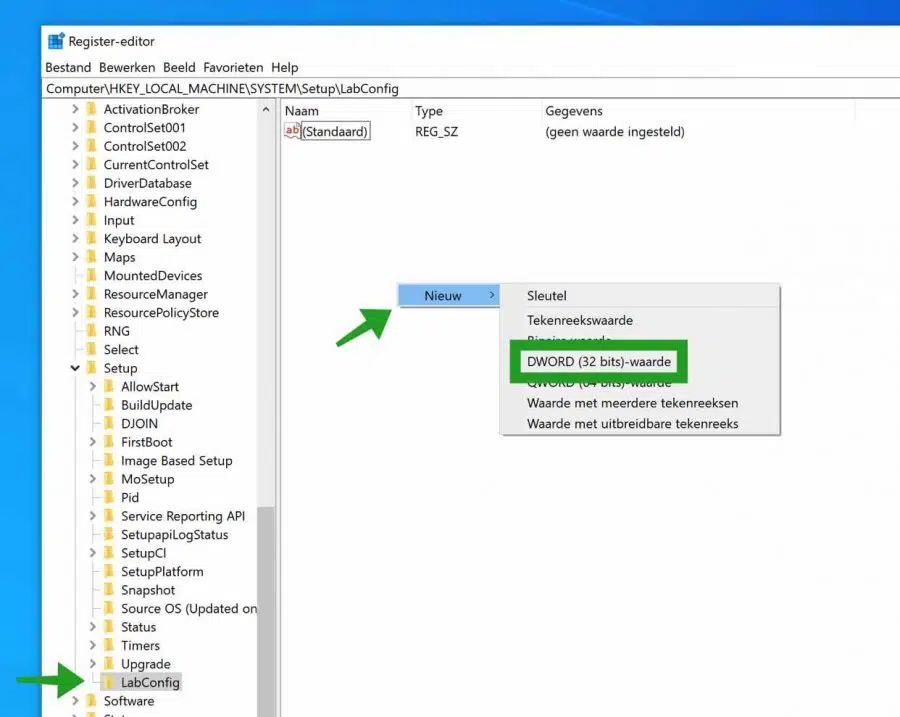
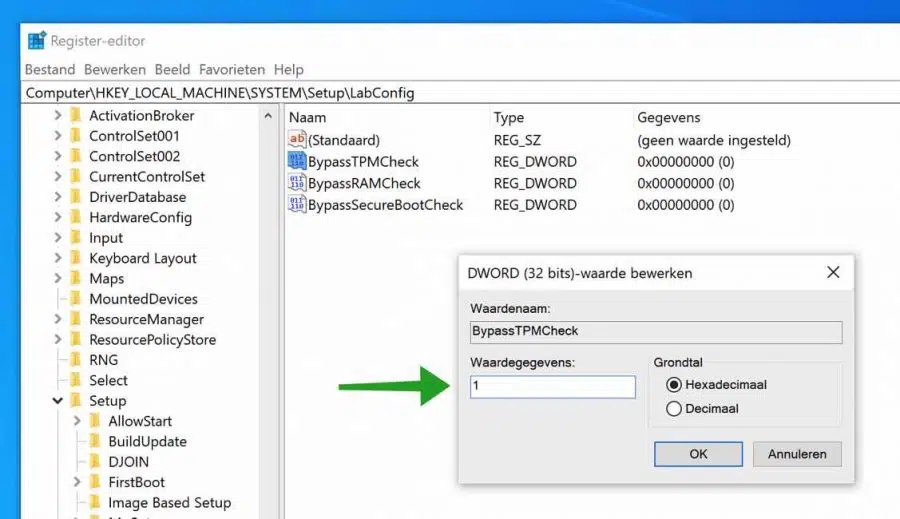
You should now see a 'Setup' key. Right-click on it and choose New > Key. You will now be asked to give the key a name. Choose 'LabConfig' (everything is without quotes) and press enter.
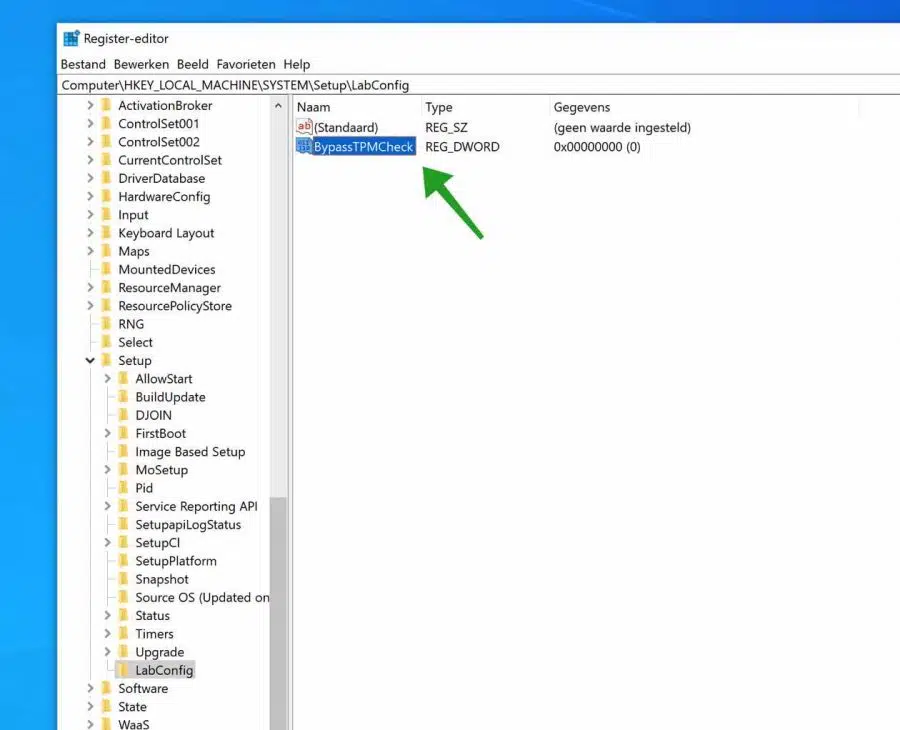
Right-click on the new 'LabConfig' key you created and choose New > DWORD (32-bit) Value. Name the key 'BypassTPMCheck' and set the data to 1.
Do this again for two other keys for 'BypassRAMCheck' and 'BypassSecureBootCheck', with the same value of 1. Below is the result.
Close this window with the red X in the top right corner.
Close the Command Prompt window by typing 'exit' and pressing enter. You are now back to the 'This PC cannot run Windows 11' message. Click the Back button in the top left corner. You should now be able to complete the Windows 11 installation on a computer that does not actually support Windows 11.
Option 3: Install Windows 11 without TPM from Windows 10
To be sure I recommend getting one Create a Windows restore point before making changes to the Windows registry. This way you can always revert the changes.
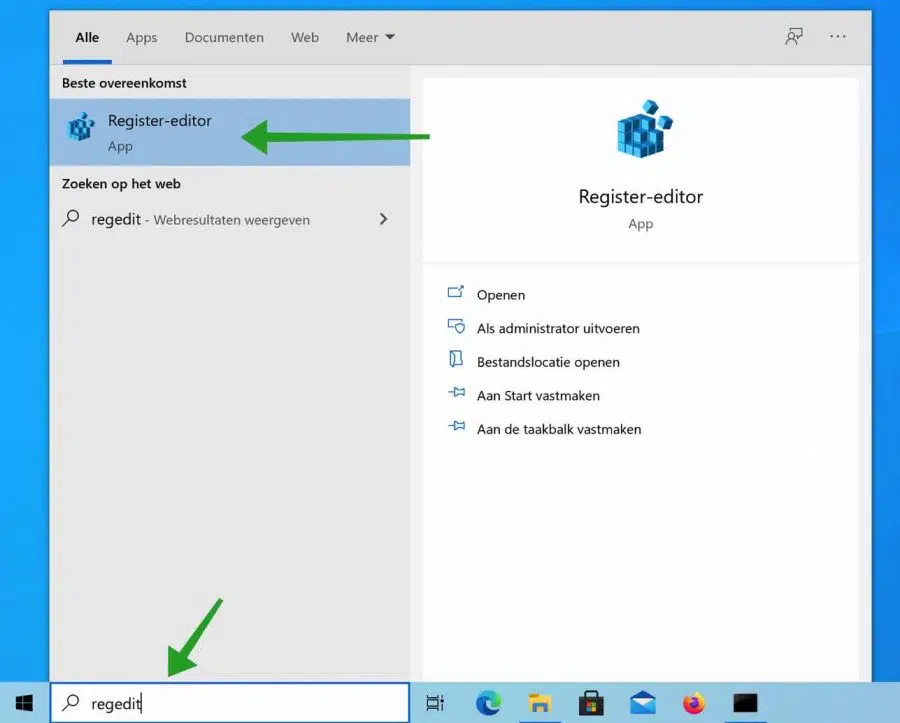
In the Windows 10 search bar type: regedit. Open the Windows Registry Editor.
In the regedit editor open the following folder structure on the left.
HKEY_LOCAL_MACHINE\SYSTEM\Setup
Right-click on the “Setup” folder in the menu, click on New and then on Key.
Give the Key the following name: LabConfig
1. Then click on the free space on the right with the right mouse button. In the menu, click New and then DWORD Value (32-bit).
2. Name this new DWORD (32-bit) value: BypassTPMCheck
Below you can see the result. But we're not done yet.
Repeat steps 1 + 2 two more times. However, now you create two more DWORD (32-bit) values with a different name, namely:
- Bypass RAM Check
- Bypass Secure Boot Check
Below in the image you can see the result.
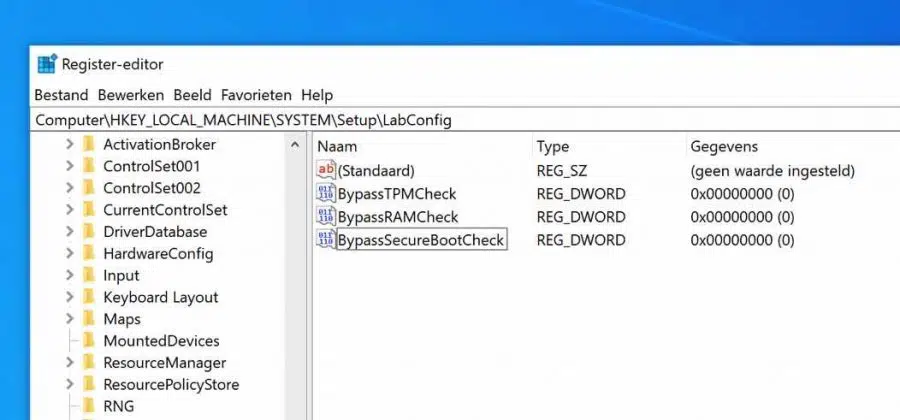
Double-click each value and change the value to 1. Starting at “BypassTPMCheck,” double-click it and change the value to 1. Click OK. See image below.
Repeat this for all 3 values, so “BypassTPMCheck” to 1, “BypassRAMCheck” to 1 and “BypassSecureBootCheck” to 1.
Ultimately this is the result, see image below.
Now close the Windows registry editor and restart your computer. After the restart you can Update Windows 10 to Windows 11 without TPM and SecureBoot controls.
Option 4: Install Windows 11 without TPM 2.0 and SecureBoot via an ISO
If you wanted to install Windows 11 without TPM 2.0 check and SecureBoot check on an older PC that does not support it, you will need two ISO files. Namely a Windows 10 ISO file and a Windows 11 ISO file. We will modify these ISO files and then write them to installation media such as a USB stick. You can then use this USB stick to install Windows 11 on a computer that does not actually support Windows 11 according to Microsoft.
Please note that some technical knowledge is required for this method. I do my best to explain it as clearly as possible for everyone. Processing the information in this tip and in this way takes a lot of time. I recommend option 1 in this article. This option is easier.
Download Windows 10 ISO file
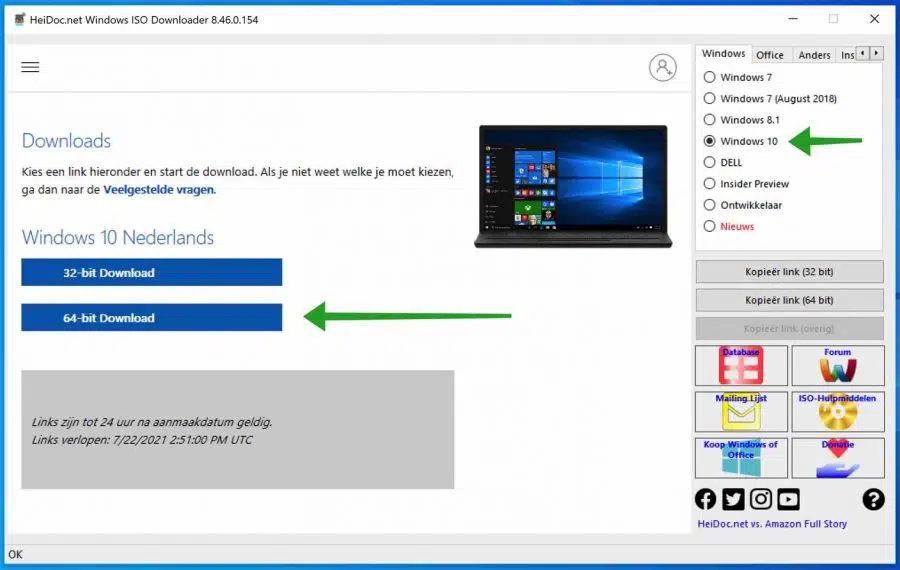
You start by downloading a Windows 10 ISO file. You can do this with the tool Windows ISO Downloader.
Open Windows ISO Download and click on Windows 10 in the right column. Then follow the steps and download the Windows 10 ISO file.
You now have a Windows 10 ISO file. Now we need a Windows 11 ISO file.
Download Windows 11 ISO file
Go to the website uupdump.net. In the search bar type: Windows 11.
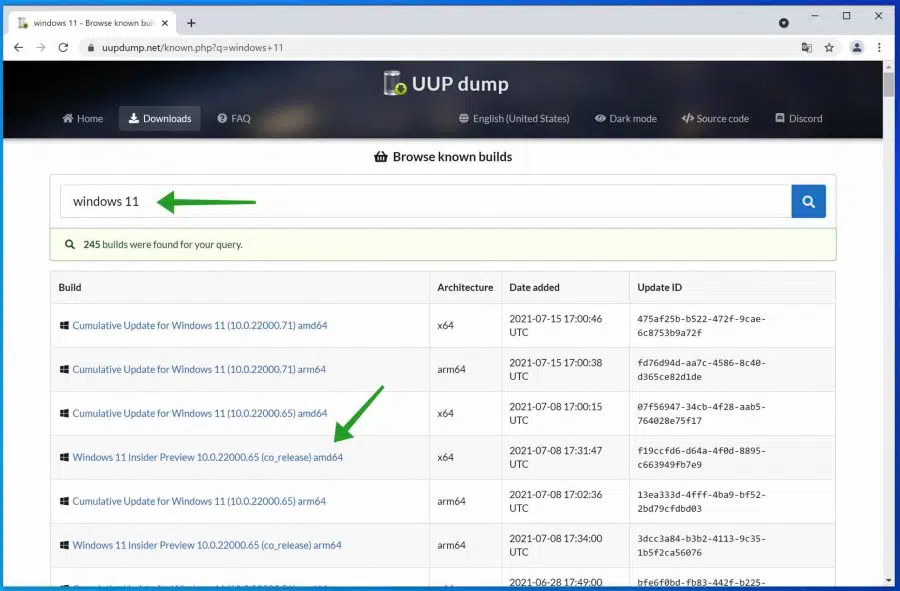
Select a Windows 11 Insider Preview version. The latter in most cases. Click here. Do not click on Cumulative Update because it is not complete Windows 11 version.
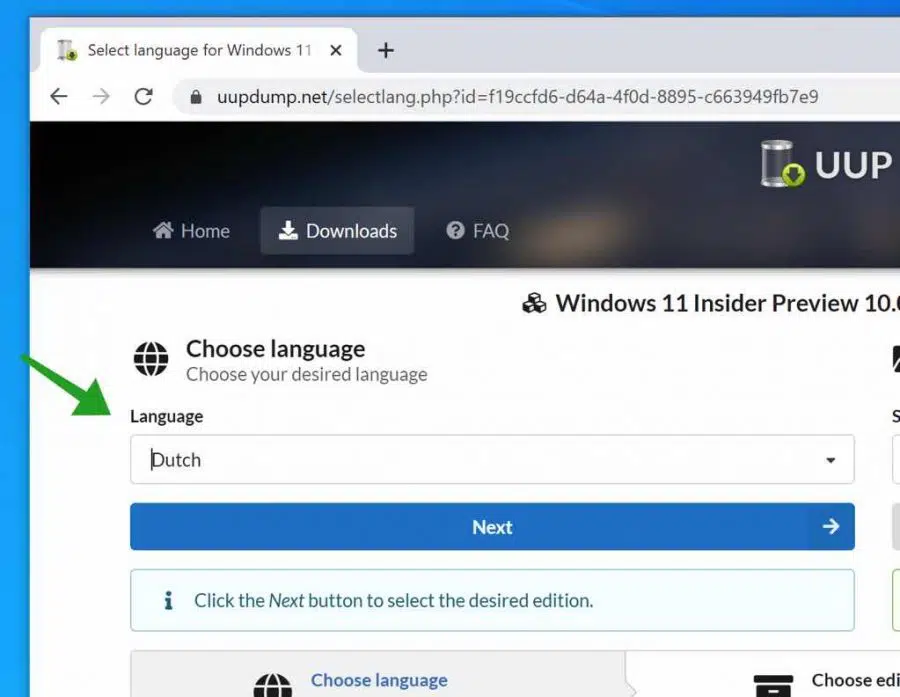
Change language to Dutch. Then click on the Next button.
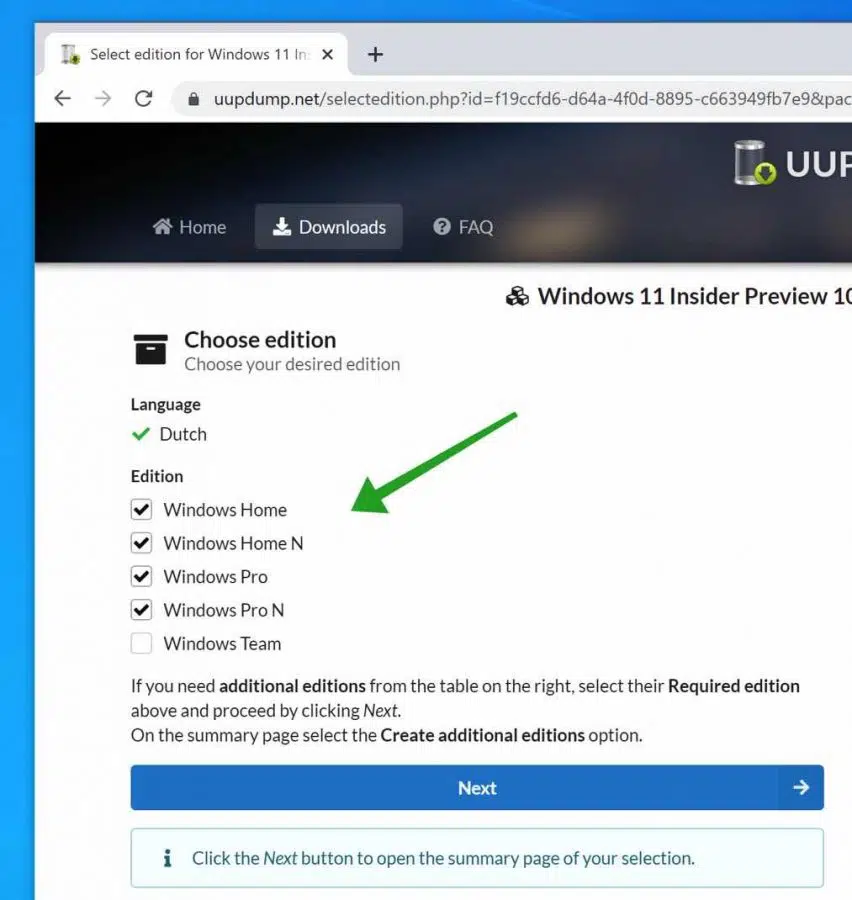
Select the edition you want. In most cases you can leave this as it is, you do not need to change anything. Then click Next.
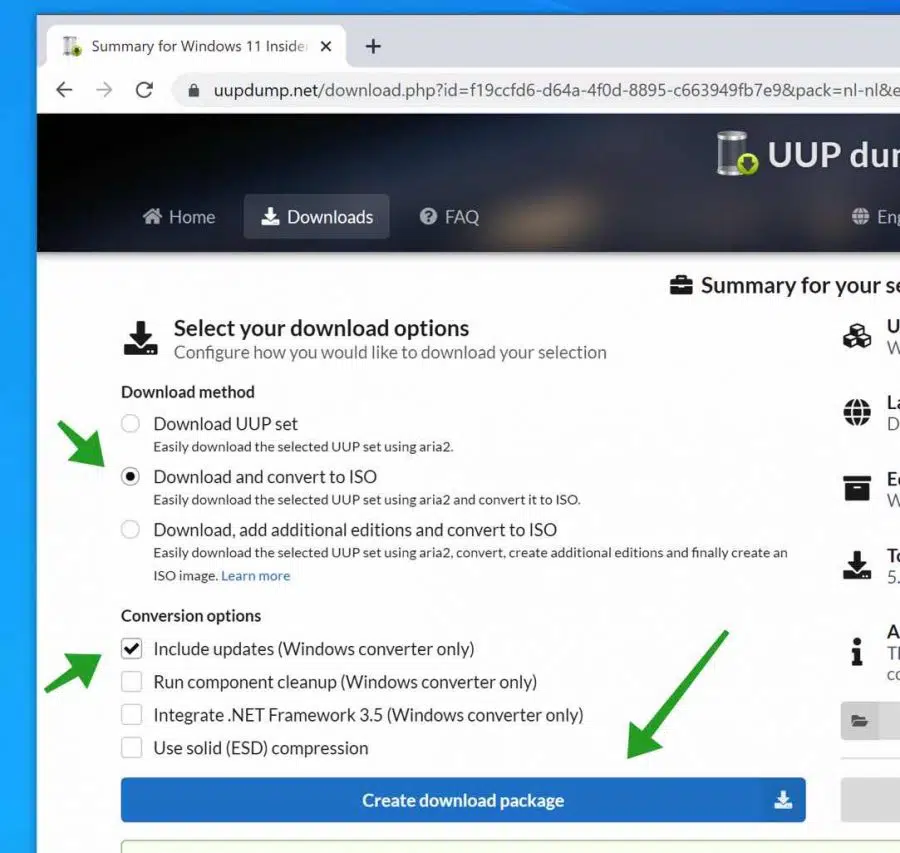
In principle, you don't have to change anything here either. Make sure “Download and convert to ISO” is enabled and “Include updates (Windows converter only)” is checked. Then click Create download package.
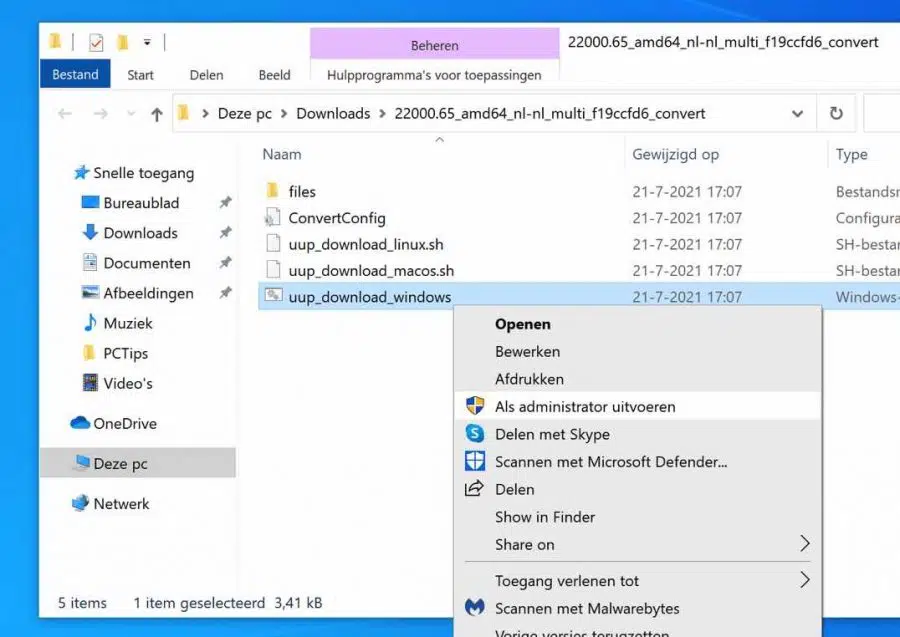
A zip file will now be downloaded to your computer. Unzip the zip file and place the files in a desired location.
Note: I recommend that you disable your antivirus for the next step. Sometimes this causes problems and files and connections are blocked unnecessarily.
In the new folder you will find a number of files. We need the file: uup_download_windows.cmd. Right-click on it and choose Run as Administrator.
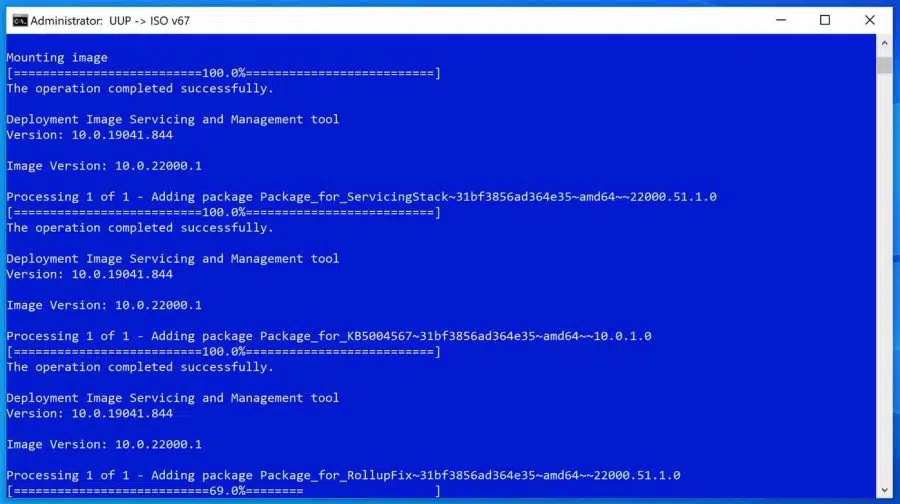
A new Command Prompt window will now open where the script will download the Windows 11 files and convert the ISO. This process can take a long time.
When the script is finished you will find a new file in the same folder as uup_download_windows.cmd. You will see a Disk Image file. This file is the Windows 11 ISO you need.
I recommend putting the Windows 10 iso file and the Windows 11 iso file together in a new folder, that keeps things organized.
Double-click on the Windows 11 ISO file to mount the ISO file, in other words to open it in Windows Explorer. You will now see a new disk drive. Double-click it to open its contents.
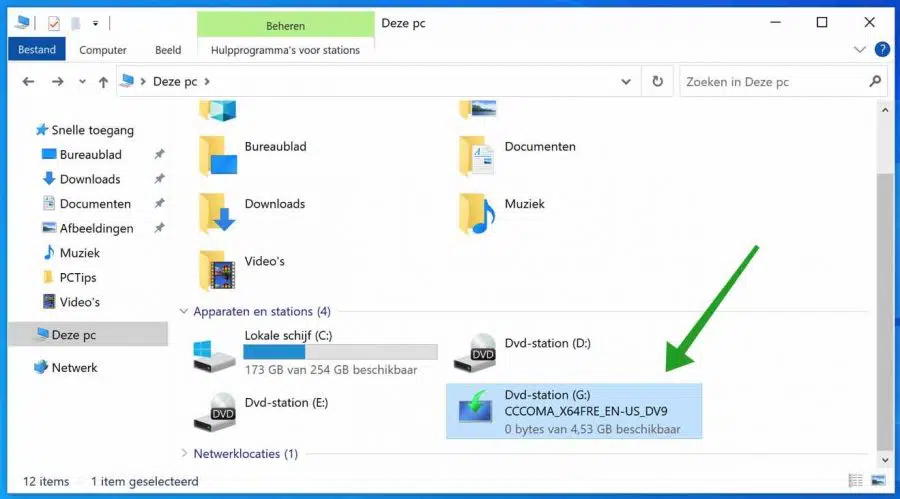
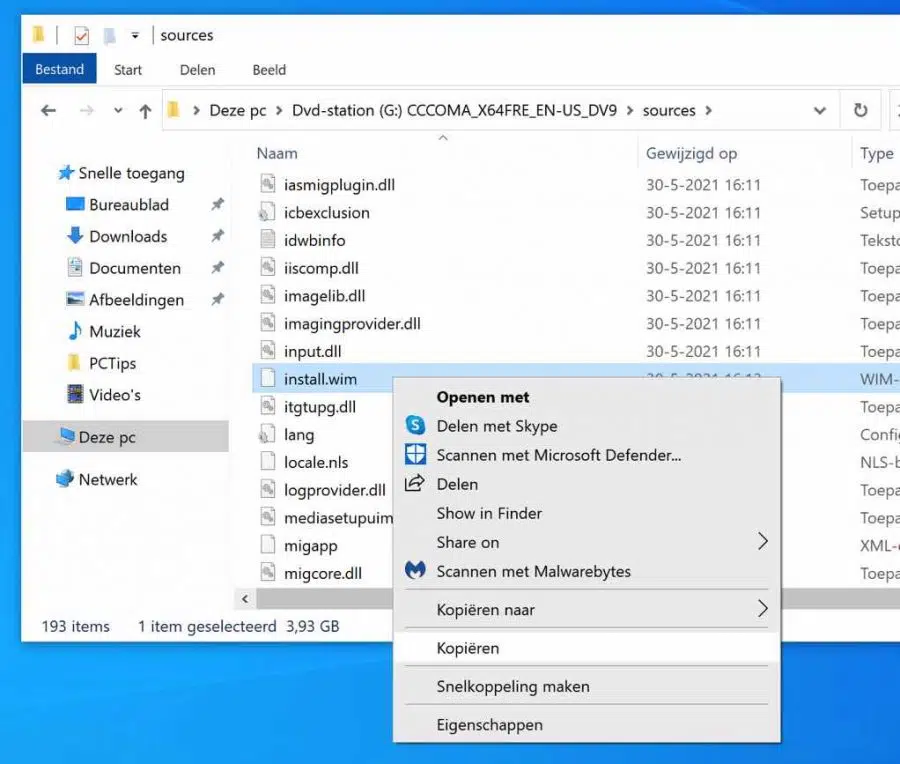
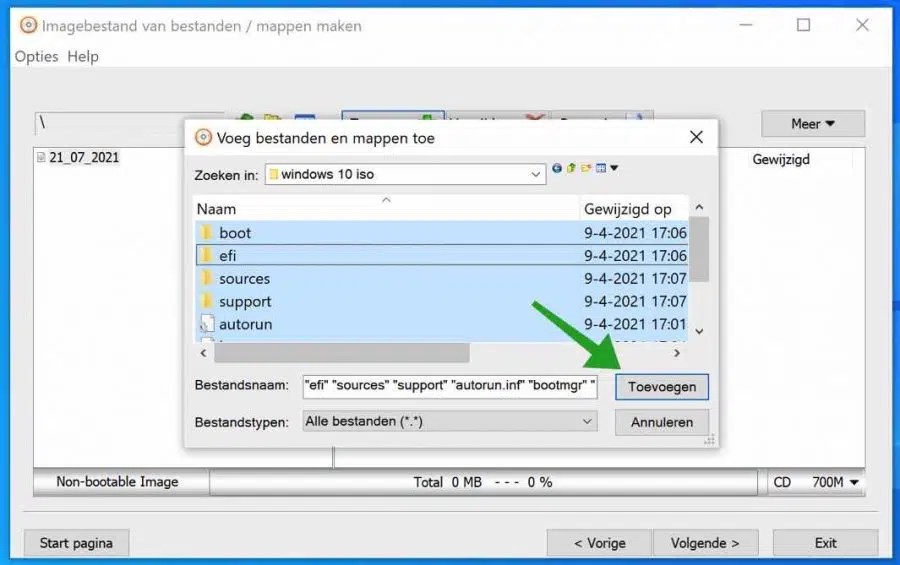
Go to the Sources folder. Search for file: install.wim. Right-click on the install.wim file and choose Copy. Copy the file to the root of the C drive.
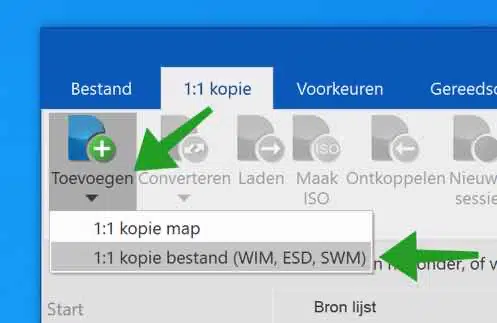
Download NTLite now to your computer and install NTLite by following the installation process. Select the free version while opening.
Click Add in the menu bar. Then click on Copy file (WIM, ESD. SWM).
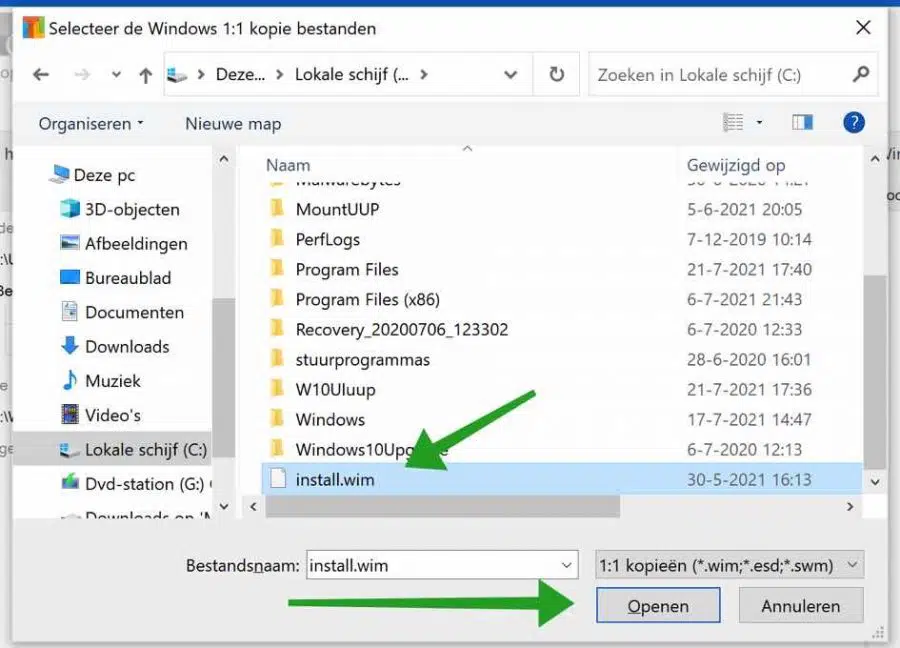
Go to the C drive and select the Install.wim file you just copied. Then click Open.
Click OK on the warning.
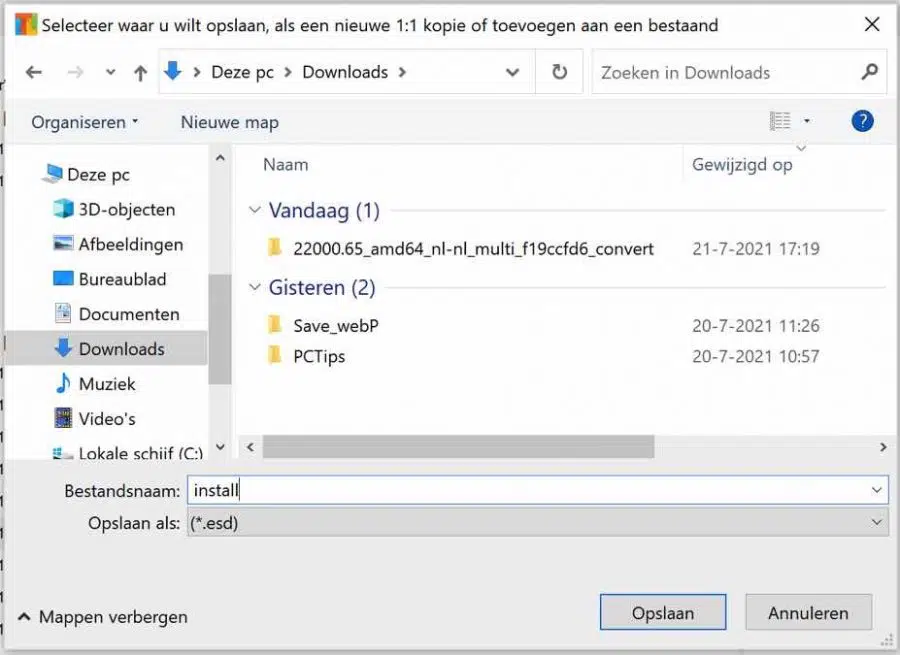
You will now see a list of all the versions that the Windows 11 ISO contains. Right-click on the desired Windows 11 version and click Export and then ESD.
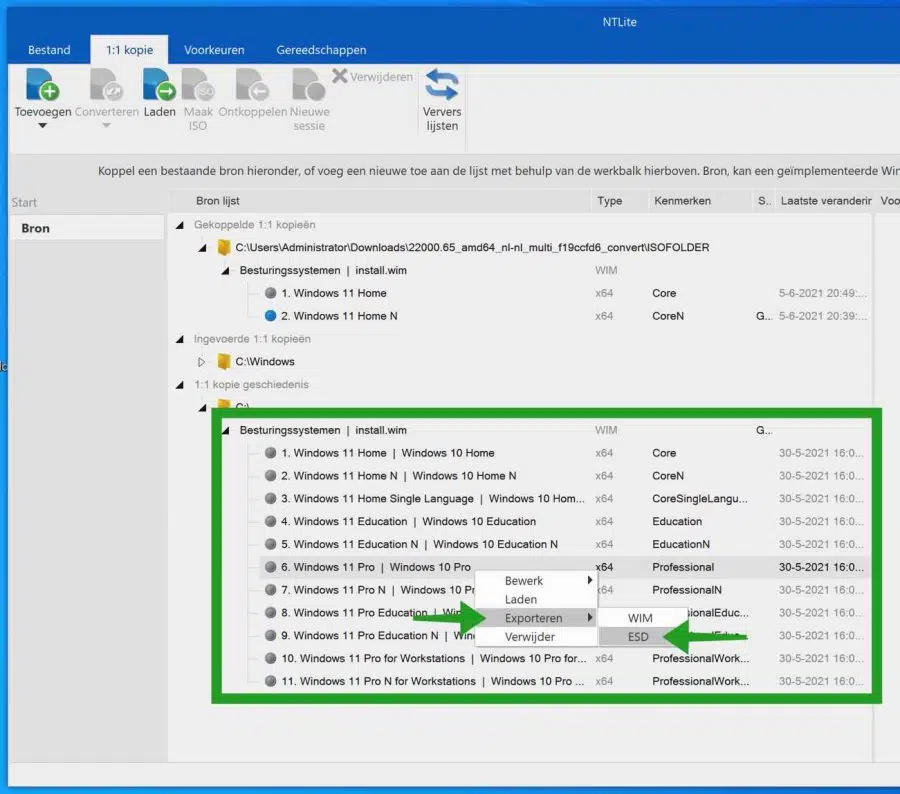
Click OK at the compression warning. Save the install.esd file in the Downloads folder of your computer.
Please wait until the export action is finished. You will be notified when it is complete. This can take a long time, up to an hour or more.
Download and install 7-zip now. This is necessary to extract the Windows 10 iso file to a folder.
In the meantime, go to the folder where you saved the Windows 10 ISO file. Right-click on the Windows 10 iso file and choose 7-Zip and then Extract to “windows 10 iso” (possibly a different name for you, this depends on the name of the iso file).
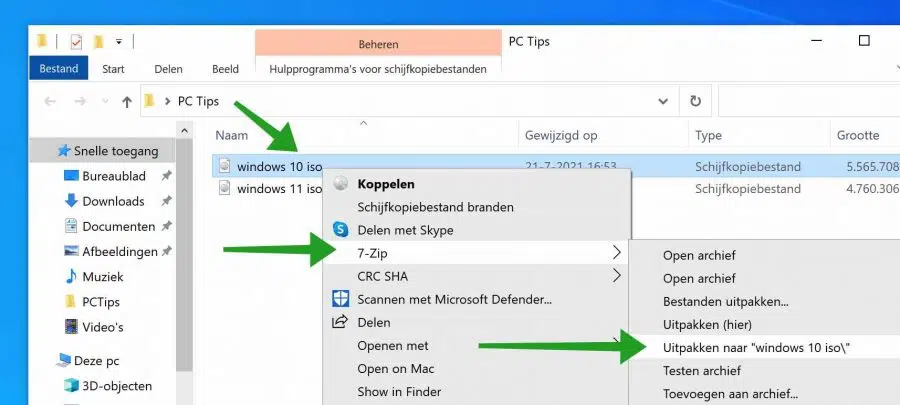
A new folder will now be created with the contents of the Windows 10 ISO file. Open this new folder. Go to the sources folder and in the sources folder look for file: install.esd. Select this file and right click on the file and choose delete.
Go back to the Downloads folder where you saved the install.esd of the Windows 11 ISO. Please check whether the export via NTLite has been completed in the meantime?
Copy this install.esd file from the Downloads folder and paste it into the sources folder of the Windows 10 iso contents. So you have now moved an exported install.esd file from the Windows 11 ISO to the installation media (sources) folder of the Windows 10 ISO contents. Do you still get it? Luckily 🙂
Create ISO file from Windows 10 content
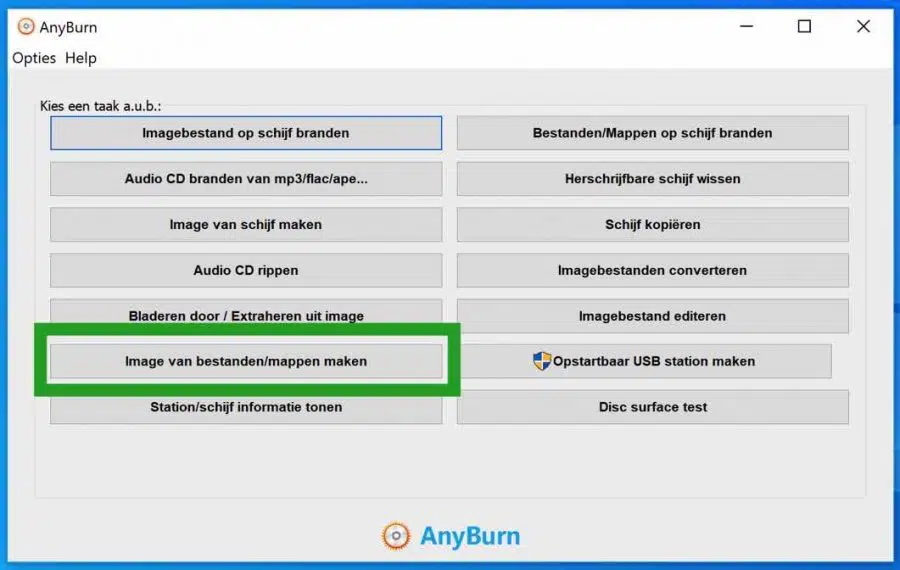
Now that you have adjusted the contents of the Windows 10 ISO in the folder you just created, you must create an ISO file again to be able to install our “custom” Windows 11 via USB again.
To now create an ISO file again from the contents of the Windows 10 ISO you need Any Burn to download. Install AnyBurn on your computer.
Click on “Image files/folders”.
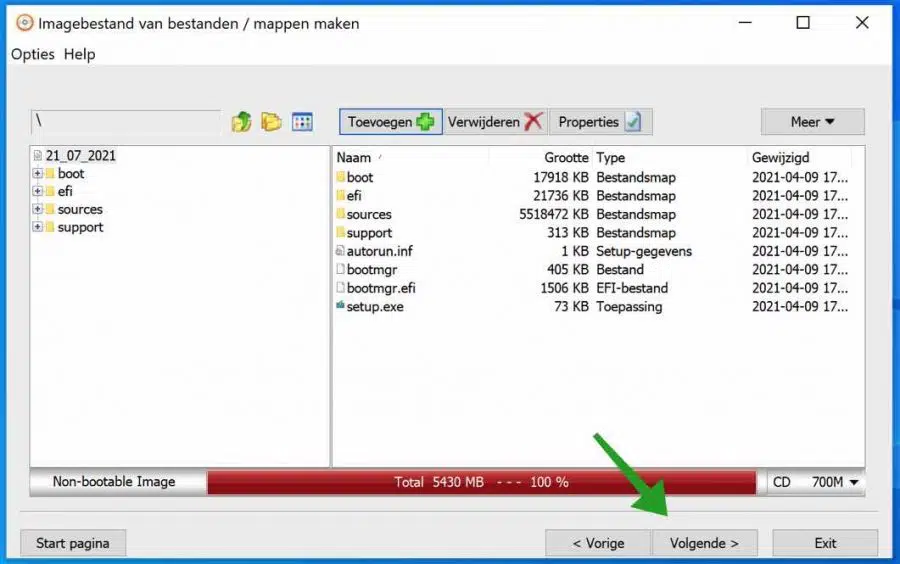
Click the add button. Click on the folder containing the contents of the Windows 10 ISO (and the modified Windows 11 install.esd file in the sources folder). Select all files by pressing CTRL + A on your keyboard. When all files are selected, click Add.
Click Next.
Click the folder icon to save a name for the new custom ISO file. Give it a name and click Save.
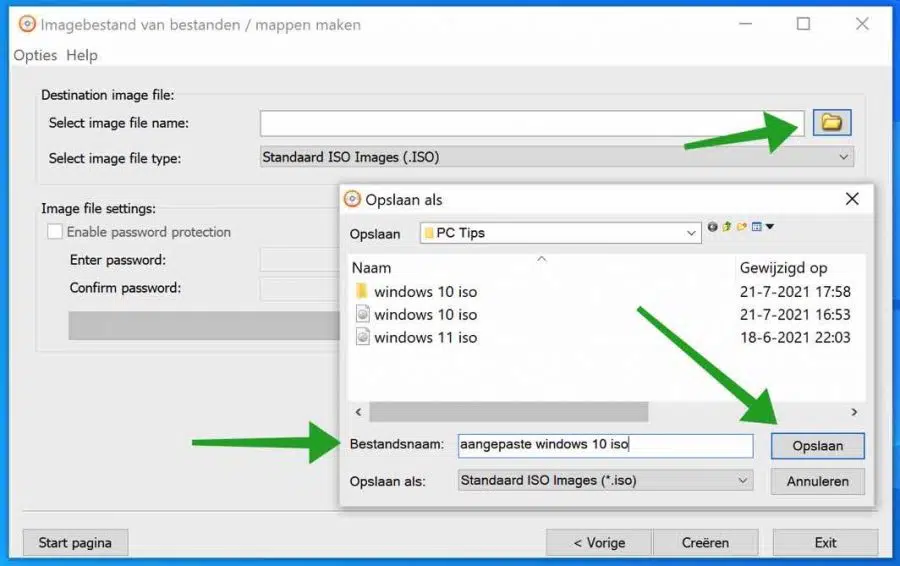
Then click Create at the bottom. An ISO file will now be created in the selected location. This may take a while.
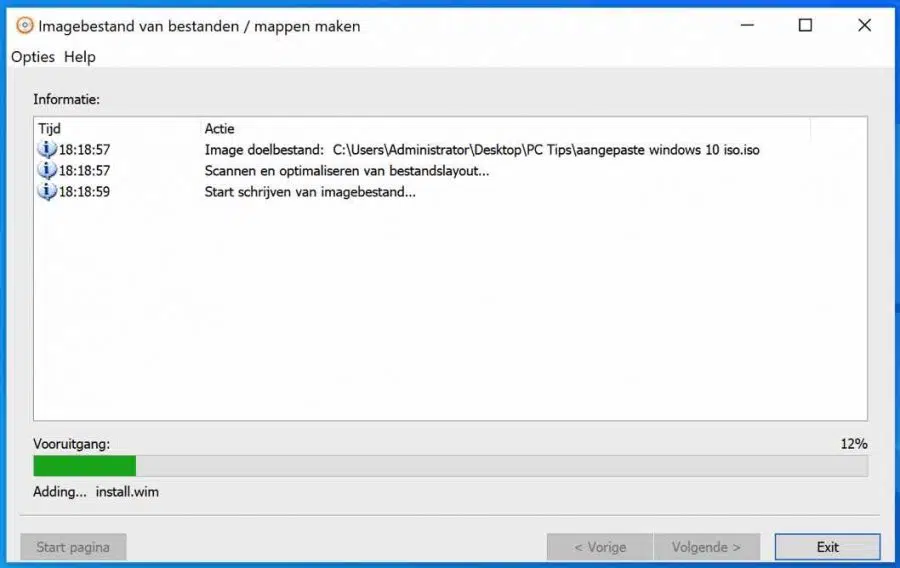
Once the AnyBurn process is complete, you now have an ISO file with a modified Windows 10 version that will install Windows 11. You can use this ISO to install Windows 11 on a computer that would not actually be supported.
To place the ISO on a USB stick you can use Rufus.
Option 5: Create Windows 11 installation USB with EaseUS Win11builder
To create a Windows 11 USB for installation, you can use EaseUS Win11builder. This Windows 11 tool for you to put on a USB stick for installation. You can also choose to bypass TPM 2.0 and Secure Boot checks.
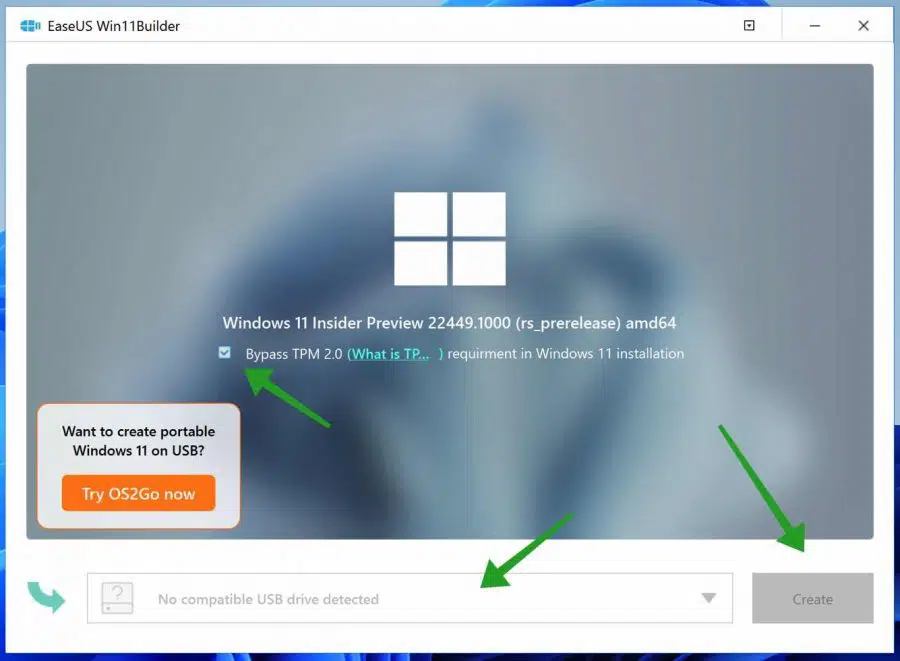
Insert the USB stick into your computer. Select the USB device and click Create. Then you can install Windows 11 with the Win11builder created by EaseUS Windows 11 USB Stick.
I hope this helped you. Thank you for reading.
I'm having a little problem
If I write BV on faecbook and it is written incorrectly, there is no red line at the bottom anymore.
He does that on Word
Not even in web telenet
I have already done a system reset but nothing works
Please give your opinion
Hello, I suspect it is in the browser spell checker. Depending on which internet browser you use, check the spell check settings.
Success!
Fantastic contribution!! My sincere thanks for this!
This is not possible for “normal” people. Can't you put all the actions on a stick as a program?
Hello, a slightly easier way is via Rufus (USB). If it doesn't work, I wouldn't even start it. It is an unofficial method that may cause any problems in the future. So Microsoft does not recommend it.
Here you can read more: https://www.pc-tips.info/tips/windows-tips/windows-11-22h2-installeren-via-usb-zonder-beperkingen/
Success!
dear stefan
I have downloaded the program, but there is no bypass, so I cannot install the 11 yet
mvg
Hello, unfortunately it is not clear to me which program. That's okay, I recommend doing the following to install Windows 11 on a PC that doesn't actually support it: https://www.pc-tips.info/tips/windows-tips/windows-11-installeren-niet-ondersteunde-pc/#Methode_4_Windows_11_installatie_USB_maken_voor_niet_geschikte_PC_via_RUFUS_aanbevolen
Good luck! Greetings, Stefan.
Fantastic solution(s) to install Win 11, but you can also do a very clean install. install it on a new SSD as you unzip the downloaded ISO and remove appraiserres.dll, so that (in this case) my old PC still gets a new life. (from 2010) I now have Win 7 ultimate X64. In any case, YOUR solutions are useful to everyone.
Hello John, thank you for your message. Nice to read that it helps people! Yes, you can certainly perform a clean install. If you use option 1 you can choose whether you want to keep or delete the personal files during installation. If you choose uninstall during installation, Windows 11 will be clean installed on your Windows 7 computer. Greetings, Stefan.
Your device is missing important security and quality fixes.
Windows troubleshooter offers no help.
How to proceed further.
Hello Henny, have you tried these tips? https://www.pc-tips.info/tips/windows-tips/op-uw-apparaat-ontbreken-belangrijke-beveiligings-en-kwaliteitsfixes/
Good luck! Greetings, Stefan
Best;
Thank you in advance for all your efforts.
I have the following problem, as soon as I run uup_download_windows.cmd as administrator, I get the following message in the cmd window:
“”Current directory contains spaces in its path.
Please move or rename the directory to one not containing spaces.
Press any key to continue . . .””, hit enter, just close this. An idea?
Thanks, much appreciated, site!
MVG
Rudi
Hello Rudi, I have updated the article. I recommend that you use option 1 or option 4 to install Windows 11 on a computer that doesn't actually support it. Good luck! Greetings, Stefan
Dear Stefan;
Thanks for your prompt response, I'll try that out and keep you posted.
MVG
Rudi
Dear Stephen
Finally I had the urge, lol... time to try this out further. I had overlooked method 4, unfortunately not found regedit, but clean install anyway, thanks
Very Nice!
Don't think Microsoft wants to give me a new PC that can run Windows 11 without tweaks.
Ask! I was in the insider preview, I have no access again,
Msg hardware specs back not OK, (sigh!) and says, NO!
If you have an idea, let me know!
Thanks!
Rudi
Hi, install.esd cannot be found in the win.10 source folder, only install.wim?
Hello Geert, yes that also depends on the ISO, then copy install.esd from Windows 11 to the Windows 10 ISO sources folder. For information. Microsoft has indicated that TPM and Secure Boot will not be a requirement to install Windows 11. You can now also download the Windows 11 ISO without creating it: https://www.pc-tips.info/tips/windows-tips/download-de-officiele-windows-11-iso/
Greetings, Stefan
Thanks Stefan for the answer, unfortunately it doesn't work for me, he keeps saying I don't have TPM.
I have expanded the article with easeUS Win11builder. However, I tested this tool and for me the bootable USB was not detected. It may work for you.