

If the internet is slow, we often immediately think that it is due to the internet connection. This is not always the case. In some cases, the problem lies in the system settings of the operating system, the installed apps or the background processes.
There are many reasons why an internet connection is or has become slow. The most obvious reasons are.
- Too many devices are connected at the same time via the same internet connection.
- Someone else using the same Internet connection consumes a large portion of the Internet connection's bandwidth.
- The distance to the distribution box for the internet connection is long.
- A poor Wi-Fi signal.
- Malware has been installed on the computer.
- Background processes in Windows 11 that use the bandwidth of the Internet connection without your knowledge.
In this article I offer you some tips to solve the problem of a slow Internet connection to identify. Once you have identified the problem, you can solve it immediately. Before proceeding, it is important to check that the slow internet connection is not caused by hardware such as a router, hubs or bad WiFi signals.
Also check with your internet provider whether there is currently an outage or whether internet work is being carried out in your area. You can check this on the website of your internet provider.
If you have determined that the problem must be in the Windows 11 computer, then follow the steps below.
Internet slow in Windows 11
How fast is your internet connection really?
To start, I recommend getting one perform a speed test. A speed test is a test to determine the maximum internet speed for your internet connection. A file will be downloaded and a graph will show you the overall internet connection speed. This way you can determine whether the maximum speed that your internet provider makes available is actually achieved.
Limit bandwidth for Windows updates
Windows 11 installs updates and uses a certain portion of the internet connection bandwidth to download the updates. This happens automatically. If you are having trouble downloading updates and want to set a maximum download speed for Windows updates, you can do this as follows.
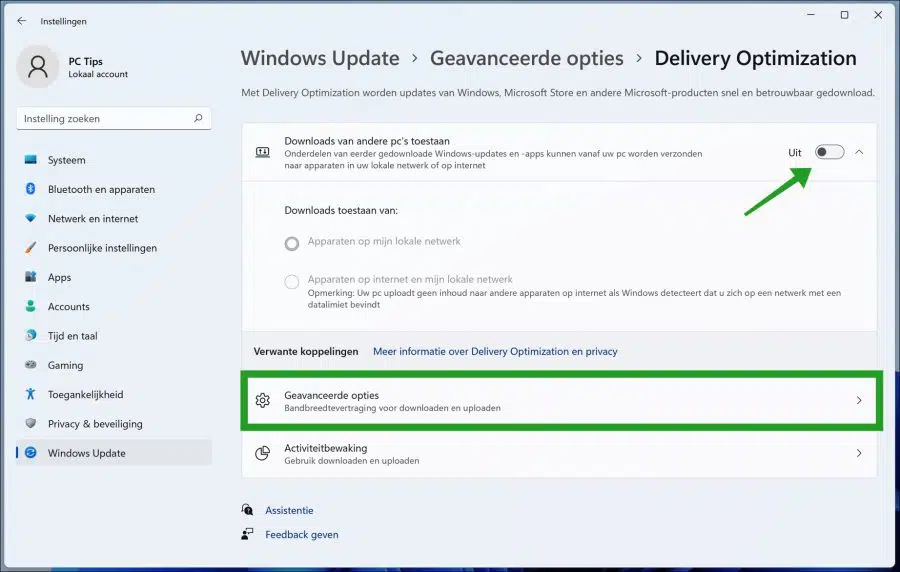
Right-click on the start button. Click on Settings in the menu. Click on Windows update in the menu on the left. Then click on Advanced Options and on Delivery Optimization.
If you did not want to share the Internet connection by allowing updates to be downloaded to other PCs, change this option to “Off”.
Then click on Advanced Options.
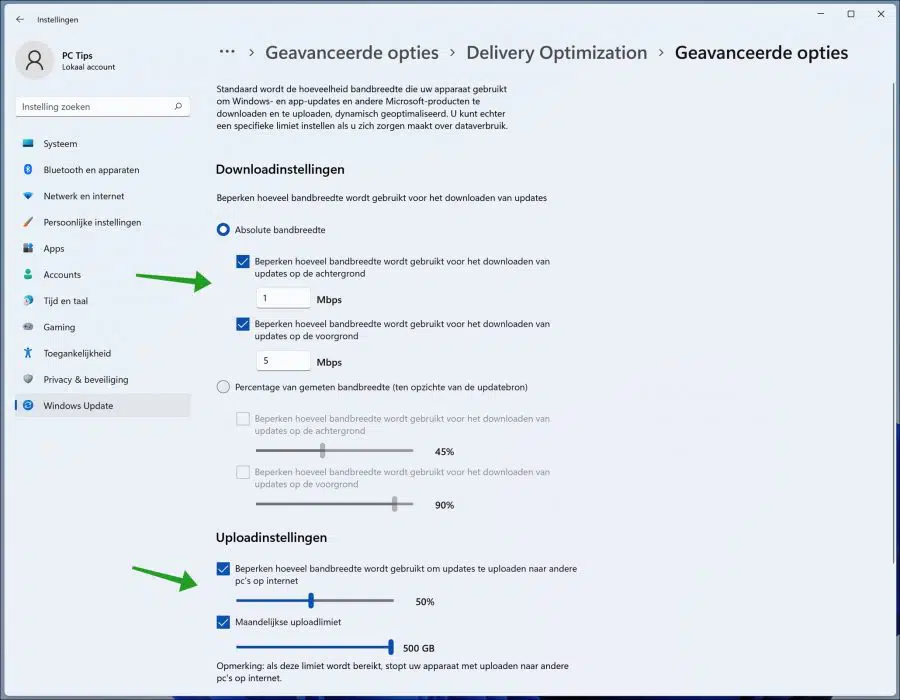
If you wish to limit the download and upload speed for downloading Windows updates or uploading Windows updates, you can set this here. Enable the limitation and set a maximum number of Mbps for the download and upload speed. This limitation only applies to the download or upload speed of Windows updates. In addition to setting the Mbps speed, you can also choose to allocate a percentage of the internet speed to Windows updates.
Uncheck the options to allocate full bandwidth to Windows updates. This may slow down your internet connection while downloading or uploading updates.
Identify apps that use your internet connection
If you suspect that an app is slowing down your internet connection, you can identify this app via the Source Control app. If you have identified the process that is slowing down your internet connection, you can close this process and, if necessary, restart it delete app.
Right-click on the start button. click on task management in the menu. Click on the tab: Performance. Click Open Source Monitor at the bottom. Click on the tab: Network in Source Control.
Here you will see a list of processes that belong to an application. Look in the column: Send (bytes) and receive (bytes) for a process that has high values.
Once you have identified the process, right-click on the process name and click End Process.
Don't just end any process. Some processes are important for the functioning of Windows. Is it an unknown process for you? Then consult the internet to check what the process belongs to and which app exactly it is on your computer. You can then delete this app if necessary.

Disable background apps
many apps run in the background and perform tasks that are not really relevant to the work they do. This apps don't just consume internet bandwidth, but also system resources. While there is no harm in leaving them running in the background, it would still be wise to disable them if they are causing problems. Moreover, you can always run them manually if necessary.
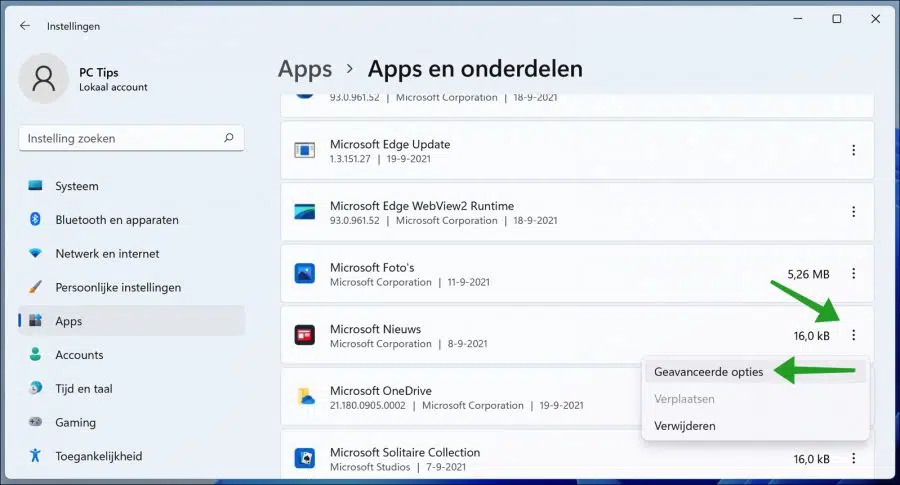
Right-click on the start button. Click on Settings in the menu. Click on Apps on the left. Click Apps & features.
Check the list of installed apps. It is best to disable apps that you do not use or do not use much from running processes in the background. Click on the three vertical dots to the right of the app name. Then click on Advanced Options.
Change “Allow this app to run in the background” to Never.
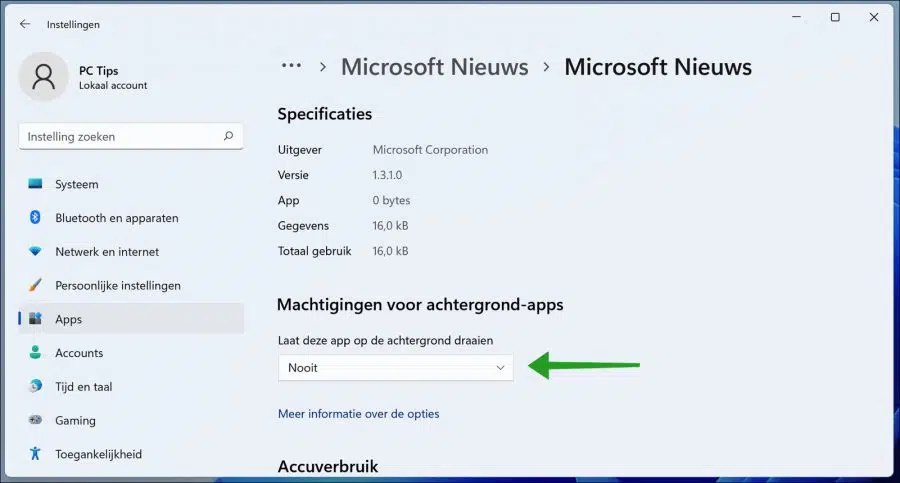
Do this for any apps that you don't want using system resources and internet bandwidth in the background.
Check your computer for malware
If for some unknown reason you suddenly have a slow computer and the internet connection has also become noticeably slower, then malware may be the problem. Malware is a collective name for various types of unwanted software on your computer. This could be a virus, but also an app that displays unwanted advertisements in your browser. It is advisable to check your computer for malware with Malwarebytes. You can do this antivirus program Use it for free for 14 days to detect and remove malware from your computer.
Set up a different DNS server
A DNS server, simply put, contains the names of websites along with their associated IP addresses. When you type in the hostname or website name, the DNS server will look for the respective IP address and load the website.
The DNS server selection is set to automatic by default. This can cause a slow internet connection. In this case, it is recommended to switch to a public DNS server such as Google's.
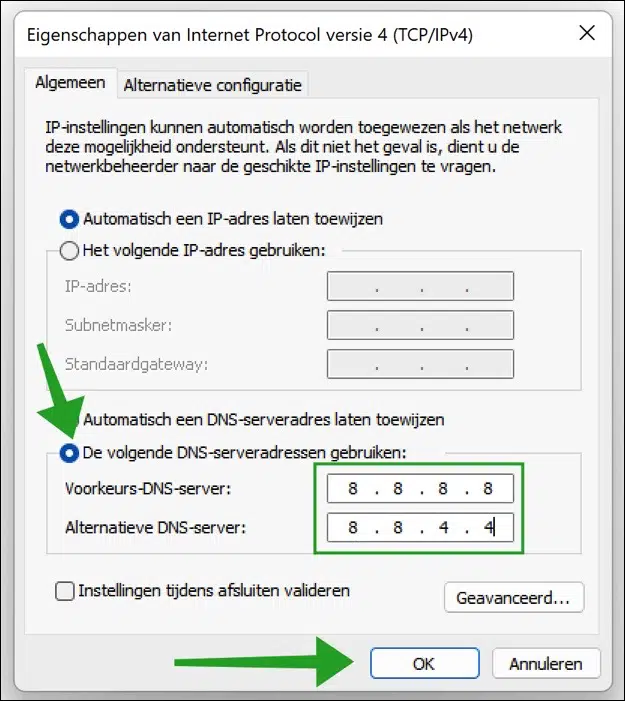
Right-click on the start button. Click Run in the menu. In the run window type: ncpa.cpl. Right-click on the active Ethernet or Wi-Fi connection. Click Properties in the menu. Click Internet Protocol version 4 and click Properties.
I recommend that you write down the current settings first before making any changes.
Click on “Use the following DNS server addresses”. Change the preferred DNS server to: 8.8.8.8. and the Alternate DNS server to: 8.8.4.4. Then click OK.
These are the public Google DNS servers.
Restart your computer to apply the DNS server settings.
Disable connection with a data limit
If a data limit has been set on your internet connection, the speed of the connection will be limited. It is therefore advisable if you are connected to an internet connection without limits to disable the data limit and get the maximum speed from the internet connection.
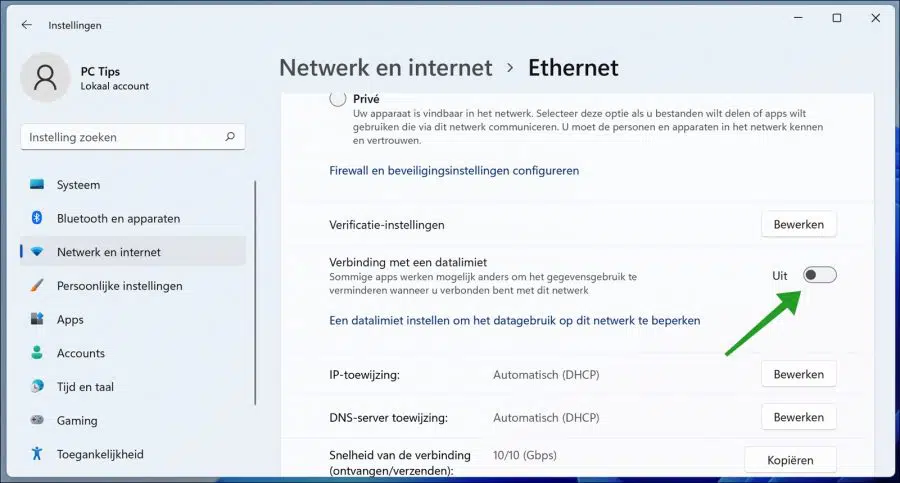
Right-click on the start button. Click on Settings in the menu. Click on network and internet in the menu on the left. Click on Ethernet if you are connected to the cable, click on Wi-Fi if you are connected to the Internet wirelessly.
Disable the option: Connection with a data limit.
Other tips
If you still have a slow internet connection then you can use the Reset Windows Firewall or for Disable Windows Firewall to see if this solves the problem. If the internet is only slow via the web browser then you can try another browser. If you're just lacking internet speed in general, consider increasing your internet provider's plan.
I hope this helped you. Thank you for reading!
Topper!
Thank you very much for this information.
Thanks for your response! 🙂