
Als u uw computer met meerdere mensen deelt, hebt u meestal meerdere gebruikersprofielen op de computer. Elke gebruiker heeft een apart profiel dat specifieke instellingen en apps alleen voor die gebruiker beschikbaar maakt.
Als u een account in Windows 11 echter niet meer gebruikt, zijn er enkele opties. U kunt het gebruikersaccount verwijderen, inclusief het profiel, of het uitschakelen. Het uitschakelen of blokkeren van een gebruikersaccount heeft voordelen ten opzichte van het verwijderen van het profiel.
Als u de account uitschakelt in Windows 11, blijven de profielinstellingen, zoals apps en persoonlijke instellingen, op de computer staan. Als u het account in de toekomst weer nodig heeft, bestaat het gebruikersaccount nog steeds op de computer en kunt u het weer gebruiken nadat u het account hebt ingeschakeld.
Meld u dan aan voor onze nieuwsbrief.
Stel dat u een computergebruiker helemaal uit Windows 11 verwijdert. In dat geval verliezen ze hun volledige profiel, inclusief alle instellingen, persoonlijke bestanden zoals documenten, afbeeldingen en apps. In dit artikel wordt beschreven hoe u een gebruikersprofiel in Windows 11 op drie verschillende manieren kunt uitschakelen.
Gebruikersaccount uitschakelen of blokkeren in Windows 11
Gebruikersaccount uitschakelen via Computerbeheer
Met Computerbeheer kunt u veel instellingen in Windows 11 beheren. Het kan ook worden gebruikt om gebruikersaccounts te beheren, bijvoorbeeld om een gebruikersaccount uit te schakelen.
Klik met de rechtermuisknop op de knop Start en klik vervolgens op Computerbeheer in het menu. Klik links op “Lokale gebruikers en groepen” en vervolgens op “Gebruikers”.
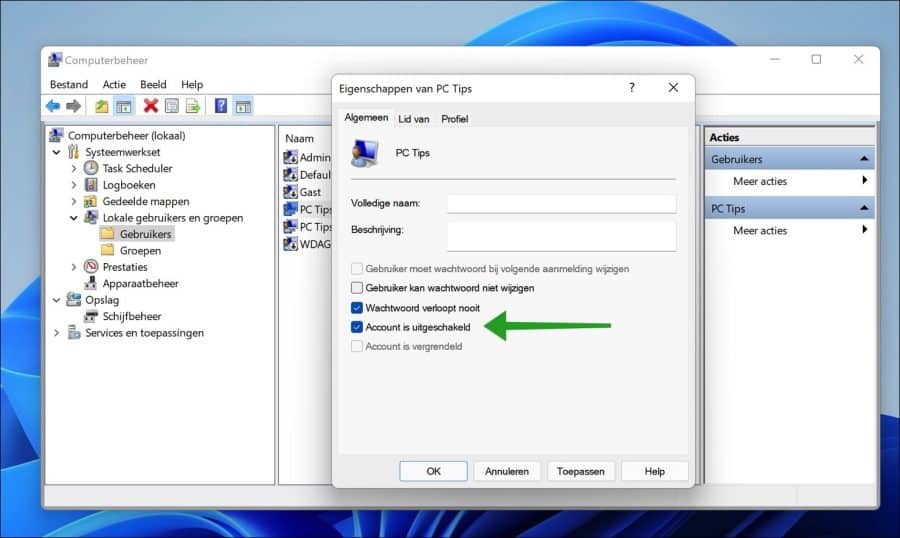
Nu ziet u alle gebruikersaccounts op de computer in een lijstweergave. Dubbelklik op het gebruikersaccount dat u wilt uitschakelen.
Schakel op het tabblad Algemeen het selectievakje “Gebruikersaccount is uitgeschakeld” in om het gebruikersaccount uit te schakelen. Schakel dit selectievakje uit om het gebruikersaccount in te schakelen.
Een gebruikersaccount uitschakelen via PowerShell
Windows PowerShell is een objectgeoriënteerde automatiseringsengine en scripttaal met een interactieve command-line shell. Microsoft heeft PowerShell ontwikkeld om IT-professionals te helpen bij het configureren van computersystemen en het automatiseren van administratieve taken.
U kunt het gebruiken om een gebruikersaccount uit te schakelen en nog veel meer.
Klik met de rechtermuisknop op de Start-knop, klik in het menu op “Windows Powershell (admin)” of “Windows Terminal (admin)“.
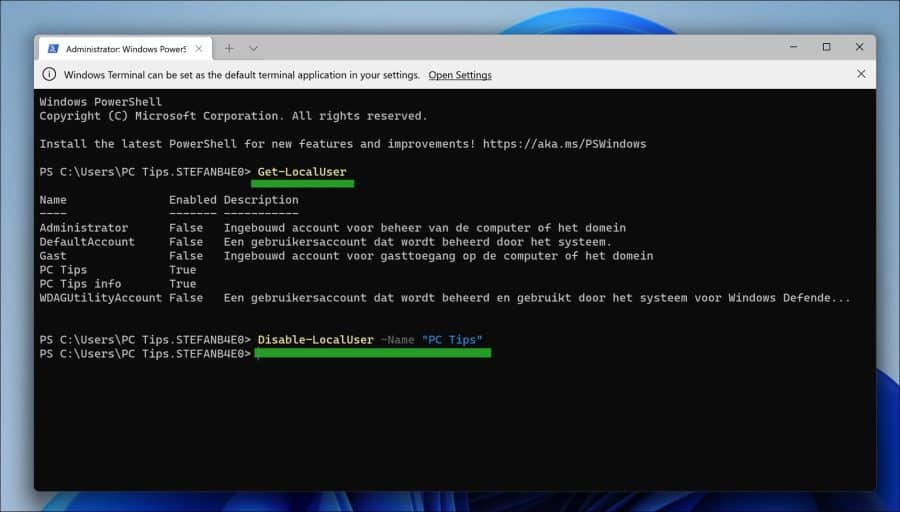
Nu moeten we eerst het gebruikersaccount identificeren die we proberen uit te schakelen. Om alle gebruikersaccounts op te sommen met PowerShell, voert u het volgende commando in.
Get-LocalUser
Nu zie je een lijst van alle gebruikersaccounts, dan kun je het volgende commando gebruiken om een specifiek gebruikersaccount uit te schakelen.
Disable-LocalUser -Name "Gebruikersnaam"
Als u een gebruikersaccount wilt inschakelen met PowerShell, voert u het volgende commando in.
Enable-LocalUser -Name "Gebruikersnaam"
Een gebruikersaccount blokkeren via opdrachtprompt
In Windows-besturingssystemen is de opdrachtprompt een programma dat het invoerveld in een op tekst gebaseerde gebruikersinterface nabootst met de grafische gebruikersinterface (GUI) van Windows.
Het kan worden gebruikt om ingevoerde opdrachten uit te voeren en geavanceerde beheerfuncties uit te voeren. Het kan ook worden gebruikt voor het opsporen en oplossen van specifieke Windows-problemen, zoals het blokkeren van een gebruikersaccount.
Klik op de knop Zoeken in de taakbalk van Windows 11. Typ in het zoekveld: cmd.exe. Klik vervolgens met de rechtermuisknop op “Opdrachtprompt” en klik op “Uitvoeren als Administrator”.
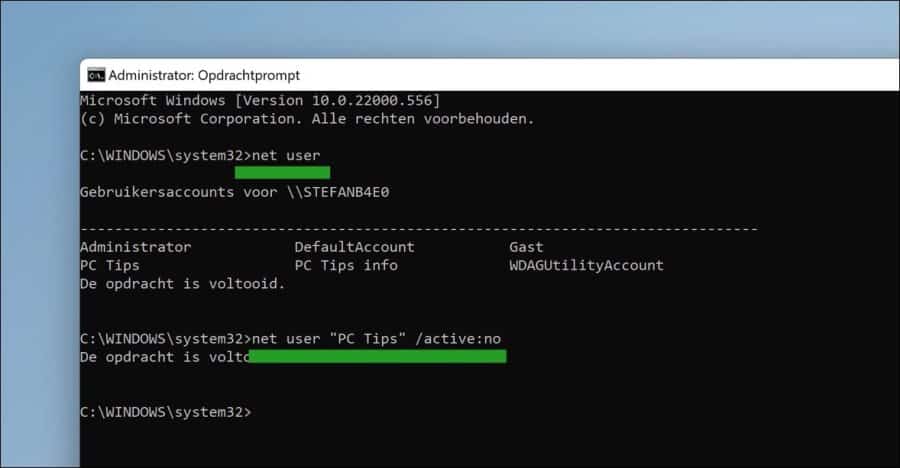
Eerst wilt u een lijst maken van alle gebruikersaccounts op de computer. U kunt dit doen door het volgende commando te typen in het opdrachtprompt venster.
net user
Vervolgens moet u de te blokkeren gebruikers accountnaam identificeren. Als u de te blokkeren gebruikers accountnaam hebt gevonden, typt u de volgende opdracht om het account te blokkeren.
net user "username" /active:no
Als de opdracht met succes is voltooid, is het gebruikersaccount nu geblokkeerd.
Lees meer:
- Windows 11 register opschonen? Dit is hoe!
- 8 tips om Windows 11 sneller te maken.
- Windows 11 toch installeren op een niet ondersteunde PC.
- PIN code of wachtwoord wijzigen in Windows 11.
- 15 tips voor Windows verkenner in Windows 11.
Ik hoop u hiermee geholpen te hebben. Bedankt voor het lezen!
Help mee
Mijn computertips zijn gratis en bedoeld om andere mensen te helpen. Door deze pc-tip te delen op een website of social media, helpt u mij meer mensen te bereiken.Overzicht met computertips
Bekijk ook mijn uitgebreide overzicht met praktische computertips, overzichtelijk gesorteerd per categorie.Computerhulp nodig?
Loopt u vast met uw pc, laptop of software? Stel uw vraag op ons computerforum en krijg gratis computerhulp van ervaren leden en experts.