
Als u Windows 11 met succes heeft geïnstalleerd, of u heeft een computer gekocht met Windows 11 voorgeïnstalleerd, dan is het tijd om Windows 11 aan te passen naar wens.
In dit artikel bied ik u aanbevolen aanpassingen die het werken met Windows 11 aangenamer kunnen maken, stel ik verschillende wijzigingen voor om uw computer te optimaliseren en verkennen we verschillende instellingen om Windows 11 te personaliseren.
PC Tips voor als u Windows 11 net heeft geinstalleerd (Gids)
Herstelpunt inschakelen en aanmaken
Het eerste wat ik u aanraadt om te doen is om een herstelpunt aan te maken. Dit is een back-up waarmee u op een makkelijke manier altijd Windows 11 terug kunt herstellen naar de datum en tijd waarin u het herstelpunt heeft aangemaakt. U zet hiermee Windows 11 in zijn geheel terug, het is geen bestanden of mappen back-up.
Meld u dan aan voor onze nieuwsbrief.
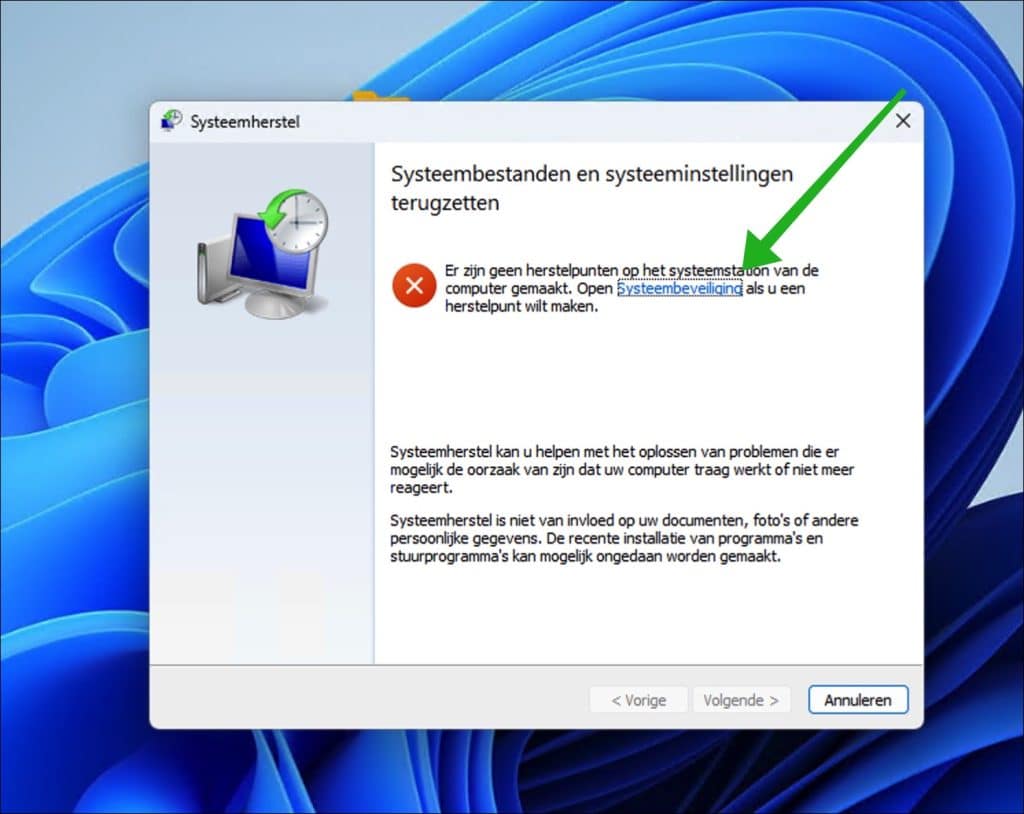
Klik met de rechtermuisknop op de Startknop. Klik op “uitvoeren” in het menu. In het uitvoeren venster, type: rstrui.exe.
Wanneer er nog nooit een herstelpunt is aangemaakt dient u deze eerst aan te maken. Klik hiervoor op de link “Systeembeveiliging”.
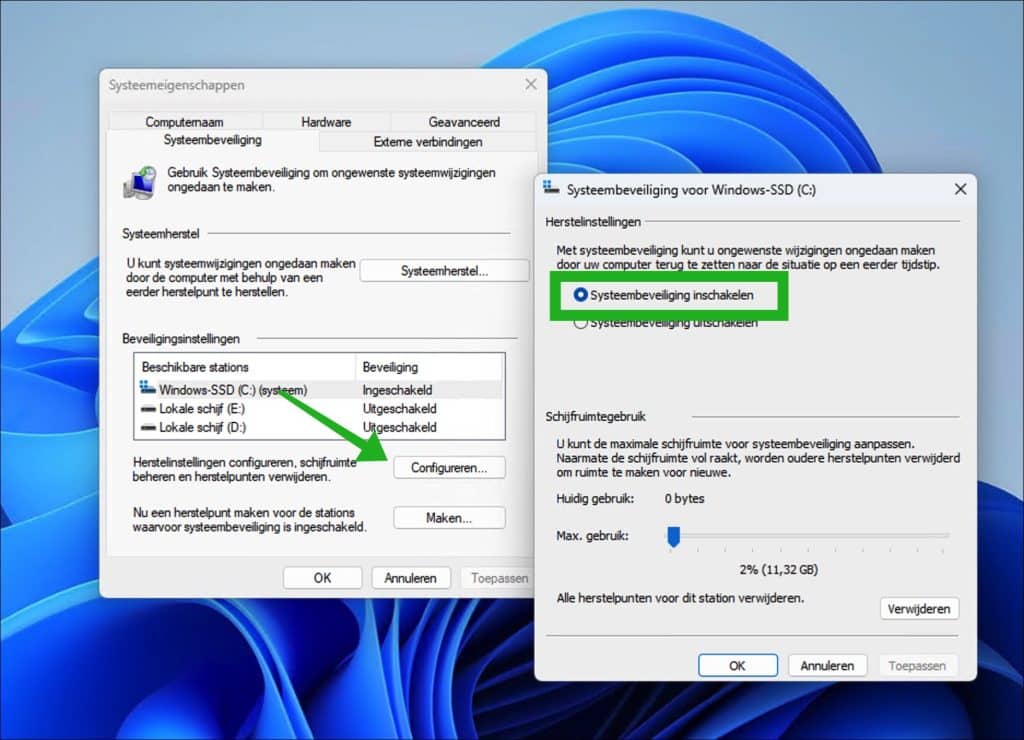
Klik op “Configureren” om systeemherstel te openen. In de systeemherstel instellingen klikt op “Systeembeveiliging inschakelen” en vervolgens op “OK” om te bevestigen.
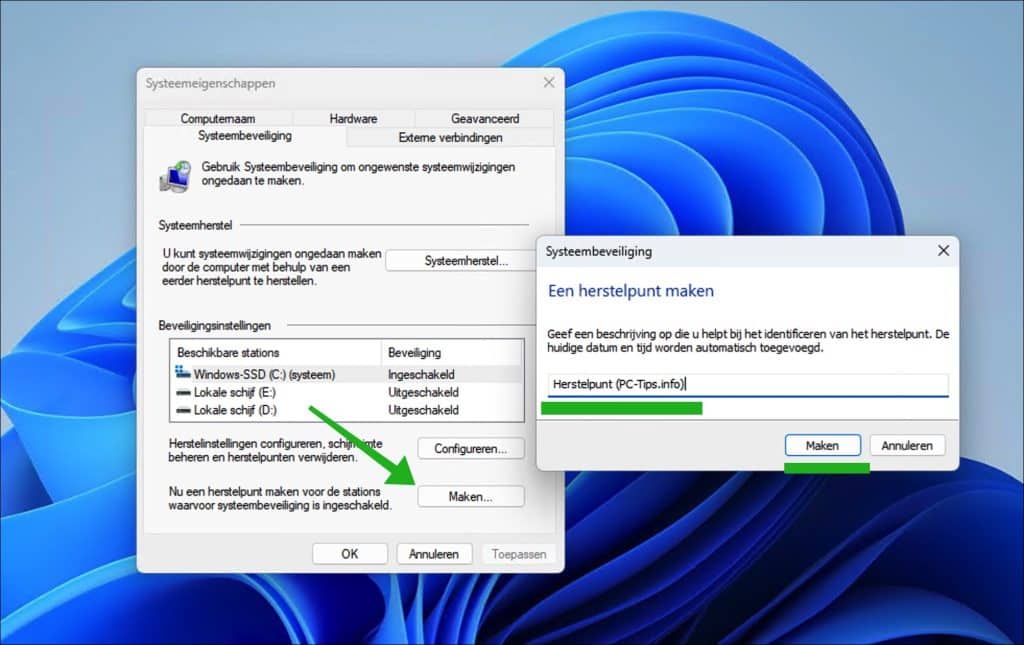
Nadat u systeemherstel heeft ingeschakeld klikt u op de “maken” knop om een herstelpunt aan te maken. Geef hiervoor een herkenbare naam in voor het herstelpunt en klik op “OK”. Systeemherstel wordt nu uitgevoerd, dit duurt niet lang.
Lees hier hoe u een herstelpunt kunt terugzetten wanneer nodig. Ook kunt u een herstelpunt aanmaken bij het opstarten van de computer.
Energiebeheer instellen
Energiebeheer in Windows 11 is een set van instellingen en functies die zijn ontworpen om het stroomverbruik van uw computer te beheren en te optimaliseren. Dit is vooral belangrijk voor laptops om de batterijduur te maximaliseren, maar het kan ook nuttig zijn voor desktopcomputers om energie te besparen en efficiënter te werken. Het is aan te raden om na installatie direct het gewenste energieplan te selecteren.
Windows biedt verschillende vooraf ingestelde energiebeheerschema’s, zoals ‘Gebalanceerd’, ‘Energiebesparing’, en ‘Hoge prestaties. Elk schema past verschillende instellingen aan zoals de helderheid van het scherm, slaaptijd, en processorprestaties om een evenwicht te vinden tussen prestaties en energieverbruik.
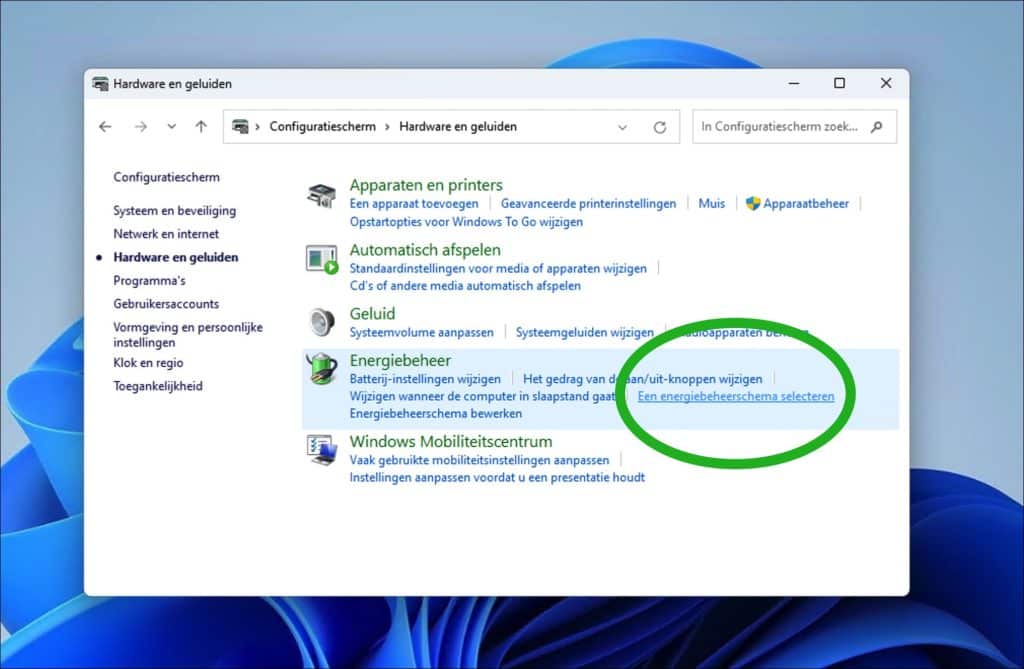
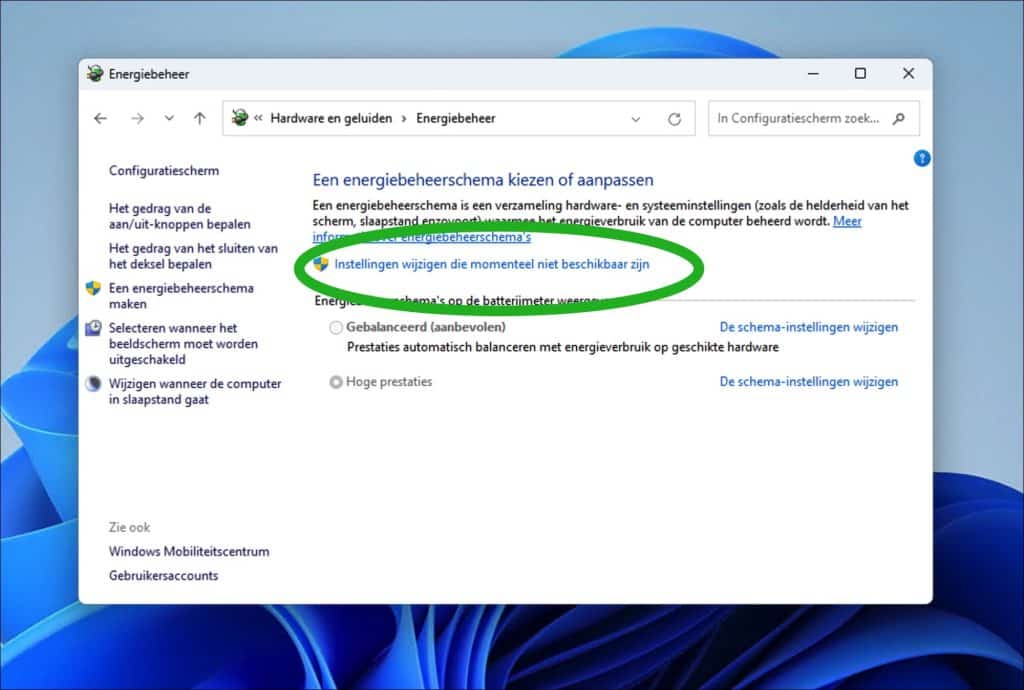
Om het gewenste energieschema in te stellen opent u het Configuratiescherm. Klik vervolgens op “Hardware en Geluiden” en op “Een energieschema selecteren”.
Om een energieschema te kunnen kiezen klikt u eerst op “Instellingen wijzigen die momenteel niet beschikbaar zijn”. Hiervoor is een beheerdersaccount nodig.
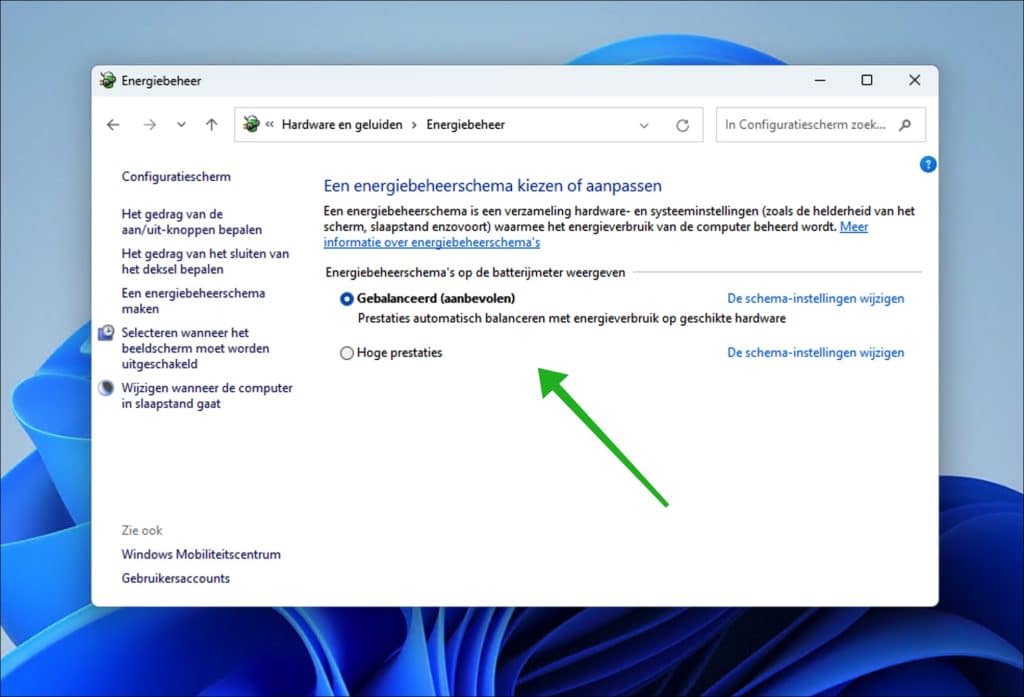
Selecteer vervolgens het gewenste energieschema. Hierbij een overzicht van ieder energieschema met uitleg.
- Energiebesparing:
- Uw Doel: U wilt de batterijduur maximaliseren.
- Wanneer Gebruikt: Dit is ideaal wanneer u geen toegang hebt tot een oplader en de batterijduur zo lang mogelijk moet uitrekken.
- Hoe het Werkt: U verlaagt de schermhelderheid en beperkt de processorprestaties om energie te besparen. Achtergrondactiviteiten die energie verbruiken, worden ook verminderd.
- Aanbevolen Voor: Als u onderweg bent of beperkte toegang tot stroom heeft, is dit de beste keuze.
- Gebalanceerd:
- Uw Doel: U zoekt een evenwicht tussen prestaties en energiebesparing.
- Wanneer Gebruikt: Geschikt voor de meeste dagelijkse computeractiviteiten.
- Hoe het Werkt: Het past de prestaties van uw computer automatisch aan op basis van uw gebruik. Als u meer kracht nodig heeft, verhoogt het de processorprestaties, en het verlaagt deze als de computer minder actief is.
- Aanbevolen Voor: Alledaags gebruik, zowel voor laptops als desktops.
- Hoge Prestaties:
- Uw Doel: U streeft naar maximale prestaties, ongeacht het energieverbruik.
- Wanneer Gebruikt: Ideaal voor taken die veel van uw computer vergen, zoals gaming of videobewerking.
- Hoe het Werkt: Het houdt de processor en andere componenten op maximale prestaties, wat leidt tot een hoger energieverbruik en een kortere batterijduur.
- Aanbevolen Voor: Als u maximale prestaties nodig heeft en u zich geen zorgen maakt over het energieverbruik of de batterijduur, is dit de juiste keuze voor u.
Windows.old map verwijderen om schijfruimte vrij te maken
Als u Windows 10 heeft bijgewerkt door Windows 11, dan blijft er een map met inhoud van Windows 10 beschikbaar op uw computer. Dit is de “Windows.old” map en kan aanzienlijk groot zijn. Het is aan te raden (als u zeker bent dat u niet terug wilt naar Windows 10) om deze map te verwijderen om schijfruimte vrij te maken.
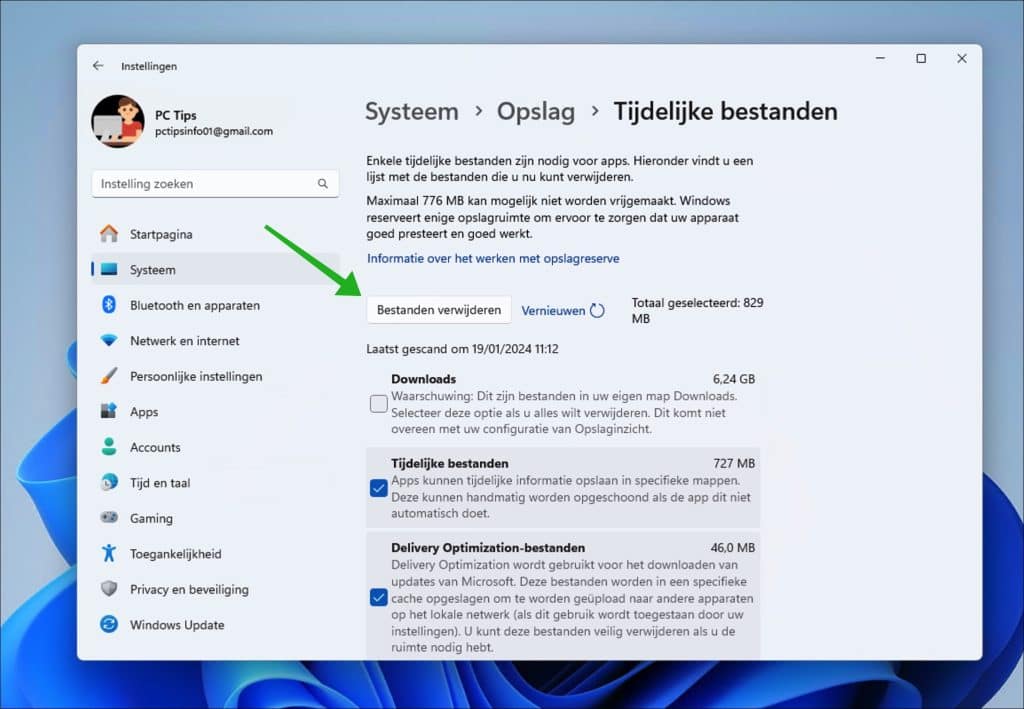
Open de instellingen. Klik eerst op “Systeem” en vervolgens op “Opslag”. In de opslaginstellingen klikt u op “Tijdelijke bestanden”. In de lijst van tijdelijke bestanden zoekt u naar “vorige Windows installaties (Windows.old)”. U selecteert deze optie en klikt u op de knop “Bestanden verwijderen” om deze tijdelijke map te verwijderen. U kunt hiermee tot Gigabytes schijfruimte vrijmaken, altijd meegenomen.
Installeer al uw persoonlijke apps
Het is nu tijd om al uw persoonlijke apps te installeren. Denk hierbij aan de gewenste internetbrowser zoals Google Chrome, Firefox of Brave. Ook een internetbeveiligingspakket of een antivirus is aan te raden om te installeren, net zoals een e-mailclient zoals Outlook. Gebruikt u de computer in een werkomgeving dan kunt u aanvullend nog Microsoft Office installeren en Skype.
Kortom, alle apps die u nodig denkt te hebben, kunt u installeren. Na het installeren van deze apps kunt u doorgaan met het bijwerken van Windows 11 met de laatste updates.
Alle updates installeren
Na het installeren van Windows 11, zorgt u ervoor dat u nieuwe updates installeert, omdat deze uw computer beschermen tegen beveiligingsdreigingen en virussen. Ze verbeteren ook de stabiliteit en prestaties van uw systeem, wat leidt tot een soepelere gebruikerservaring. Bovendien brengen updates vaak nieuwe functies en verbeteringen met zich mee, waardoor u kunt profiteren van de nieuwste mogelijkheden die Windows 11 biedt.
Windows updates zorgen ook voor compatibiliteit met de nieuwste software en apparaten, waardoor uw programma’s en apparatuur goed blijven werken. Ten slotte maakt het hebben van de nieuwste updates het gemakkelijker om ondersteuning te krijgen bij eventuele problemen, aangezien Microsoft doorgaans betere ondersteuning biedt voor de meest recente versie van hun besturingssysteem. Regelmatig updaten is dus essentieel voor de veiligheid, functionaliteit en efficiëntie van uw Windows 11 computer.
Open de instellingen. Klik vervolgens op “Windows update” en zoek naar nieuwe updates door op de “Naar updates zoeken” knop te klikken. Ik raad u aan om dit meerdere keren te doen, bijvoorbeeld na het installeren van updates gaat u nogmaals terug naar de update instellingen en klikt u nogmaals op deze knop. Hiermee forceert u constant dat er naar updates wordt gezocht en bent u zeker dat u de laatste updates heeft ontvangen.
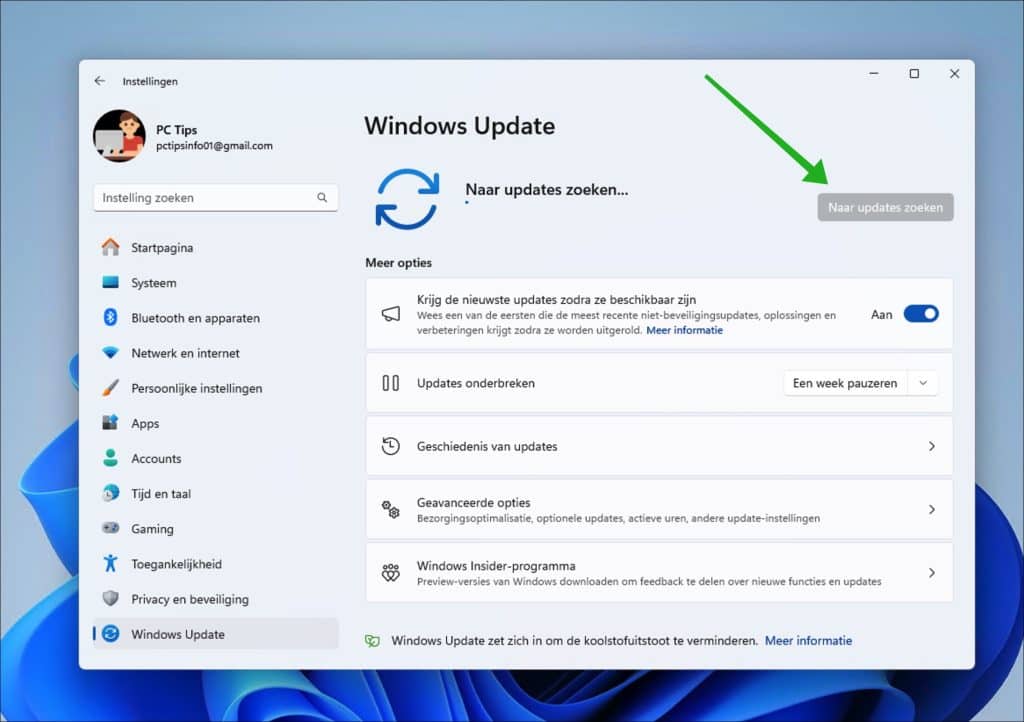
Eventueel kunt u de optie “Krijg de nieuwste updates zodra ze beschikbaar zijn” inschakelen.
Sluit randapparatuur aan en installeer stuurprogramma’s
Wanneer u gebruikmaakt van randapparatuur zoals een printer, een webcam, een microfoon e.d. dan is het nu tijd om deze aan te sluiten. Na het aansluiten wordt de randapparatuur niet altijd door Windows 11 herkent. Als de randapparatuur niet direct werkt, dan installeert u de geschikte stuurprogramma’s voor dit apparaat. Dit doet u door op het internet te zoeken naar het merk/model in combinatie met “driver”. Bijvoorbeeld “HP model + driver + Windows 11”. Download dan de geschikte stuurprogramma’s voor Windows 11 voor dit apparaat van de officiele website van de fabrikant.
In enkele gevallen is het geschikte stuurprogramma er niet specifiek voor Windows 11, u kunt dan ook het stuurprogramma (“driver”) downloaden voor Windows 10 en deze proberen.
Controleer op optionele updates
Als uw randapparatuur is aangesloten, dan is het aan te raden om te controleren op optionele updates. Deze updates zijn niet kritisch voor de veiligheid of basiswerking van uw systeem, dus ze worden niet automatisch geïnstalleerd. U moet deze zelf selecteren en installeren vanuit het Windows Update gedeelte in Instellingen. Klik hiervoor eerst op “Windows update” vervolgens op “Geavanceerde opties” en hierna op “Optionele updates”.
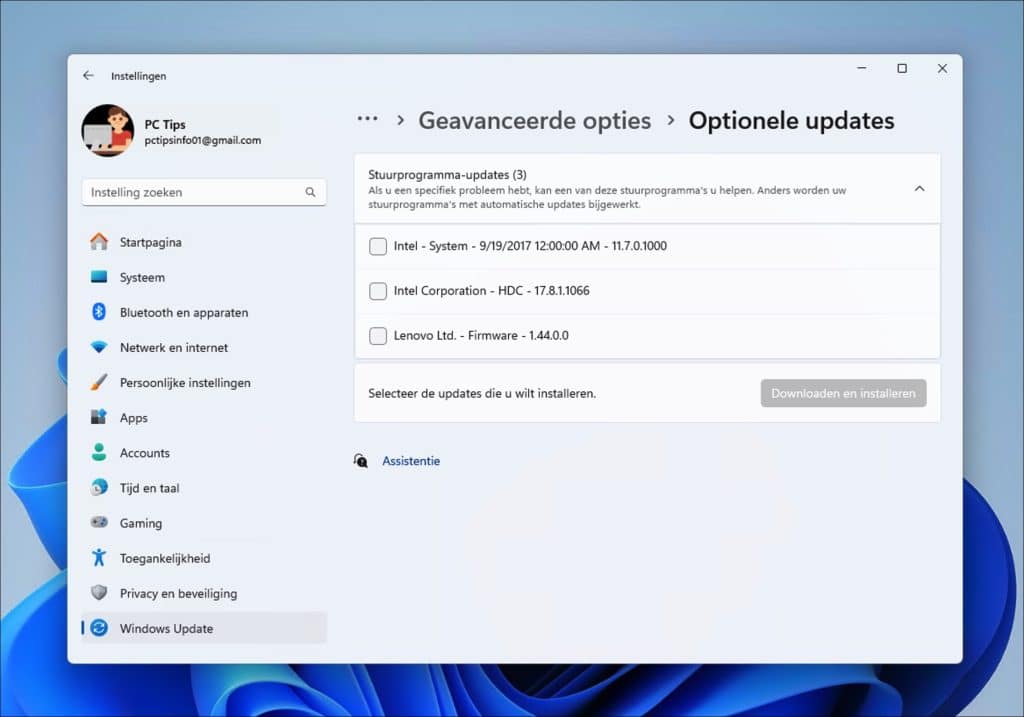
Het is aan u om te beslissen of u deze updates wilt installeren. Ze kunnen handig zijn voor het oplossen van specifieke problemen of voor het verbeteren van de functionaliteit van apparaten zoals printers en beeldschermen. Het controleren en installeren van deze updates kan helpen om uw systeem soepel en up-to-date te houden.
Standaard apps instellen
Als u alle apps die u wilt gaan gebruiken heeft geïnstalleerd, dan kunt u de standaard apps wijzigen. Standaard apps zijn apps die worden gebruikt bij het openen van verschillende acties in Windows 11. Denk hierbij aan het openen van een link in een e-mail, hiervoor opent standaard de Microsoft Edge browser. Als u liever een andere browser gebruikt dient u de standaard app voor de browser te wijzigen via de instellingen.
Standaard browser wijzigen
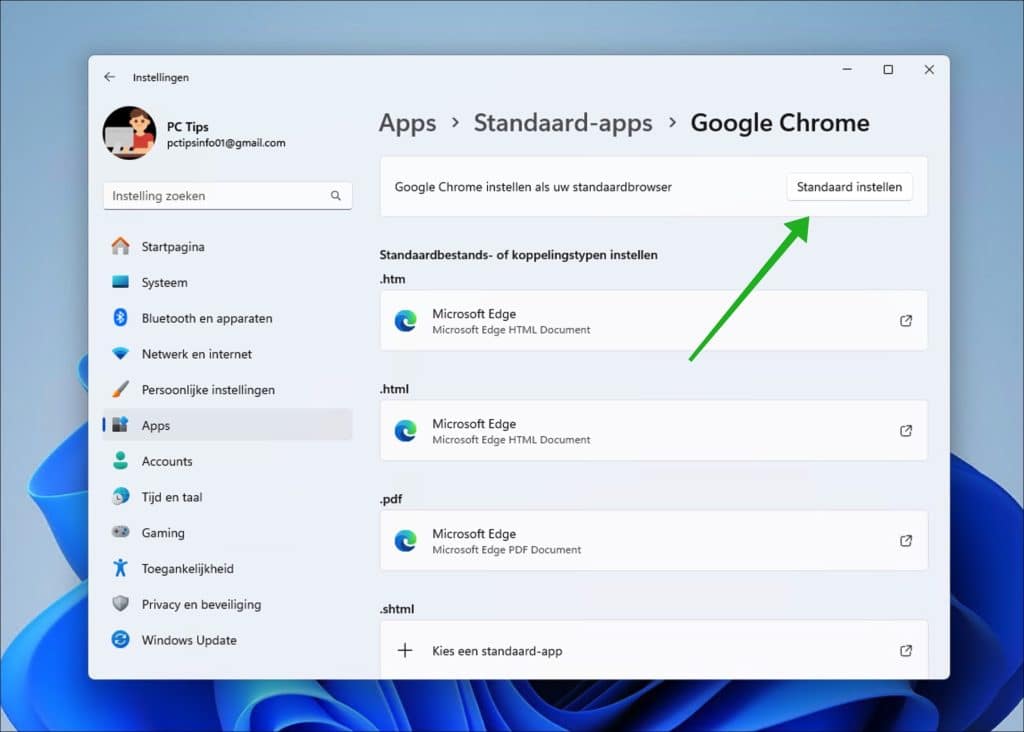
Veel mensen willen de standaardbrowser wijzigen. Dit kunt u doen op de volgende manier.
Open de instellingen. In de instellingen klik op “Apps” en vervolgens op “Standaard apps”. Zoek naar de gewenste browser (die moet u eerst installeren) in de lijst van apps. Klik erop om te openen. In de instellingen klikt u op “Standaard instellen” om de standaardbrowser te wijzigen.
Standaard app voor bestandstype wijzigen
Ditzelfde kunt u doen voor een bepaald bestandstype. Als u bijvoorbeeld een fotobewerkingsprogramma heeft geïnstalleerd en u wilt een bepaald fotobestandstype koppelen aan dit fotoprogramma dan doet u dit op de volgende manier.
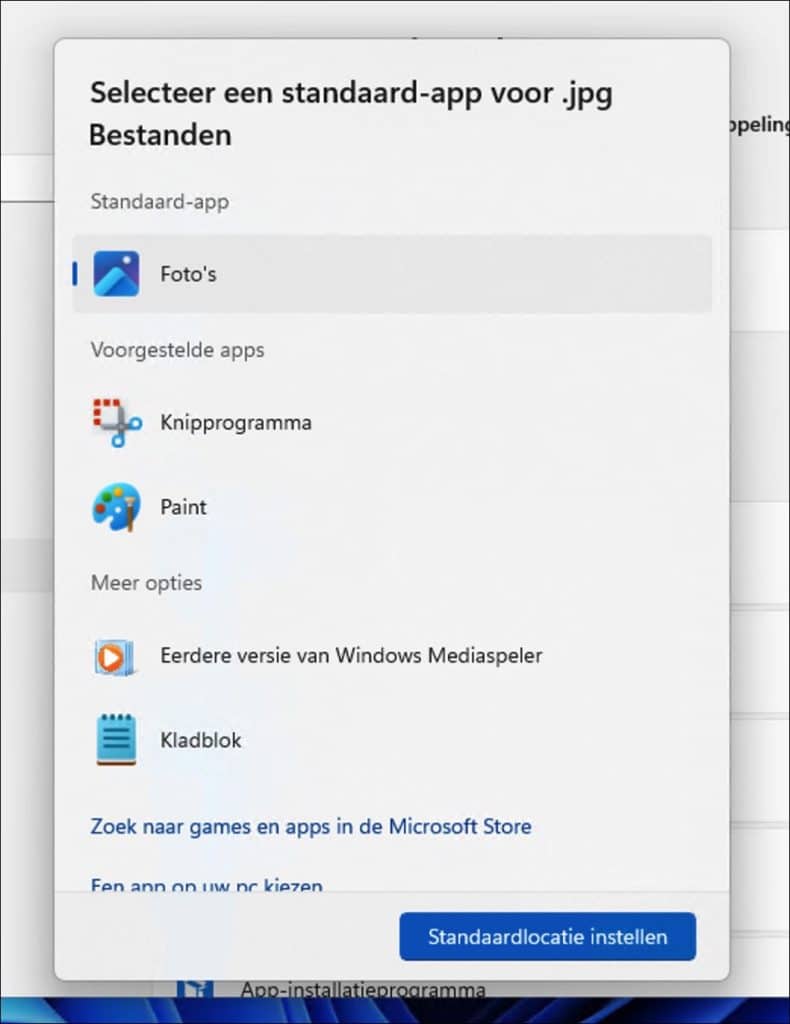
Open de instellingen. In de instellingen klik op “Apps” en vervolgens op “Standaard apps”. In het veld “voer een bestands of koppelingstype in” geeft u het bestandstype in, bijvoorbeeld “jpg” zonder quotes. Klik vervolgens op de app die er op dit moment aangekoppeld is.
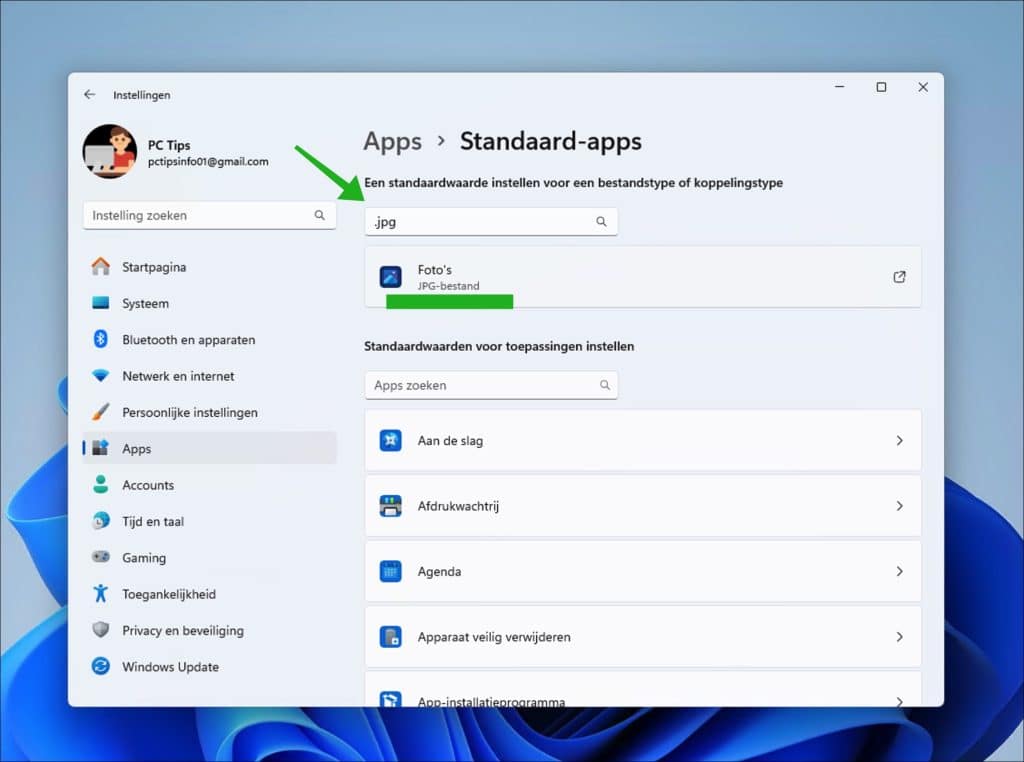
U kunt nu een nieuwe app koppelen aan dit bestandstype. Dit doet u voor ieder bestandstype waarvan u de standaard app wilt wijzigen.
Privacy instellingen wijzigen
Als u iemand bent die controle wilt houden over de privacyinstellingen in Windows 11, dan is het aan te raden om de verschillende privacyopties eens naar te lopen en aan te passen naar wens.
U vind de privacy opties als u de instellingen opent en vervolgens klikt op “Privacy en beveiliging”. Hierbij een toelichting op alle privacy instellingen.
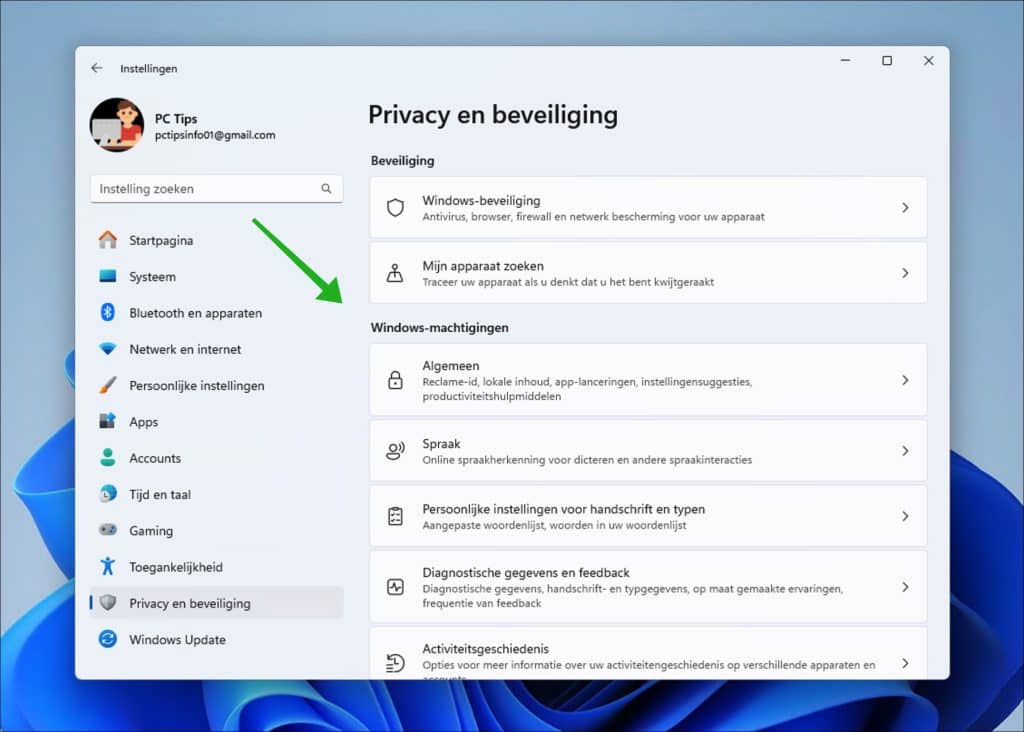
Algemene Privacyinstellingen
Hier kunt u instellen hoe Windows en apps met uw activiteitengegevens omgaan, zoals spraakopnames, schrijfgedrag en typen, en locatiegeschiedenis.
App-machtigingen
U kunt specifieke machtigingen voor apps beheren, zoals toegang tot uw locatie, camera, microfoon, contacten, agenda en meer. Dit geeft u controle over welke apps bepaalde gevoelige gegevens kunnen gebruiken.
Camera- en Microfooninstellingen
U kunt bepalen welke apps toegang hebben tot uw camera en microfoon. Dit is belangrijk voor uw privacy, vooral als u bezorgd bent over apps die mogelijk op de achtergrond toegang hebben.
Locatieservices
Hier kunt u de locatieservices in- of uitschakelen en bekijken welke apps toegang hebben tot uw locatiegegevens. U kunt ook uw locatiegeschiedenis bekijken en beheren.
Diagnose- en Feedbackinstellingen
U kunt kiezen welk niveau van diagnostische gegevens naar Microsoft wordt verzonden. Dit omvat basisinformatie over uw apparaat en gedetailleerdere gegevens voor probleemoplossing.
Activiteitsgeschiedenis
U kunt beheren hoe uw activiteitsgeschiedenis wordt verzameld en gebruikt. Dit omvat gegevens over de apps en services die u gebruikt, evenals websites die u bezoekt.
Spraakherkenning
Als u spraakherkenning gebruikt, kunt u bepalen hoe uw spraakgegevens worden verzameld en gebruikt voor het verbeteren van spraakherkenningsdiensten.
Advertentie-ID
U kunt uw advertentie-ID beheren, die wordt gebruikt voor het weergeven van gepersonaliseerde advertenties in apps.
Windows 11 achtergrond wijzigen
Net na installatie kunt u Windows 11 personaliseren. Een van de manieren om Windows 11 te personaliseren is door een andere achtergrond in te stellen. Hier zijn verschillende opties voor.
Open de instellingen. Klik vervolgens op “Persoonlijke instellingen” en vervolgens op “Achtergrond”. U kunt nu een eigen achtergrond afbeelding kiezen door op de knop “Door foto’s bladeren” te klikken.
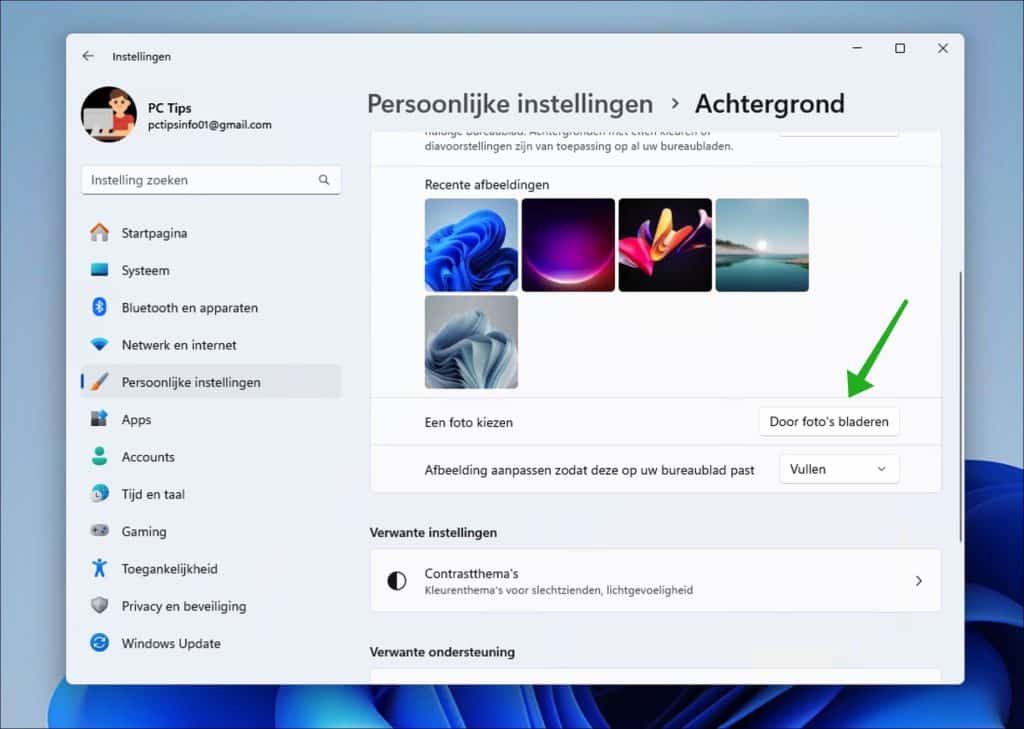
Als alternatief kunt u ook een effen kleur, diavoorstelling of windows spotlight instellen als achtergrond. Dit doet u door op de knop “afbeelding” te klikken in het kopje “achtergrond aan uw persoonlijke voorkeur aanpassen”.

Windows 11 thema wijzigen
Naast een achtergrond zijn er in Windows 11 ook thema’s beschikbaar. Een thema bevat een combinatie van achtergrondafbeeldingen, systeemkleuren, geluiden en soms een aangepaste cursorstijl. U kiest een achtergrond voor uw bureaublad uit een reeks standaardafbeeldingen of gebruikt uw eigen foto. De kleuren van het thema veranderen het uiterlijk van menu’s, de taakbalk en het startmenu. U kunt een eigen accentkleur kiezen of een voorgedefinieerd kleurenpalet gebruiken. Thema’s kunnen ook unieke geluiden hebben voor systeemgebeurtenissen. Sommige thema’s veranderen zelfs het uiterlijk van uw cursor.
U kunt een thema kiezen in de persoonlijke instellingen. Open de instellingen. Klik vervolgens op “Persoonlijke instellingen”. Hier ziet u een zestal standaard thema’s die u kunt kiezen door erop te klikken.
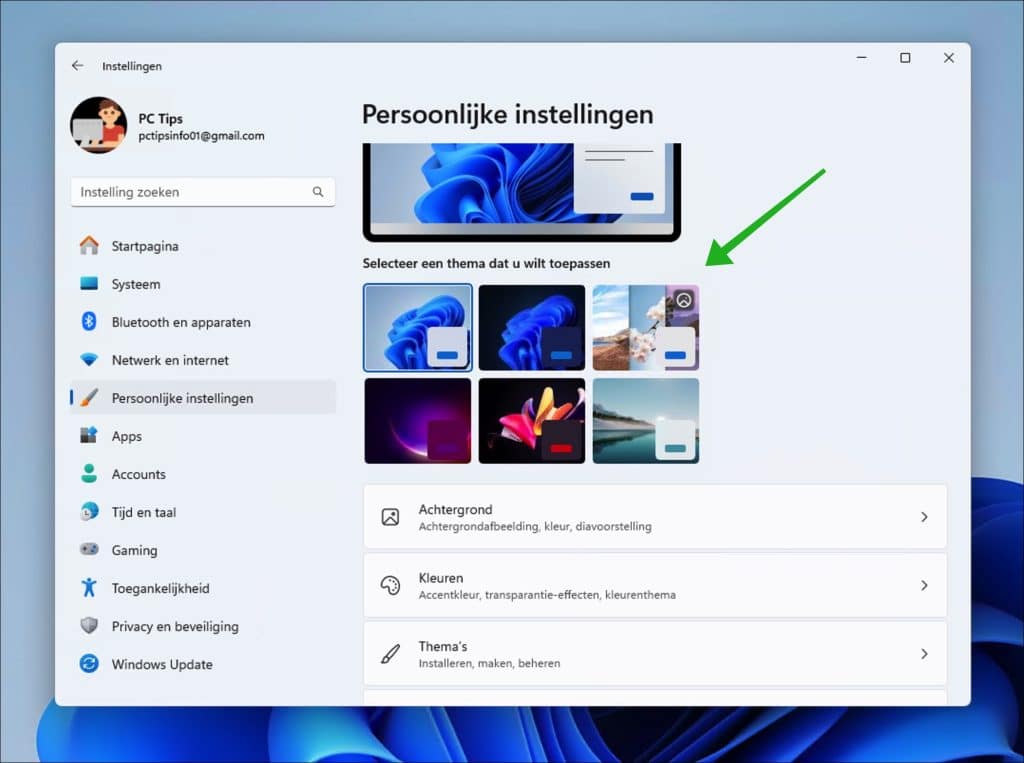
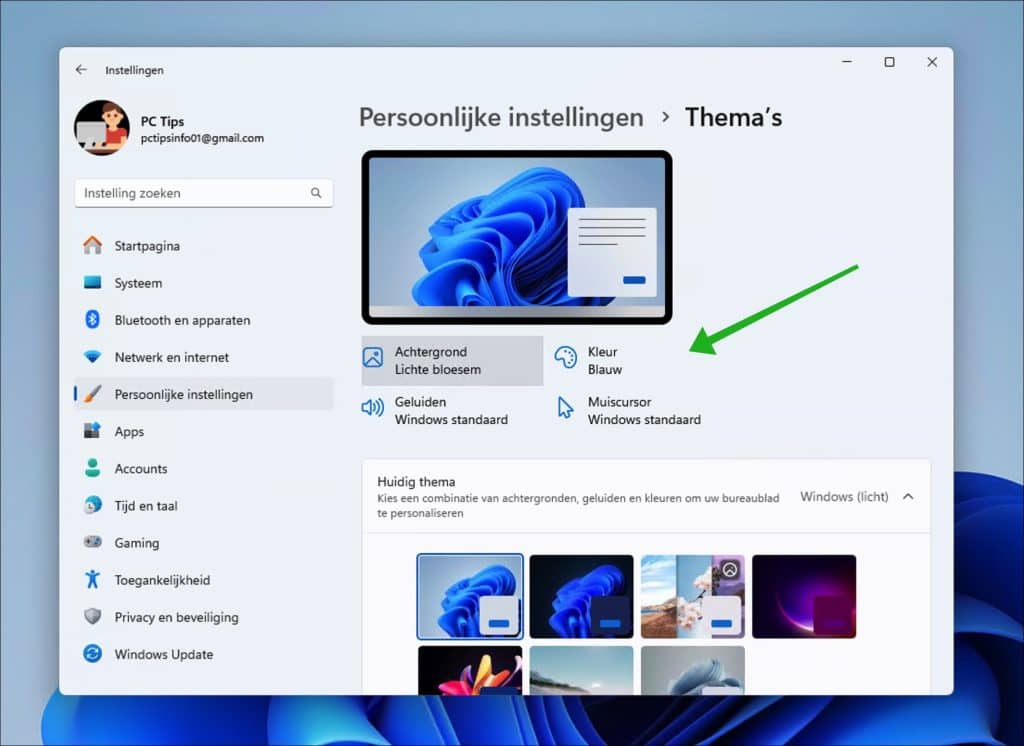
Wilt u een thema verder personaliseren, dan klikt u in de “persoonlijke instellen” op “Thema’s”. Hier kunt u vervolgens de achtergrond, de accentkleur, de geluiden en de muiscursor voor het thema personaliseren.
Windows Verkenner personaliseren
De Windows Verkenner is het hulpmiddel om door uw computer te bladeren. Het biedt een overzicht van allerlei bestanden, mappen en instellingen om uw wegwijs door de inhoud van uw computer makkelijker te maken. U kunt de weergave van de Windows Verkenner personaliseren. Dit zijn de meest gewijzigde opties voor de Windows Verkenner.
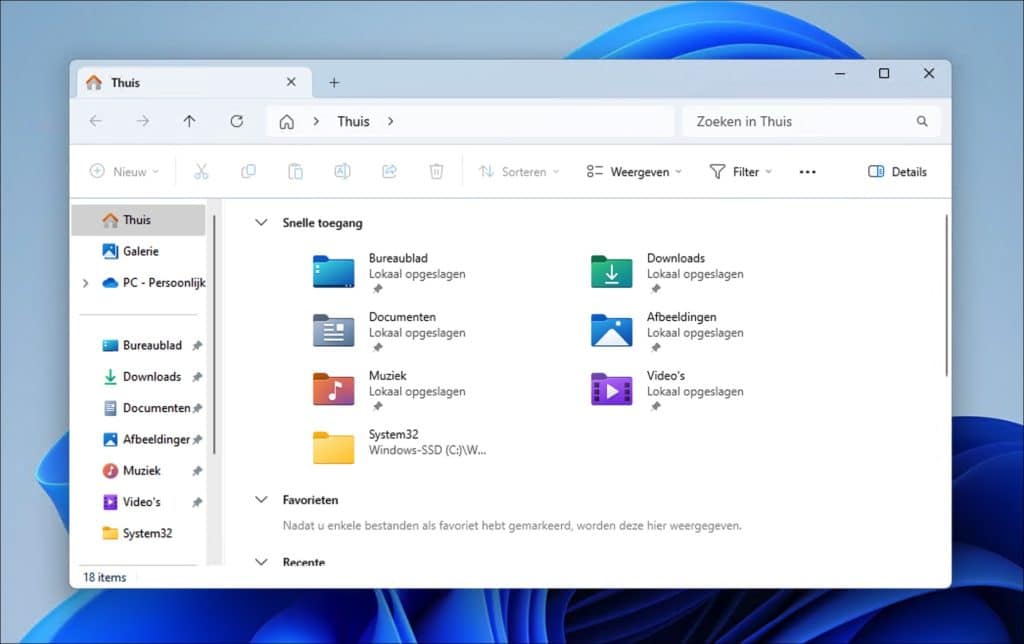
Verkenner openen in
Als u de Verkenner opent, dan wordt het overzicht “Thuis” getoond. Thuis biedt een overzicht van “Snelle toegang”, “Favorieten” en “Recent geopende bestanden”.
In eerdere versies van Windows was dit overzicht er nog niet, de Verkenner opende altijd in “Deze PC”. Er zijn dan ook veel mensen die liever dit oude overzicht terug willen plaatsen. Dit doet u op de volgende manier.
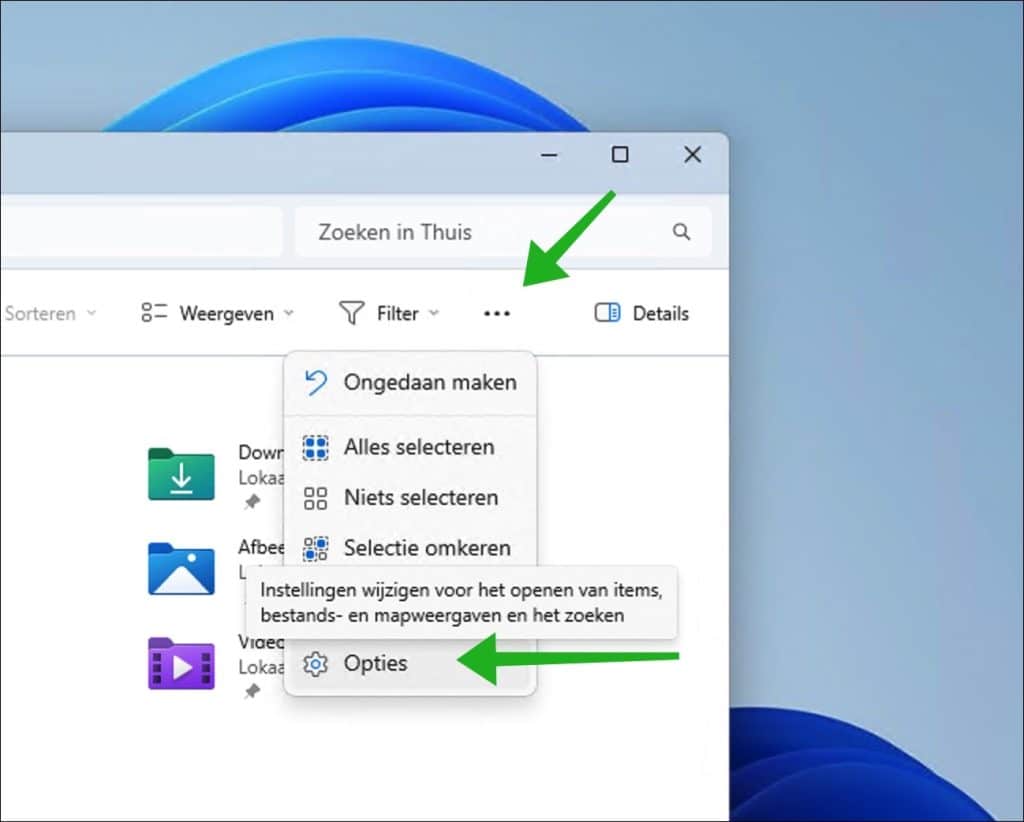
Klik in de Verkenner op de “…” in het lint. Klik vervolgens op “Opties” in het menu.
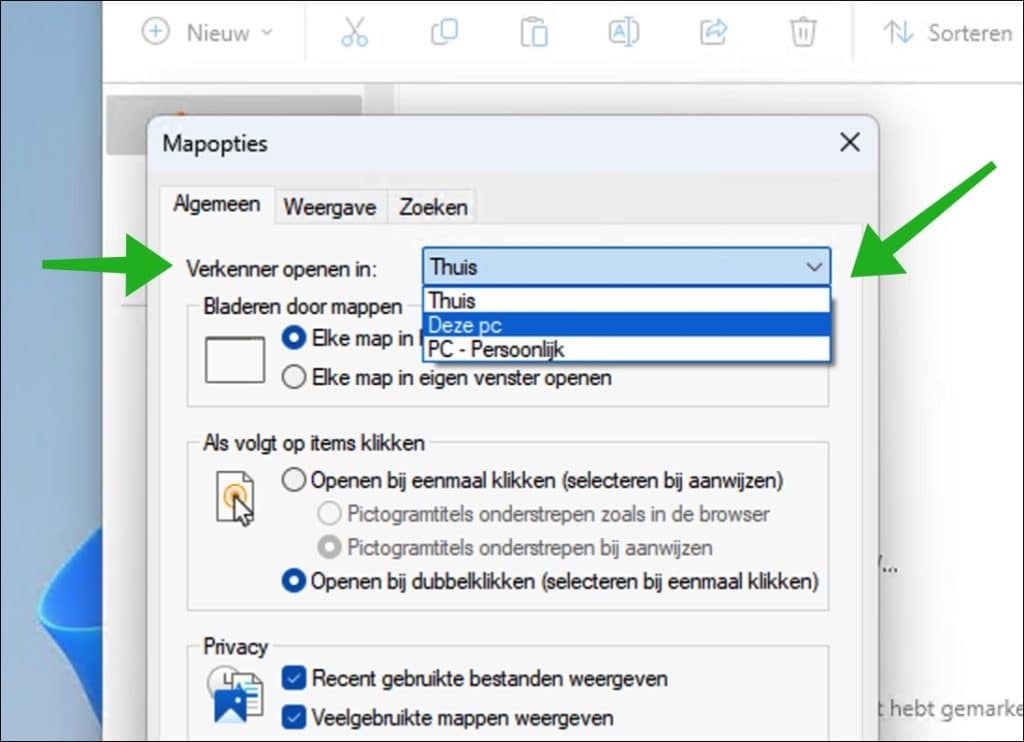
Wijzig “Verkenner openen in” naar de gewenste weergave. Bijvoorbeeld “Thuis”, “Deze PC” of “PC – Persoonlijk” (OneDrive). Klik op “toepassen” en “OK” om te bevestigen.
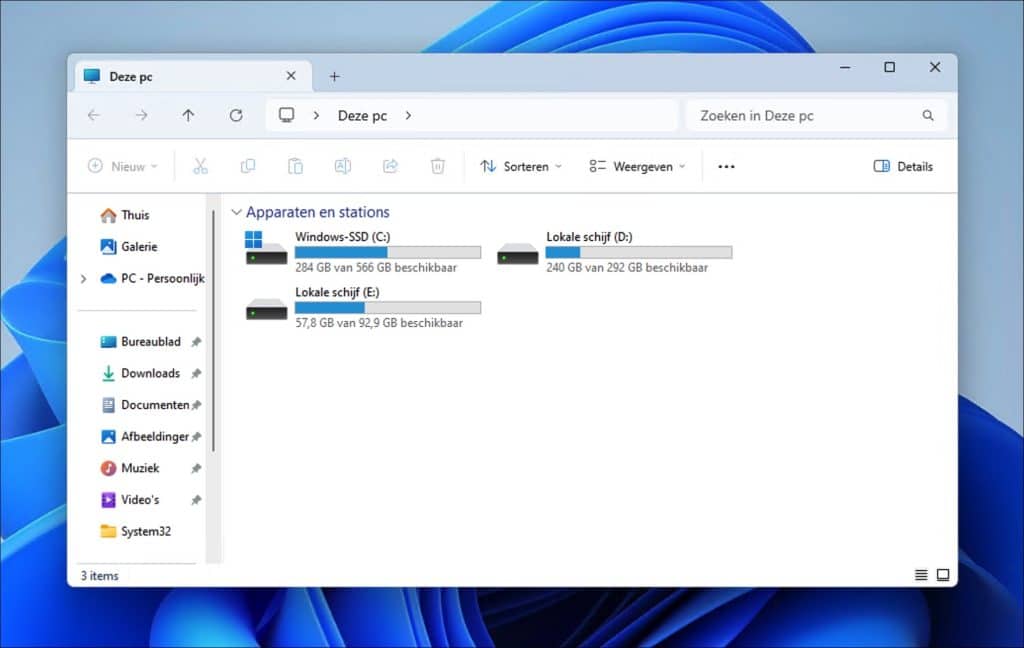
Als u nu de Verkenner sluit en opnieuw opent, dan ziet u het vertrouwde overzicht van alle lokale en eventuele netwerkschijven en aangesloten externe of USB schijven.
Verkenner weergave wijzigen
Een andere veel aangepaste wijzigingen in de Verkenner is de weergave. Standaard worden er “tegels” weergegeven, dit zijn vrij grootte pictogrammen met weinig meta informatie. Deze weergave kunt u wijzigen naar allerlei grootte van pictogrammen of detailweergaves.
Klik hiervoor in het lint van de Verkenner op “Weergeven”. Selecteer nu de gewenste weergave in het menu.

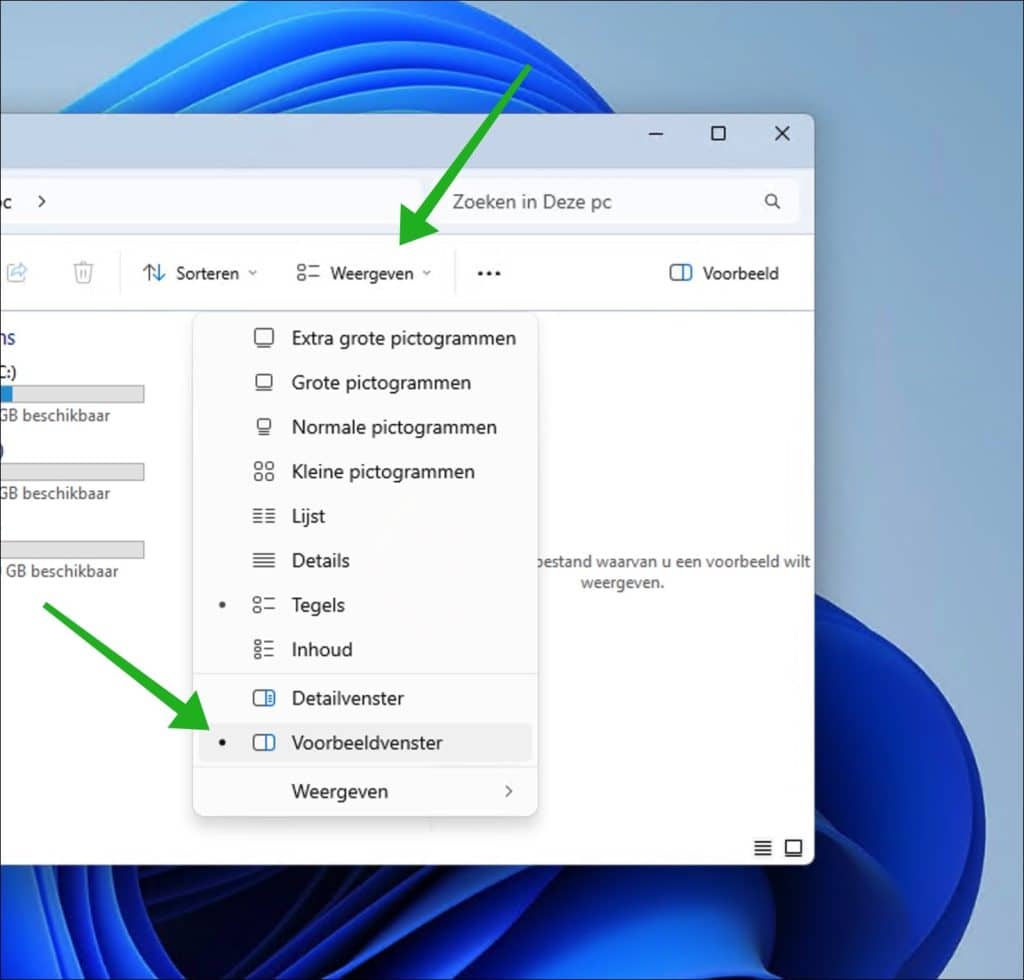
Voorbeeldvenster weergeven
Ook het voorbeeldvenster wordt veel gebruikt. Het voorbeeldvenster geeft bijvoorbeeld een voorbeeldafbeelding weer als u erop klikt, ook de inhoud van een PDF bestand wordt getoond in het voorbeeldvenster. U kunt het voorbeeldvenster op de volgende manier inschakelen.
Klik hiervoor in het lint van de Verkenner op “Weergeven”. Klik nu op “Voorbeeldvenster” in het menu om het voorbeeldvenster weer te geven.
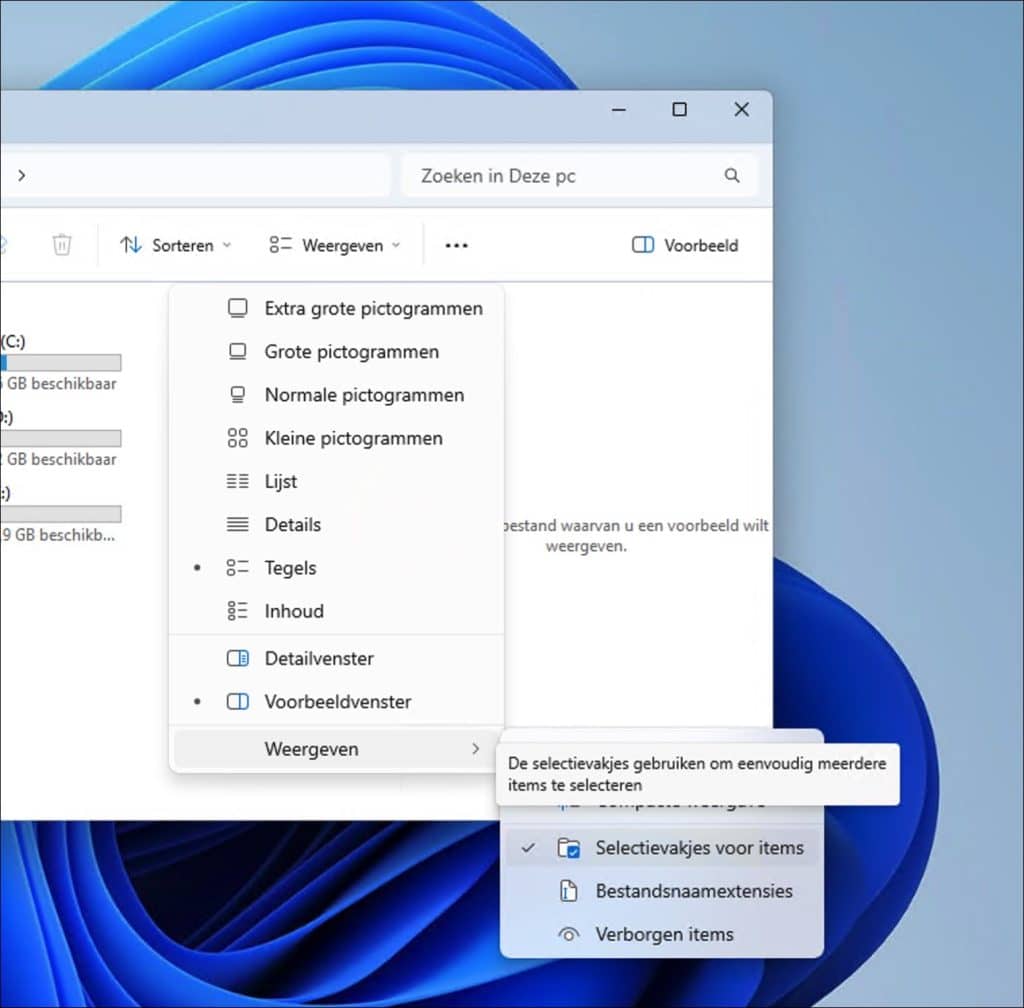
Selectievakjes voor items weergeven
Sommige mensen vinden handig om de selectievakjes naast bestanden en mappen weer te geven. Dit geeft meer controle bij het selecteren van meerdere bestanden of mappen. U kunt selectievakjes op de volgende manier in- of uitschakelen.
Klik hiervoor in het lint van de Verkenner op “Weergeven”. Klik nu op “Selectievakjes voor items” in het menu om de selectievakjes in te schakelen. Klik nogmaals om uit te schakelen.
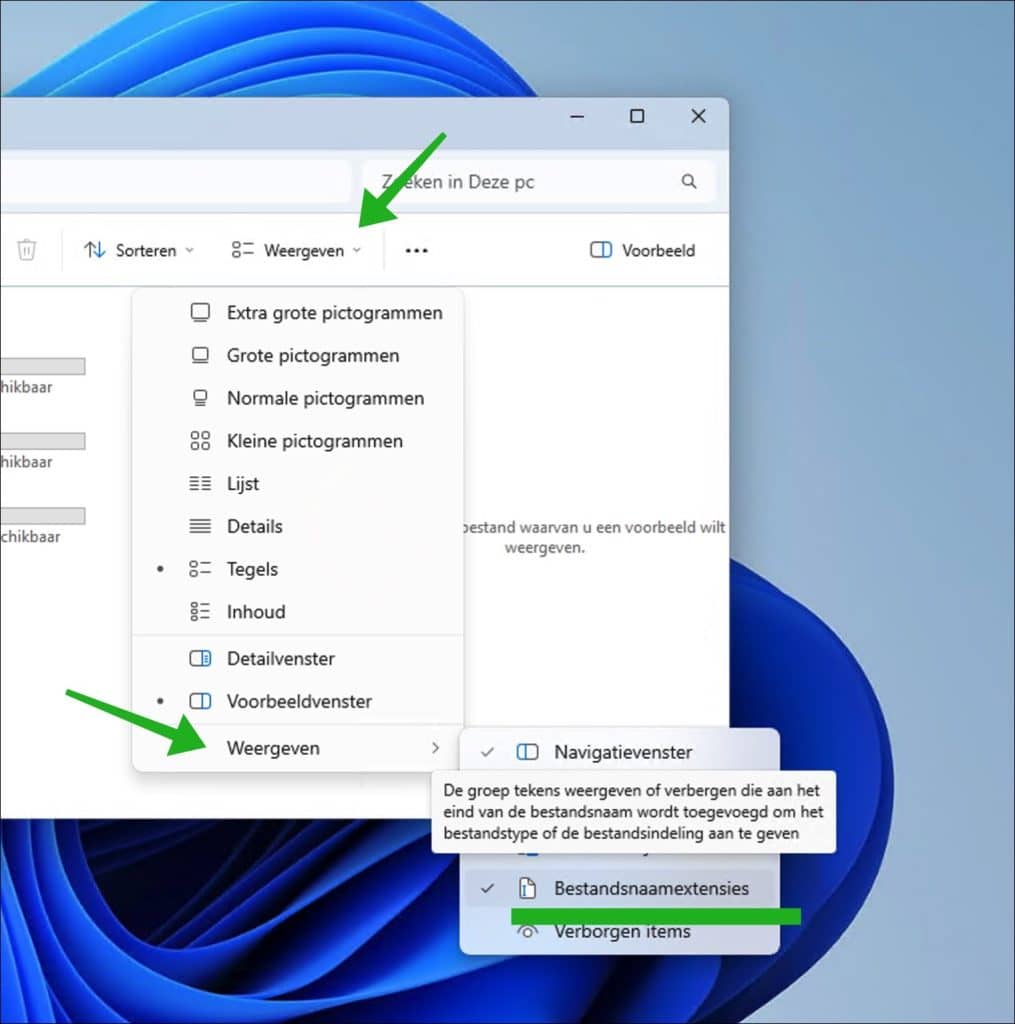
Bestandsnaamextensies weergeven
In de Verkenner ziet u niet standaard de bestandsnaamextensies. De bestandsnaamextensies is het type bestand achter de ., bijvoorbeeld “afbeelding.jpg” waar .jpg de bestandsnaamextensie is. Als u liever direct ziet om wat voor bestandsnaamextensie het gaat, dan kunt u deze op de volgende manier via de Verkenner weergeven.
Klik hiervoor in het lint van de Verkenner op “Weergeven”. Klik nu op “Bestandsnaamextensies” in het menu om de bestandsnaamextensies in te schakelen. Klik nogmaals om uit te schakelen.
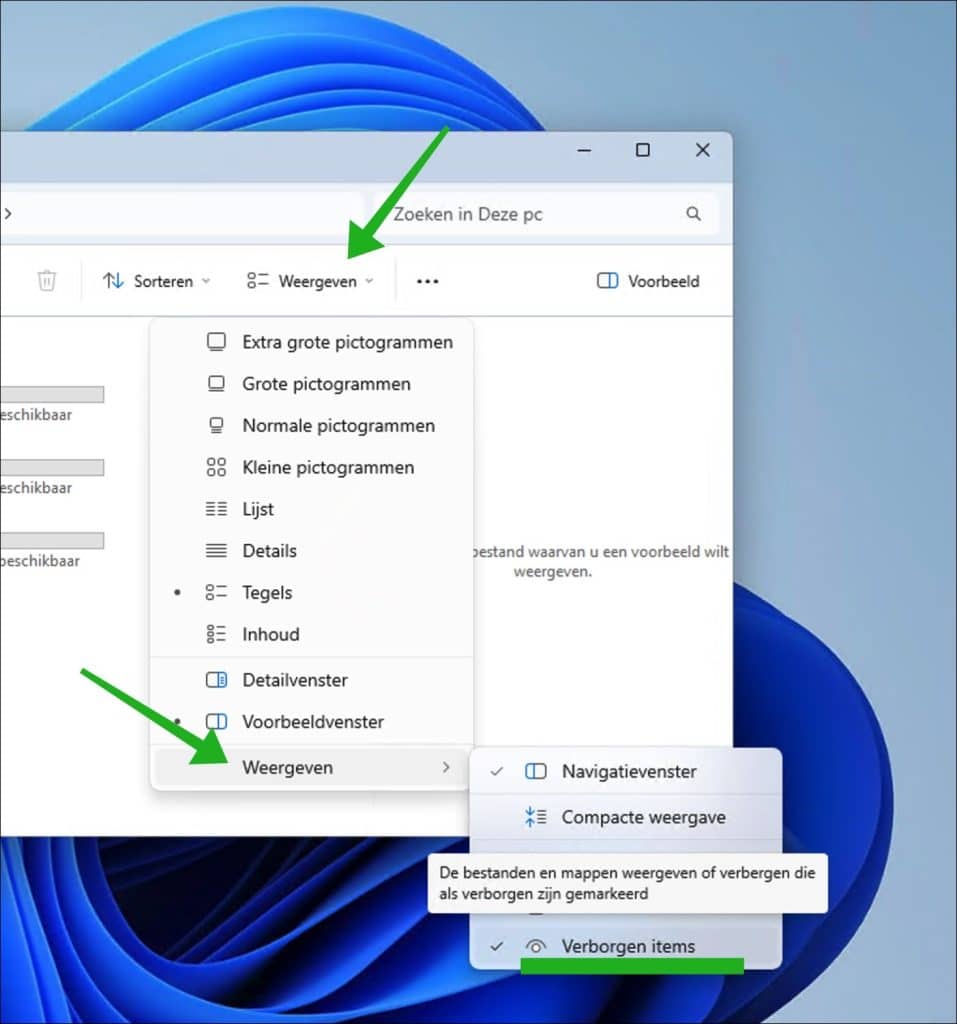
Verborgen bestanden weergeven
Windows 11 maakt gebruik van verborgen bestanden. Veel verborgen bestanden zijn essentiële systeembestanden. Door deze bestanden te verbergen, voorkomt Windows dat gebruikers per ongeluk belangrijke systeembestanden wijzigen of verwijderen, wat kan leiden tot systeemproblemen of -fouten. Als u liever controle heeft over deze verborgen bestanden, dan kunt u ze op de volgende manier weergeven via de Verkenner.
Klik hiervoor in het lint van de Verkenner op “Weergeven”. Klik nu op “Verborgen items” in het menu om de verborgen bestanden direct weer te geven. Klik nogmaals om uit te schakelen.
Overige aanpassingen aan de Windows Verkenner
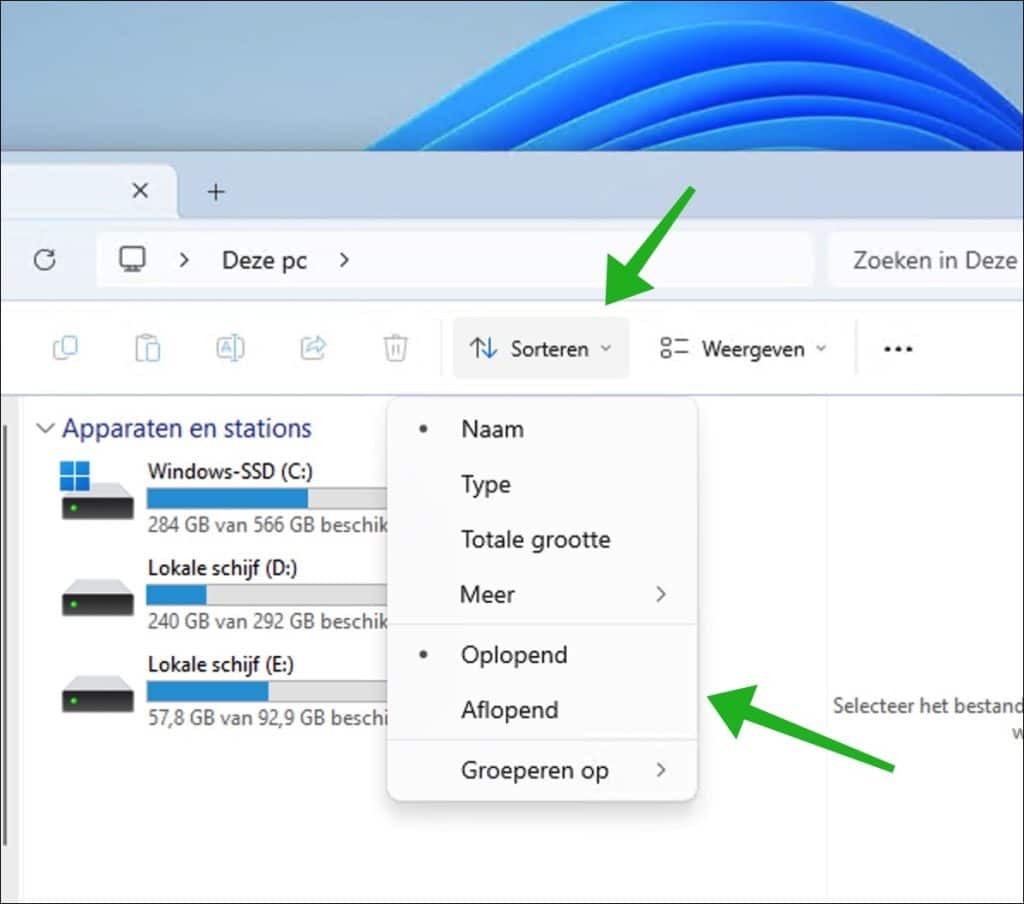
In het lint van de Verkenner vind u ook de optie “Sorteren”. Hiermee kunt u bestanden en weergaves sorteren naar wens. Dit kan op naam, type, grootte en meer. Deze sortering kunt vervolgens groeperen. Het is aan te raden om ook deze sortering in te stellen naar wens.
Wilt u nog meer instellingen wijzigen voor de Verkenner, dan klikt u in het lint op “…” en vervolgens op “Opties”. In de verschillende tabbladen “Algemeen”, “Weergave” en “Zoeken” kunt u allerlei mapopties voor de Verkenner wijzigen en aanpassen naar wens.
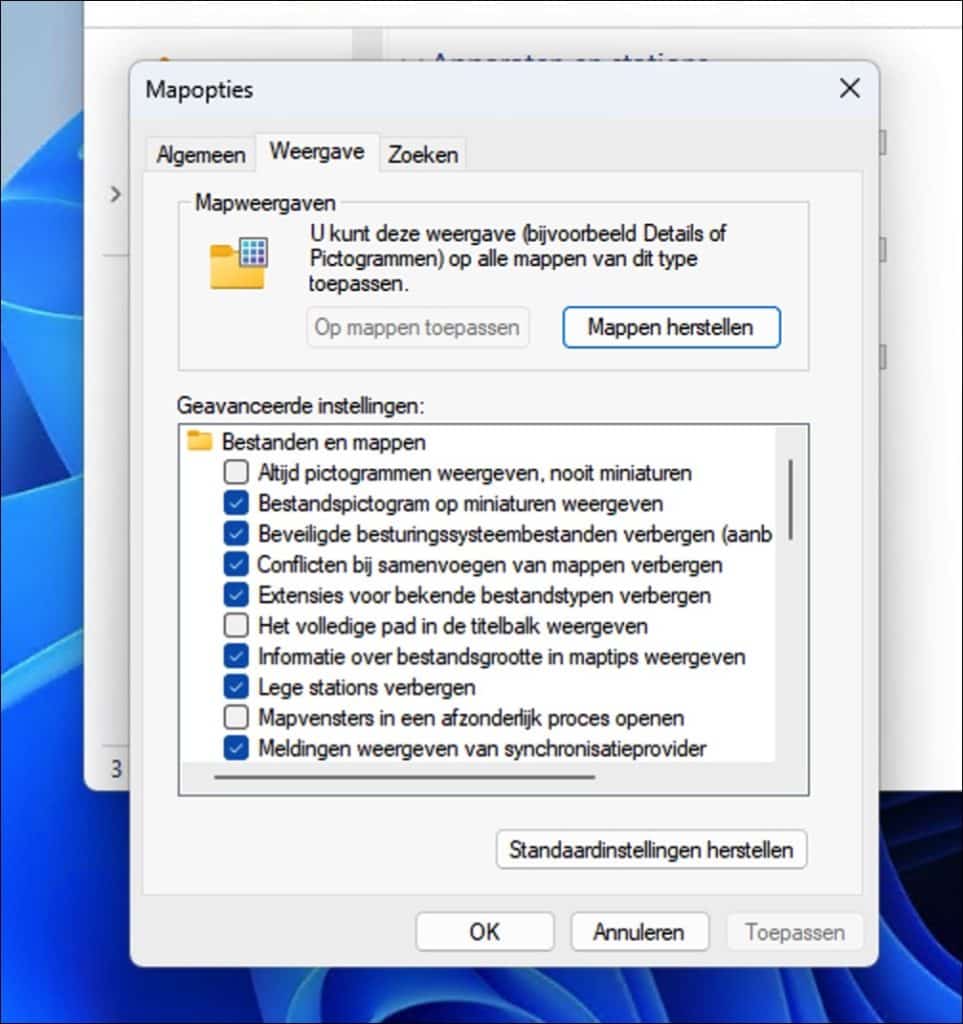
Wilt u alles terugzetten naar hoe het was? Klik dan op “standaardinstellingen herstellen” in de mapopties.
Lees ook deze 16 tips voor de Windows Verkenner.
Back-up
Als u Windows 11 helemaal naar wens heeft ingesteld nadat u het heeft geinstalleerd, dan is het tijd om een back-up te maken. Dit kan op verschillende manieren, ik heb enkele gidsen gemaakt voor back-ups.
- Windows 11 back-up maken naar externe harde schijf.
- Windows 11 back-up maken met Macrium Reflect software.
- Windows 11 systeem back-up maken.
Ik hoop dat deze gids u heeft geholpen om Windows 11 zo in te stellen na wens bij een nieuwe installatie of aankoop. Heeft u nog aanvullende vragen stel ze gerust. Bedankt voor het lezen!
Help mee
Mijn computertips zijn gratis en bedoeld om andere mensen te helpen. Door deze pc-tip te delen op een website of social media, helpt u mij meer mensen te bereiken.Overzicht met computertips
Bekijk ook mijn uitgebreide overzicht met praktische computertips, overzichtelijk gesorteerd per categorie.Computerhulp nodig?
Loopt u vast met uw pc, laptop of software? Stel uw vraag op ons computerforum en krijg gratis computerhulp van ervaren leden en experts.